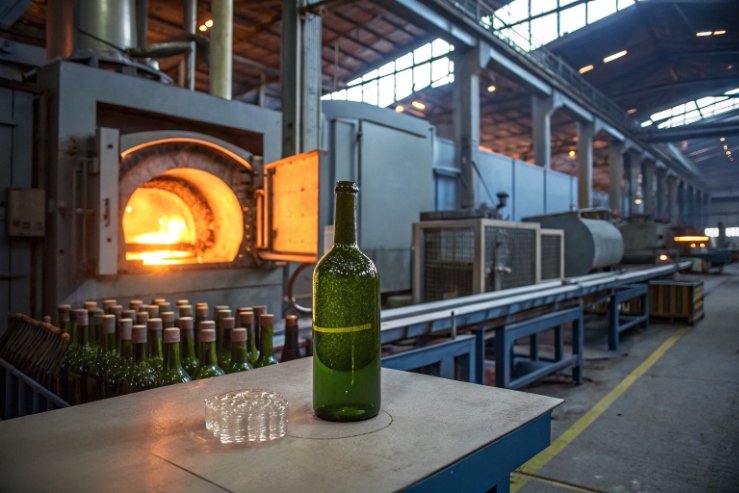
Glass wine bottles only look simple from the outside. Behind every “standard” bottle is a chain of heat, pressure, and timing that can make or break your brand.
Glass wine bottles are made by melting a controlled batch, stabilizing color and viscosity in the forehearth, forming with blow-and-blow or press-and-blow/NNPB, then annealing, coating, and inspecting so stress and scuffing stay under control.

If you understand the main process levers, you can ask better questions in RFQs and plant visits. That is how you move from “we hope these bottles are okay” to “we know why they run safely on our line.”
How do blow-and-blow, press-and-blow, and NNPB actually differ?
Many buyers only learn the forming method after something goes wrong: thin shoulders, random heel cracks, or a bottle that feels flimsy despite good weight.
Blow-and-blow is simple and proven, press-and-blow improves glass placement, and NNPB pushes control further for narrow-neck bottles, which is vital for lightweight or premium shapes.
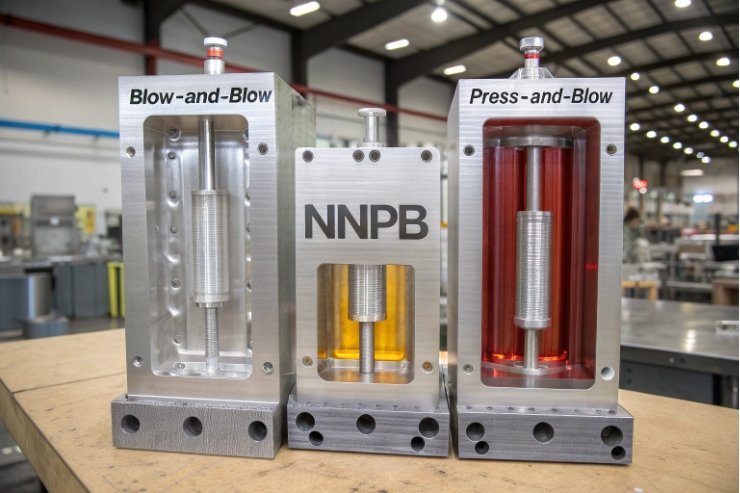
Blow-and-blow, press-and-blow, NNPB – what changes?
All three methods start the same way: molten glass leaves the forehearth 1, the feeder cuts it into gobs, and each gob falls into a blank mold on an IS (Individual Section) machine 2.
- Blow-and-blow (B&B)
A gob drops into the blank mold. Air forms the parison (the first-stage shape). The parison then moves to the blow mold, where air expands it to the final bottle. - Press-and-blow (P&B)
A plunger presses the gob in the blank mold to shape the parison more directly before final blowing. - Narrow-neck press-and-blow (NNPB)
A refinement of P&B for narrow-neck bottles, using tighter control of gob weight, plunger travel, timing, and air to achieve very consistent wall thickness.
For a quick side-by-side view of the container glass forming process 3, it helps to see how parison control changes where glass “lands” in the shoulder, heel, and base.
The more control you have at the parison stage, the more uniform your wall thickness and the easier it becomes to “right-weight” bottles without losing strength.
When does each process make sense?
For many classic still-wine bottles, blow-and-blow is still common, especially at standard weights. It is robust and well understood. When you start pushing weight down or geometry up (taller, more slender, very deep punt), P&B or NNPB give better control over:
- shoulder thickness
- heel strength
- base/punt glass distribution
If you have issues like thin shoulders or random heel failures on lightweight bottles, one of the first questions I ask is: which forming process and what parison control is in place?
| Feature / Risk | Blow-and-blow | Press-and-blow | NNPB (narrow-neck P&B) |
|---|---|---|---|
| Typical use | Many standard wine shapes | Wider-mouth & some wine | Lightweight or premium wine bottles |
| Parison control | Air only | Plunger + air | Precise plunger + tuned air |
| Wall thickness uniformity | Good on conservative designs | Better | Best, if process is well controlled |
| Weight reduction potential | Limited | Better | Strong (right-weighting focus) |
| Setup sensitivity | Lower | Higher | Highest – needs experienced operators |
The “best” method is the one that can repeatedly hit your wall-thickness map at production speed, not just on lab samples.
Which furnace and forehearth controls keep color and viscosity stable?
Color drift and viscosity swings do not just change how glass looks. They change how glass flows into molds, which changes wall thickness and defect rates.
Furnace controls stabilize melting and refining; forehearth controls stabilize temperature and viscosity for forming, so color, clarity, and gob weight stay consistent across the whole run.
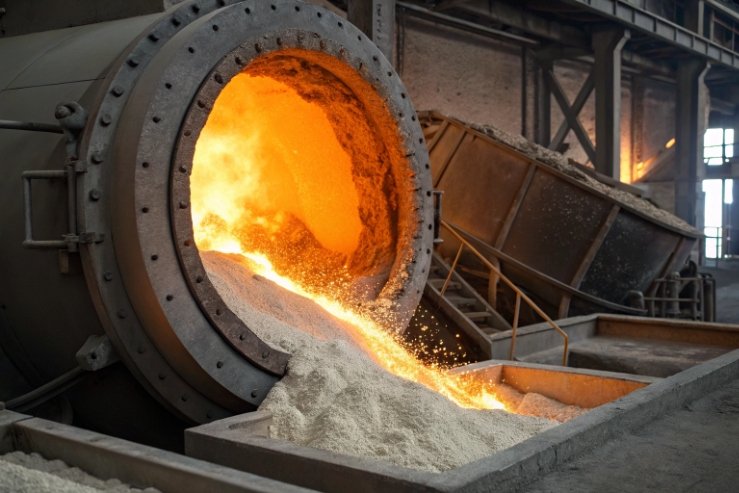
Furnace: where chemistry and color really begin
The process starts with a batch of:
- silica sand
- soda ash
- limestone
- cullet (recycled glass)
Heaters and burners in the main tank glass furnace 4 melt this batch into a stable melt. At this stage, you:
- melt and dissolve the batch
- refine bubbles (fining)
- mix the melt so cords and streaks are minimized
- stabilize color through controlled addition of colorants (for flint, green, amber, etc.)
If the furnace is unstable, you see more seeds, cords, stones, and color variation. Those defects are not just aesthetic; cords and inclusions act as stress concentrators.
Forehearth: “tuning” glass for the IS machine
After melting and refining, the glass flows into the forehearth, which is essentially a long, temperature-controlled channel feeding the IS machine.
Good forehearth control:
- keeps temperature uniform across width and length
- keeps viscosity in the right range for the chosen forming process
- helps maintain color consistency by avoiding hot/cold bands that alter oxidation or refraction
Viscosity is what ties everything together. If glass is too hot (too fluid), gobs lengthen or sag, and wall distribution changes. If glass is too cold, it may not fill sharp details, and defects like checks and folds increase.
Why color and viscosity stability matter for your bottles
For wine bottles, color is not just branding. Darker greens and ambers protect wine from light; flint shows off rosés and whites. But a color that drifts between runs makes labels look inconsistent on shelf and can signal process drift.
At the same time, thickness patterns that drift because of viscosity changes are a hidden strength issue. That is why, when you are auditing a plant, it is worth asking:
- How do you monitor furnace and forehearth temperatures?
- How do you adjust color and batch composition?
- How often do you adjust gob weight and parison settings when viscosity shifts?
| Control point | If unstable, you see… | What you want instead |
|---|---|---|
| Furnace temperature | Seeds, cords, stones, color drift | Clean melt, stable color |
| Batch/cullet balance | Clarity issues, unexpected tint | Predictable color and fining behaviour |
| Forehearth temperature | Gob-weight variation, forming issues | Tight, documented temperature profile |
| Gob forming | Variable parison and wall thickness | Consistent gob length/weight by cavity |
Stable melting and conditioning are the starting point for both quality and lightweighting.
What roles do hot-end tin oxide and cold-end PE coatings play?
A bottle can be strong internally but still fail because the surface was scratched on the line or inside a carton. That is where coatings earn their keep.
Hot-end tin oxide and cold-end polyethylene (PE) coatings work together: tin oxide builds a thin, hard base layer, and the PE layer reduces friction, cuts scuffing, and protects decoration and labels.
Hot-end coating: a thin “armor” for the glass
Hot-end coating is usually applied just after forming, while the bottle is still very hot, but before annealing. For background on hot-end coatings for glass containers 5, it helps to see how they’re used to reduce early surface damage.
What it does:
- increases surface hardness
- improves scratch resistance
- gives a better base for the later cold-end coating
This layer is invisible but important. If the hot-end coating is missing or patchy, later damage from conveyor contact or bottle-to-bottle impact can be much worse.
Cold-end PE coating: lubricity and scuff control
Cold-end coating is applied after annealing on the still-warm bottle, often as an aqueous emulsion of polyethylene or similar materials.
Its jobs:
- reduce glass-to-glass and glass-to-metal friction
- help bottles slide smoothly on conveyors
- reduce scuffing in dividers and cartons
- help labels stay clean (less rubbing and burnishing)
The combination of hot-end and cold-end coatings builds a surface that is more forgiving to real-world handling. You still need good line design, but each scratch is less likely to turn into a crack starter.
Coatings, decoration, and your route-to-market
If you use direct-on-glass decoration (screen print, ceramic label, frosting), coating and decoration must be compatible. Otherwise you get flaking or poor adhesion.
Good practice:
- confirm with the bottle supplier and decorator which coating system is used
- run rub/scuff tests on decorated, coated bottles after vibration in real cartons
- check that the coating does not interfere with label adhesion in label zones
| Layer | Applied when? | Main job | If it fails… |
|---|---|---|---|
| Tin oxide (HE) | Before annealing | Base hardness, scratch resistance | More scratches and micro-cracks |
| PE (CE) | After annealing | Reduced friction, scuff protection | Scuffing, label rub, chips |
| Decoration | After coating (usually) | Branding and shelf impact | Needs adhesion and rub resistance |
When you see scuff belts on shoulders and heels, or label panels that arrive “polished” from rubbing, coating effectiveness and handling are the first places to look.
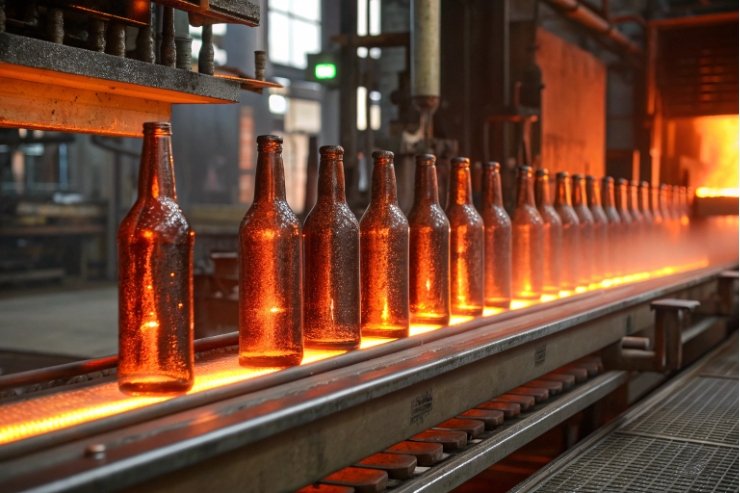
How does lehr annealing relieve residual stress in wine bottles?
A bottle can survive forming, then crack days later in a warehouse or cooler. Many of those “mystery” cracks start as residual stress from poor annealing.
Lehr annealing cools bottles through the critical temperature range under tight control, allowing internal stresses from forming and coating to relax, so bottles withstand impact and thermal changes without delayed cracking.
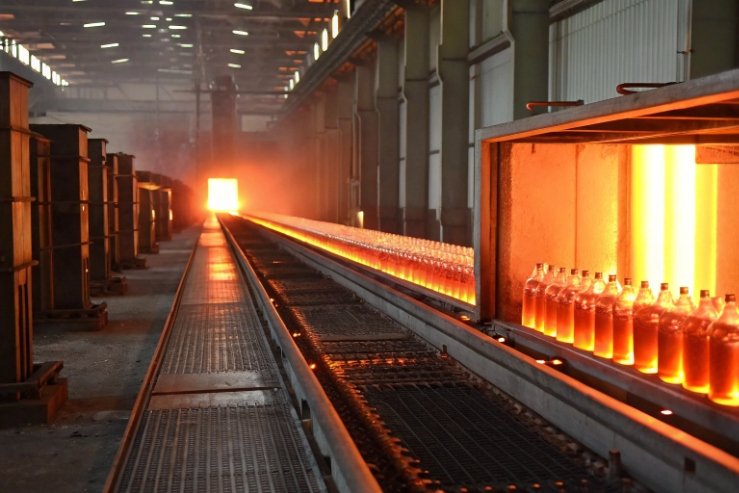
What happens inside the lehr?
After hot-end coating, bottles enter a long tunnel furnace called an annealing lehr 6. Inside the lehr:
- Bottles first pass through a high-temperature zone where the entire bottle is at a uniform temperature above the strain point.
- They then cool gradually through the critical temperature range where the glass can relax internal stress.
- Finally, they cool further to near ambient temperature at a controlled rate so new stress does not build up.
The belt speed, zone temperatures, and air flows are all tuned to the glass composition, color, bottle weight, and wall thickness distribution.
What happens if annealing is wrong?
If the lehr is too hot, too cold, or uneven, you get:
- High residual stress: bottles that crack under light impact or small temperature changes
- Uneven stress: one side of the bottle carries more tension, leading to strange fracture patterns
- Neck/finish stress: necks that split during corking/capping or shortly after
These issues often show up as:
- base or heel cracks during pallet storage
- shoulder or body cracks after a modest temperature swing
- neck cracks when closures are applied at normal forces
How to confirm annealing quality
Proper annealing is checked with stress-viewing tools like polariscopes 7 or strain viewers. The factory should:
- have a defined stress acceptance standard for each bottle type
- sample bottles from each line and shift
- adjust lehr settings when stress patterns drift
As a buyer, you do not need to read stress patterns like an engineer. But you can ask:
- How often do you audit stress in production?
- What happens when a lot fails stress criteria?
- Can you show typical stress images for this bottle and color?
| Annealing control | Good result | Bad result |
|---|---|---|
| Uniform belt temperature | Balanced stress distribution | One side more stressed than other |
| Correct cooling rate | Strong bottles, good thermal shock | Delayed cracking, thermal checks |
| Regular stress checks | Predictable strength over time | Lot-to-lot surprises |
When annealing, forming, coatings, and handling all work together, you can often reduce glass weight and still see fewer breakages.
Conclusion
Glass wine bottle robustness comes from controlled melting and forming, tuned forehearths, smart coatings, and well-run annealing lehrs, not just from “adding more glass”.
Footnotes
-
Definition of the forehearth and why temperature uniformity matters before forming. ↩︎ ↩
-
Background on IS machines used to form bottles on modern container-glass lines. ↩︎ ↩
-
Quick overview of blow-and-blow, press-and-blow, and NNPB forming methods. ↩︎ ↩
-
Overview of glass furnaces and how tank melting works for soda-lime container glass. ↩︎ ↩
-
Explains hot-end coatings and why they reduce scratches and scuff-related defects. ↩︎ ↩
-
What an annealing lehr does and how it relieves residual stress in glass. ↩︎ ↩
-
How a polariscope reveals residual stress patterns that predict delayed cracking. ↩︎ ↩


