A wine bottle can look perfect in a showroom, then crack on a line, scuff in cartons, or leak at the finish. Those defects cost more than the bottle.
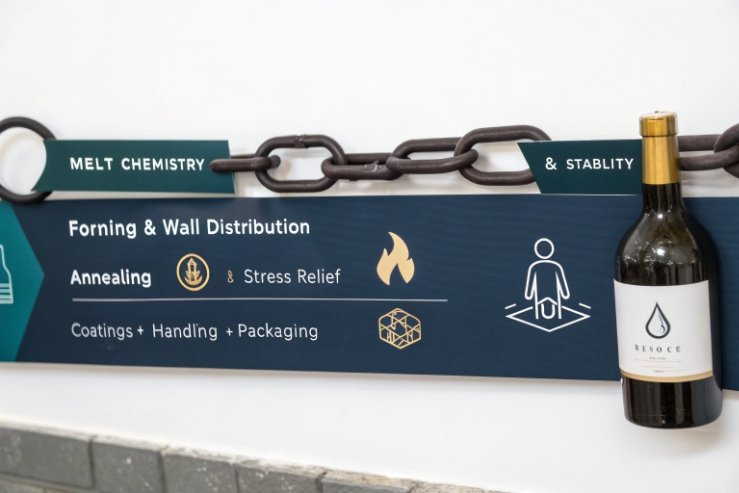
Glass wine bottle quality is set by melt chemistry and temperature stability first, then forming control, then annealing stress relief, and finally coatings plus handling that protect the surface through packing and shipping.

When quality is stable, everything downstream is easier. Closures fit with less torque drama. Labels stay clean. Breakage drops in pallets and e-commerce. The best way to manage this is to treat bottle quality like a chain. If one link drifts, the whole chain pays.
Do batch chemistry and forehearth control clarity?
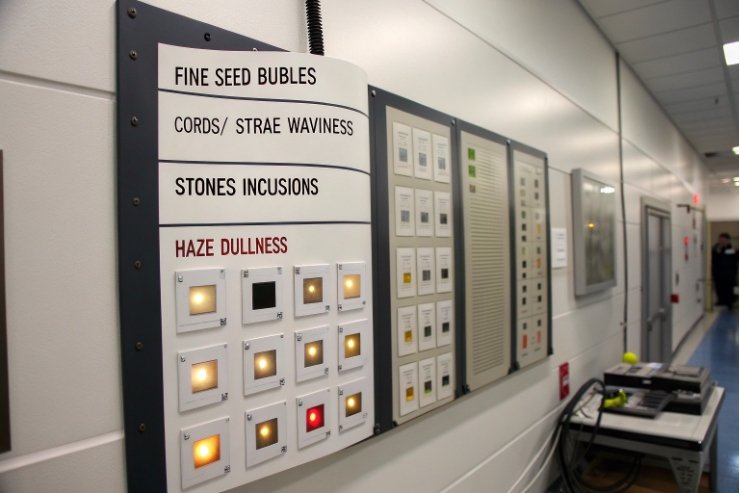
Cloudy panels, cords, stones, or “seed” bubbles can make a premium wine look cheap. Worse, the same issues can hide weak spots that break later.
Yes. Batch chemistry sets the glass’s ability to melt cleanly and stay stable, and forehearth control sets viscosity and homogeneity, which directly drives clarity, color consistency, and defect rates.
Why batch chemistry decides what “clean glass” is
Quality starts with consistent raw materials and a stable recipe. Small changes in recycled cullet ratio 1, moisture, or impurity load can change how the melt behaves. When the melt does not fine well, tiny bubbles stay trapped. When the melt is not well mixed, cords and striae show in the panel under light.
Redox balance also matters. If the oxidation/reduction state drifts, color can shift and fining efficiency can change. That is why good plants treat chemistry like a controlled process, not a “close enough” blend.
Why the forehearth is the clarity gate
The forehearth is where glass becomes “formable.” If temperature is uneven, viscosity becomes uneven. Then gob weight varies, and flow lines form. That creates thickness variation and optical distortion. A stable forehearth temperature uniformity 2 with tight temperature zones helps the gob cut cleanly and keeps the parison formation consistent.
What to ask for when evaluating clarity control
A buyer does not need furnace secrets. A buyer needs proof of stability. The best factories can explain:
- how they control cullet screening and contamination
- how they track color consistency lot to lot
- how they manage forehearth zones and gob weight drift
- how they detect stones, cords, and seeds during inspection
| Clarity defect | What it usually signals | What to check at the plant | What you see in the bottle |
|---|---|---|---|
| Seeds (fine bubbles) | Poor fining or unstable melt | Furnace stability, fining practice | Sparkly “pepper” in panels |
| Cords/striae | Poor mixing or temp gradients | Forehearth uniformity | Wavy distortion lines |
| Stones/inclusions | Raw material or cullet contamination | Cullet screening and handling | Hard specks, sometimes sharp |
| Haze | Chemistry or refractory wear | Melt cleanliness and inspection | Low sparkle, dull look |
How do mold wear and parison control set wall uniformity?
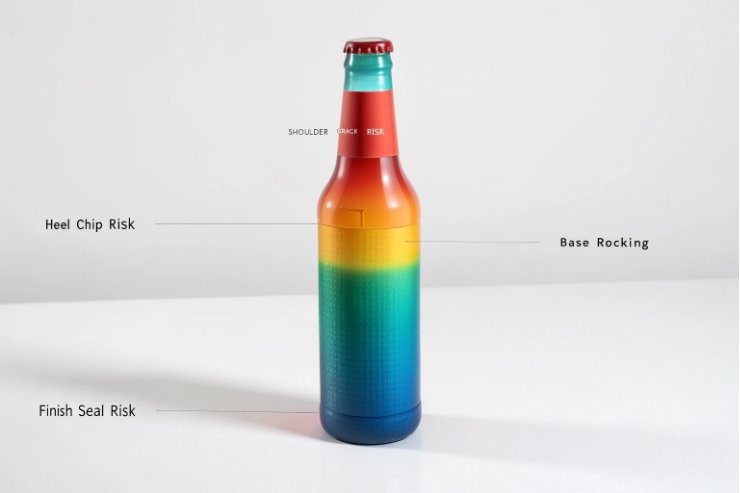
A bottle can pass a quick visual check and still be underweight in the shoulder or thin at the heel. That is where cracks start during pallet impact.
Mold condition controls surface definition and dimensions, while parison control decides how glass distributes into shoulder, heel, and base, which sets wall uniformity and real-world strength.
Mold wear is not only cosmetic
Worn molds soften embossing and create rough seams, but the deeper issue is dimensional drift. Neck finish geometry can move. Support ring height can change. The base can lose definition. When molds wear, contact points and venting change, and that changes how the glass stretches during blowing.
Common mold-wear symptoms:
- sharper or rougher seam lines
- soft embossing details
- increased scuff marks from rough cavity surfaces
- more ovality or off-center necks
Parison control is the “strength blueprint”
Parison control is how the factory shapes the first stage glass before final blow. If parison temperature or gob weight is inconsistent, thickness becomes inconsistent. If blank mold timing is off, the shoulder may thin out. If the settle blow or counterblow is unstable, the heel may get weak or the base may be uneven.
For wine bottles, the critical zones are usually:
- shoulder (crack risk during handling)
- heel (chip risk in cartons and conveyors)
- finish/neck (seal performance and break risk during corking/capping)
How to evaluate wall uniformity without fancy lab gear
A practical method is to request thickness mapping at key points and compare it to an approved master. Some plants do this with ultrasonic thickness gauging 3. Some do cut-and-measure checks on sampling. Either approach is useful if it is consistent.
| Zone | Why it matters | Typical failure if thin | Best control signal |
|---|---|---|---|
| Shoulder | High stress during impact | Shoulder crack or check | Thickness map + forming stability |
| Heel | Contact point in cartons | Heel chips, scuffs, breakage | Carton simulation + heel thickness |
| Base/punt | Stacking and drop response | Rocking base, brittle breaks | Base flatness + gob stability |
| Finish | Seal and closure load | Leaks, neck breaks | Gauge checks + mold condition |
What a strong factory process looks like
A good supplier can show:
- mold maintenance intervals and cavity tracking
- parison control settings and drift monitoring
- consistent gob weight control
- reject trends by cavity to catch one bad cavity early
Does annealing profile determine micro-check risk?
Many buyers focus on visible defects. Internal stress is invisible, but it is the reason a bottle can “randomly” crack later.
Yes. The annealing profile in the lehr determines residual stress. Poor stress relief increases micro-check and delayed breakage risk, especially after temperature swings and mechanical shocks.
What micro-checks really are
Micro-checks are tiny stress cracks that can form from residual stress combined with small impacts or temperature changes. They can appear near seams, around the finish, or at the heel. The bottle can survive production, then fail in distribution.
This is why “it broke in shipping” is often an annealing and handling story, not only a packaging story.
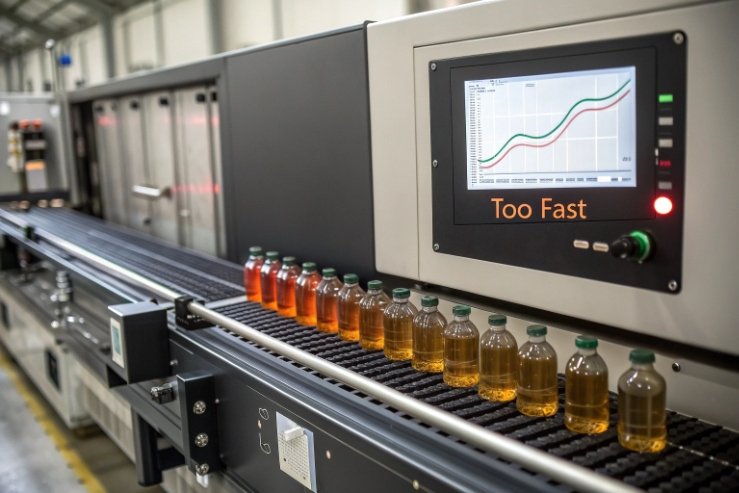
Annealing is a controlled cooling story
The lehr must cool bottles through the critical temperature range at the right pace. If cooling is too fast, stress gets trapped. If it is uneven, one side carries more stress than the other. That stress shows up later under normal handling.
The best plants treat annealing lehr cooling profile 4 control as a core quality system:
- stable conveyor speed
- stable zone temperatures
- controlled airflow patterns
- routine stress checks
How to prove annealing quality
Stress can be screened with a polariscope-based stress inspection 5. For buyers, the key is not owning the tool. The key is asking for the stress standard, sampling plan, and results trend. If stress is stable, breakage becomes predictable and low.
| Annealing issue | What it causes | Where it shows up | What to request |
|---|---|---|---|
| High residual stress | Delayed cracking | Warehouses, trucks, retail | Stress test records |
| Uneven stress | Random “one-off” breaks | One side of bottle | Zone uniformity checks |
| Poor thermal tolerance | Cracks in cold chain shifts | Chill to warm transitions | Thermal cycle screening |
| Finish stress | Neck breaks during corking | Corking/capping line | Finish stress focus sampling |
Practical handling link to annealing
Even with good annealing, rough deadplates, tight bottle-to-bottle contact, and hard conveyor transfers can start micro damage. When annealing is weak, those same touches become breakage events. That is why the best programs align annealing targets with real handling conditions.
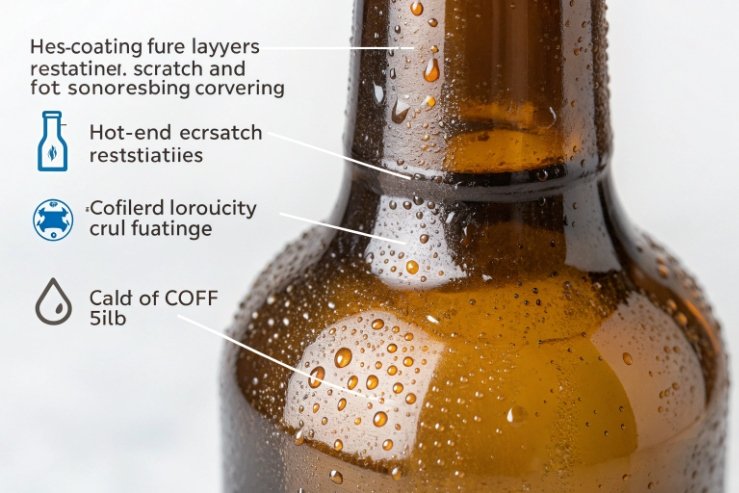
Which coatings and handling reduce scuff and breaks?
A bottle can be structurally strong and still fail quality because it arrives scuffed, hazy, or covered in abrasion lines. For premium wine, surface quality is part of the product.
Hot-end and cold-end coatings reduce friction and surface damage, while gentle conveyor design, spacing control, and correct secondary packaging reduce scuffing and impact chips that lead to breaks.
Coatings: the quiet hero of appearance quality
Many plants use a hot-end coating to improve scratch resistance and a cold-end coating to reduce friction. The exact chemistry varies, but the goal is simple: reduce glass-on-glass and glass-on-metal damage. For common treatment categories and where they apply, see hot-end and cold-end surface coatings 6.
Coating quality is not only “apply it.” It is also:
- stable application rate
- clean nozzles and consistent coverage
- correct cure and compatibility with decoration or labels
- consistent feel so conveyors do not “grab” bottles
If coating is inconsistent, scuffs become patchy. That looks worse than no coating at all.
Handling: where good bottles get damaged
Most scuffs come from:
- bottle-to-bottle contact at accumulation tables
- hard guide rails with poor alignment
- drops at transfer points
- tight cartons with weak dividers
A well-run line uses controlled spacing and smooth transfers. It also keeps glass clean, because dust and cullet can scratch coated surfaces fast.
Packaging: where surface protection becomes export readiness
For shipping, bottle protection is a system:
- dividers that prevent contact
- cartons strong enough for stacking
- pallet patterns that avoid overhang
- corner boards and strapping to prevent shifts
For decorated bottles or matte finishes, add sleeves or higher-grade dividers. Otherwise, vibration will rub the finish off before arrival.
| Protection layer | What it prevents | What to specify | What to inspect |
|---|---|---|---|
| Hot-end coating | Early scratches | Coverage standard | Scuff trend on line |
| Cold-end coating | Glass-on-glass abrasion | COF target feel | Patchy rub marks |
| Conveyor control | Impact and contact | Spacing and transfer design | Damage hotspots |
| Dividers/cartons | Shipping scuffs | Divider strength and fit | Rub marks after vibration |
| Pallet discipline | Crush and shift | No overhang + corner boards | Load photos and pattern |
A simple buyer-side checklist that works
Before approving mass production, it helps to request:
- a scuff test after a short vibration simulation aligned to ASTM D4169 distribution testing 7 in the real carton
- photos of accumulation points and transfer points on the line
- coating and handling notes tied to the bottle finish type
- a packing spec that matches your route-to-market, not only local delivery
Conclusion
Wine bottle quality comes from stable melt and forming control, stress-free annealing, and surface protection through coatings, handling, and packaging that survive real logistics.
Footnotes
-
Defines cullet and why recycled content affects melt stability, clarity, and defect risk. ↩︎ ↩
-
Explains the forehearth role in forming and why temperature uniformity impacts viscosity and defects. ↩︎ ↩
-
Shows how ultrasonic thickness gauging works for checking wall uniformity and thinning risk zones. ↩︎ ↩
-
Defines the annealing lehr and how controlled cooling reduces residual stress and delayed breakage. ↩︎ ↩
-
Explains how a polariscope visualizes stress patterns for quick residual-stress screening in glass. ↩︎ ↩
-
Summarizes common surface treatments, including hot-end and cold-end coatings, to reduce scuffs and scratches. ↩︎ ↩
-
Quick overview of ASTM D4169 so you can pick realistic vibration, drop, and compression checks for shipping bottles. ↩︎ ↩


