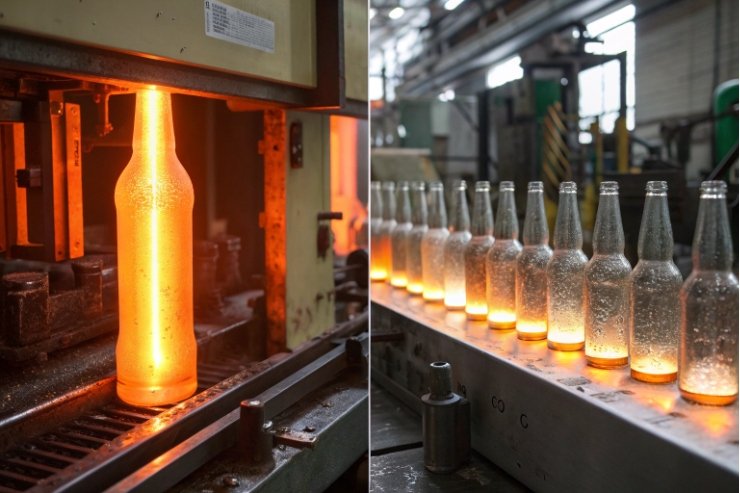
A bottle can look perfect in the mould, then show bubbles and scratches at the lehr exit. At that moment, yield and brand both take a hit.
Bubbles and scratches usually come from two sources: gas and contamination in the melt, and mechanical or thermal abuse of hot glass in the I.S. machine and conveyors.

When we connect industrial glass melting and fining processes 1, gob quality, mould condition, swabbing, timing, and coatings into one system, these defects drop sharply. Let’s walk through the main causes and the controls that work in real production.
Are seeds and blisters mainly from melt refining or contaminated batch?
Tiny bubbles seem harmless at first. Then customers call them “stones”, “seeds”, and “dirty glass”, and the whole pallet becomes a complaint.
Most seeds and blisters come from incomplete refining and contaminated batch or cullet: trapped gases, excess moisture, organics, and foreign inclusions all create nucleation points that grow into visible bubbles.
How gas and contamination turn into seeds and blisters
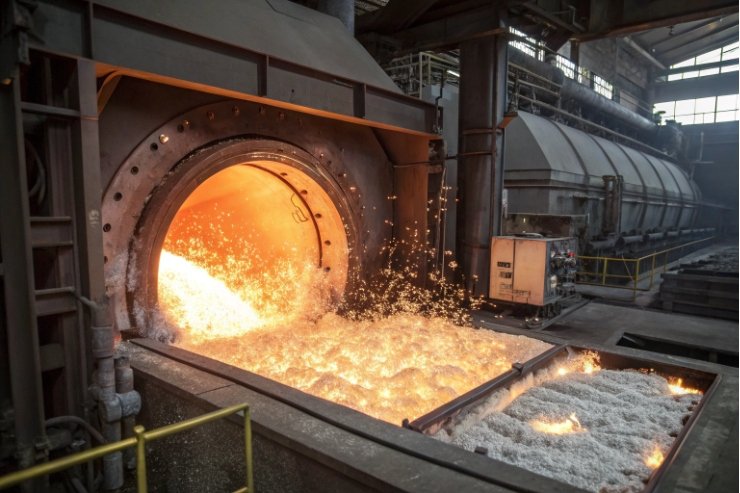
In the furnace, all gases in the melt must either react or escape before glass flows to the forehearth. If not, they show up later as seeds and blisters defect causes 2 in the bottle wall.
Typical gas sources include:
- Residual CO₂ and SO₂ from carbonates and fining agents
- Moisture in sand, cullet, and other raw materials
- Volatile organics from labels, glues, and dirt on cullet
- Gases released from contaminant particles (ceramics, metals, carbon)
If temperature in the refining zone is too low, or residence time is too short, those gases do not fully coalesce and rise out. Instead they stay dissolved until the melt cools slightly in the throat or forehearth; at that point, solubility drops and tiny bubbles nucleate.
Contaminants such as stones, ceramic bits, or high-iron fragments make the situation worse. They act as nucleation centres where dissolved gas prefers to collect. That is why “dirty” cullet often correlates with high seed counts, even if furnace settings look normal—especially when incoming feedstock misses quality requirements for glass cullet 3.
Batch moisture is a quiet troublemaker. Wet sand or cullet brings extra water into the furnace. This water turns to steam and adds to the gas load. When refining is already tight, that extra gas pushes the system over the edge and seeds rise sharply.
| Root cause | Effect in furnace | Defect in bottle |
|---|---|---|
| Low refining temperature | Gases not fully released | General high seed count |
| Short residence time | Insufficient bubble coalescence | Fine, evenly spread seeds |
| Wet batch / cullet | Extra steam in melt | Random seeds and blisters |
| Contaminated cullet (ceramics, carbon) | Nucleation sites and extra gases | Local clusters of bubbles |
Practical controls in melting and refining
To reduce seeds and blisters from the melt side, several actions usually pay off fast:
- Tight incoming QC on cullet (ceramic, stone, and metal removal)
- Covering and ventilating batch storage to keep moisture low
- Keeping a stable, sufficiently high refining-zone temperature
- Managing furnace redox so sulfate-based fining systems work properly
- Monitoring bubble levels with routine pull tests and visual checks
When melt refining is stable and cullet is clean, the forehearth can focus on delivering consistent gob temperature. If furnace-side issues remain unsolved, no forming or coating change can fully hide the bubbles later.
Do timing and temperature issues mark surfaces during blank-blow?
Even with clean glass, the forming process can scratch, bruise, or trap air on the surface if timing and temperatures are not in the right window.
Yes. Incorrect gob temperature and poor timing of blank-blow, plunger, and baffle actions can trap air, create air checks, and leave surface marks during the blank phase.
How blank-blow timing creates air checks and blisters
In both blow-blow and press-blow processes, the blank side decides how glass first touches the mould. If air cannot escape, or if glass hits metal in the wrong way, surface defects appear—especially when the container glass forming process 4 runs outside its stable timing window.
Common blank-side problems:
- Poor venting: blocked or worn vents, dirty baffles, or badly machined vent grooves prevent air from escaping. When the gob closes the mould, trapped air forms blisters or “air checks” near the contact surface.
- Mis-timed baffle or blowhead: if the blowhead seals too early or too late, air pressure distribution becomes uneven. This can create thin spots with visible surface disturbances.
- Wrong plunger timing in press-blow: if the plunger moves before the gob settles, glass folds and laminations can form, trapping air and causing internal blisters or cold wrinkles.
Surface temperatures matter just as much. If the gob is too cold when it hits the blank mould, the surface stiffens too quickly. Air struggles to move through vents, and contact forces increase, leaving drag lines and rough patches. If the gob is too hot, it can scuff more easily and pick up fine relief from any defect in the cavity.
A fast way to separate “timing” from “tooling” is to use a structured defect guide and check the same items every time—especially container defect causes and remedies 5 related to venting, baffle timing, and mould condition.
Temperature windows and viscosity balance
Glass behaves well only within a narrow viscosity range during forming. Too stiff and it resists mould shaping; too soft and it sticks and scuffs.
Key checks include:
- Gob temperature at delivery (pyrometer or thermocouple trending)
- Blank mould and plunger temperatures (cooling air balance)
- Time between gob cut and mould close (machine timing)
A simple rule of thumb: the outer skin of the gob must be stiff enough to survive contact without tearing, while the inner mass must stay soft enough to distribute evenly. When this balance is right, surfaces come out smooth and free of flow marks or wrinkles.
| Condition | Likely surface result |
|---|---|
| Gob too cold, vents poor | Air checks, chill marks, rough patches |
| Gob too hot, dirty cavity | Sticking, drag lines, scuffed panels |
| Blowhead mistimed | Localized ripples, uneven wall distribution |
| Plunger mistimed | Folds, internal blisters, double-skin areas |
Fine-tuning timing and temperature requires data and observation. Heat maps of the blank mould set, infrared images, and slow-motion video of gob entry and plunger motion all help identify where the forming dance is out of rhythm. Once timing, venting, and temperature are aligned, many small surface defects disappear without any change in raw glass.
Can worn vents and take-out tongs scratch hot glass?
A perfect blank and blow mould can still produce scratched bottles if the supporting hardware around them is tired or misaligned.
Yes. Worn vents, dirty cavities, rough neck rings, and damaged take-out tongs all scratch hot glass during contact, leaving repeatable scuff patterns that weaken the bottle.

How contact tooling marks the surface
Hot glass is soft. Anything that touches it must be smooth, clean, and correctly aligned. Over time, this is rarely true without good maintenance.
Several components often become hidden scratch sources:
- Blank and blow-mould vents: dust, glass fines, and corrosion roughen vent edges. When hot glass sweeps past these points, it picks up fine scratches or “comet tails” pointing away from the vent.
- Neck rings and guides: worn neck-ring faces and guide plates develop raised edges. These imprint or scratch the finish and shoulder during forming and transfer.
- Take-out tongs: tong inserts can chip or wear, leaving burrs. When they grip the parison or bottle, they mark the sidewall or neck with clear tong marks.
- Dead plates and transfer plates: rough surfaces or baked-on swab oil drag across the hot base, producing rings and radial scratches.
These defects are easy to spot in repetitive patterns: always at the same height, in the same orientation, from the same cavity. That is the signature of contact damage, not random handling.
Separating mould design issues from wear and dirt
Not every scratch calls for a new mould design. Often, cleaning and small refurbishments recover most performance:
- Regularly cleaning vents and cavities with proper tools and schedules
- Reworking or replacing neck rings when wear marks appear
- Switching tong contact materials or inserts to kinder options and checking alignment
- Polishing dead plates and applying controlled, thin coatings where needed
Hot-end and cold-end coatings also play a role. If hot-end container glass coating 6 and cold-end lubrication are weak, the base glass surface is more exposed to damage. Everything the bottle touches feels “harder” and scratches more easily. With proper coatings, bottles slide or release rather than grind.
| Component | Wear / dirt effect | Visible defect pattern |
|---|---|---|
| Vent holes / slots | Sharp edges, plugged openings | Comet tails, tiny star-shaped marks |
| Neck ring | Raised steps, misalignment | Finish scuffs, thread checks, shoulder rub |
| Take-out tongs | Burrs, chipped inserts | Paired tong marks or side scuffs |
| Dead / transfer plates | Roughness, stuck carbon | Base scuff rings, radial scratches |
A focused cavity-by-cavity defect map is powerful here. When QC logs every scratched bottle with its cavity number and defect height, a pattern quickly points to the guilty mould or tong. This leads to targeted maintenance instead of guessing or global slowdowns.
Which furnace and I.S. controls minimize bubbles and scratches?
Good glass and good forming hardware still need good control. Without process discipline, the same defects return every week under a different name.
Stable furnace fining, clean cullet, correct coatings, and controlled I.S. settings for timing, cooling, and conveying work together to suppress both bubbles and scratches.

Furnace-side controls for bubbles
On the melting and refining side, the key controls are:
- Consistent batch and cullet quality: moisture, grain size, contamination levels and organics should be tracked and kept inside tight windows.
- Refining zone temperature and residence time: enough heat and time for bubbles to rise and burst.
- Redox balance: especially when sulfate fining is used; wrong redox reduces fining power and leaves gases in the melt.
- Forehearth temperature uniformity: avoid cold spots where gases can come out of solution just before forming.
Many plants run routine “bubble counts” on pulled glass strips. When counts spike, they check upstream: batch changes, cullet mix, furnace temps, fining agent dosing. Quick corrections here prevent days of defective bottles.
I.S. machine and hot-end controls for scratches
On the I.S. side, several control loops keep scratches down:
- Gob temperature and weight control: consistent distribution means fewer thin spots and less stretching during contact.
- Blank and blow timing setup: carefully tuned baffle, blowhead, and plunger timing reduces folding, tearing, and surface stress.
- Mould cooling balance: correct air volume and distribution prevent local hot or cold zones that promote sticking and scuffing.
- Swabbing standards: fixed intervals, measured oil volumes, and the right product reduce “swab marks” and burnt residue.
- Hot-end / cold-end coating application: uniform coverage gives the same COF and protection to every bottle, from every cavity—supported by proven glass surface treatments 7.
- Conveyor and dead-plate speed/pressure: speeds and line pressure matched to the bottle’s coating and shape avoid grinding contact.
A simple summary of where controls live:
| Defect type | Main prevention lever | Typical control point |
|---|---|---|
| Seeds | Furnace fining + cullet QC | Refining temp, batch moisture, cullet sort |
| Blisters | Fining + blank venting | Furnace redox, vent design and cleanliness |
| Surface scuffs (forming) | Mould condition + cooling | Mould polishing, air balance |
| Surface scratches (handling) | Coatings + conveying | Hot-end/cold-end coat, line COF and pressure |
When furnace parameters, I.S. timing, mould care, and conveying rules are all documented and monitored, bubbles and scratches stop being “mystery defects”. They become measured deviations with clear root causes and corrective actions.
Conclusion
Bubbles come from gas and contamination; scratches come from friction and bad contact. With stable melting, clean tooling, smart coatings, and tuned I.S. timing, both can be driven down to a controllable level.
Footnotes
-
Reference lecture on fining, bubble removal, and why dissolved gases form seeds/blisters downstream. (↩︎) ↩
-
Practical defect notes explaining seeds vs blisters and common upstream causes in container glass. (↩︎) ↩
-
Technical proposals defining cullet contaminants and quality limits that impact furnace defects and inclusions. (↩︎) ↩
-
Clear step-by-step overview of blow-blow and press-blow forming stages and the timing-critical interfaces. (↩︎) ↩
-
Troubleshooting guide linking venting, timing, cooling, and tooling issues to repeatable container defects. (↩︎) ↩
-
Explains hot-end coating purpose and how it reduces abrasion and strength loss during early hot handling. (↩︎) ↩
-
Technical background on hot-end/cold-end surface treatments and how they stabilize COF and scratch resistance. (↩︎) ↩


