
A frosted bottle can look luxury in mockups, then arrive patchy, stained, or hard to label. The problem is almost always process control.
Frosted spirits bottles are made by forming and annealing clean bottles, preparing the surface, masking critical areas, applying acid-etch or sandblasting with tight parameters, then rinsing, sealing, and verifying ΔE color and Ra roughness in QC.

Frosting is not one step. It is a chain. If one link drifts, the bottle shows it fast. So the best factories treat frosting like a controlled manufacturing line, not a decoration trick.
How do we plan the bottle and prepare the surface for frosting?
A frosting line cannot “fix” a weak bottle. If the bottle has surface defects or stress, frosting can make those problems louder, not smaller.
Start by confirming stress control at the hot end and through the glass annealing lehr process 1, because residual stress can turn into cracks or edge chipping after decoration.
Start with a stable bottle spec and a clean, defect-free base bottle. Then surface-prep with de-dusting and degreasing so the frosting method touches glass evenly and produces a uniform matte.
Lock the spec before you lock the finish
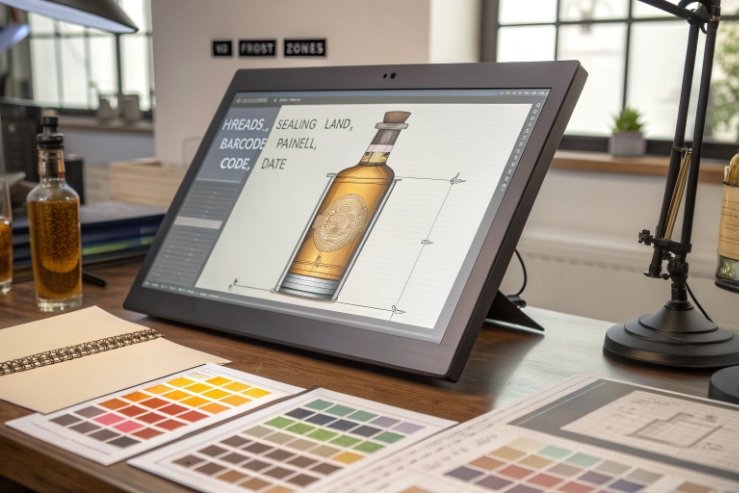
A frosted spirits bottle needs the same discipline as a clear bottle. The difference is that frosting hides some cosmetic defects but increases sensitivity to residue, staining, and label problems. The planning stage should freeze these items early: bottle color, weight target, label panel geometry, closure type, and which zones must stay unfrosted (threads, sealing land, barcode panel, date code zone). If a design has deep embossing or sharp corners, those zones need extra scuff planning, because matte surfaces show rub marks fast.
Pre-decoration inspection saves money
Frosting should never be applied to “borderline” bottles. Any small chip, check, or scuff becomes a reject later. We normally run a pre-decoration gate: visual check under strong light, finish check around the mouth, and a quick cleanliness test. This step is cheaper than frosting scrap.
Cleaning is the real beginning of uniform matte
Most uneven frosting comes from uneven contamination. Dust, mold oil carryover, and handling oils create “resist” spots where the etch or blast works differently. A practical prep flow is: air blow-off, warm alkaline degrease, rinse, and final rinse with controlled water quality. If bottles sit before frosting, they should be stored covered and handled with clean gloves to reduce fingerprints.
| Prep step | Main purpose | Common failure | Simple control |
|---|---|---|---|
| Air de-dusting | remove glass dust and carton fibers | “fish-eye” matte spots | filtered air, fixed nozzle distance |
| Degrease wash | remove oils and silicone | patchy frosting | wash temp and dwell time log |
| Rinse + final rinse | remove detergent film | slick feel and label slip | final rinse conductivity check |
| Drying | prevent water marks | streaks and watermark rings | hot air + time standard |
How do masking and edge protection keep threads crisp and sealing areas safe?
A frosted bottle can look perfect on the body and still fail in the customer’s hand if the threads feel gritty or if the sealing land gets attacked.
Masking protects threads, sealing lands, and code zones from etch or blast. Edge protection prevents undercut and chipping, so threads stay crisp, torque stays stable, and closures seal reliably.
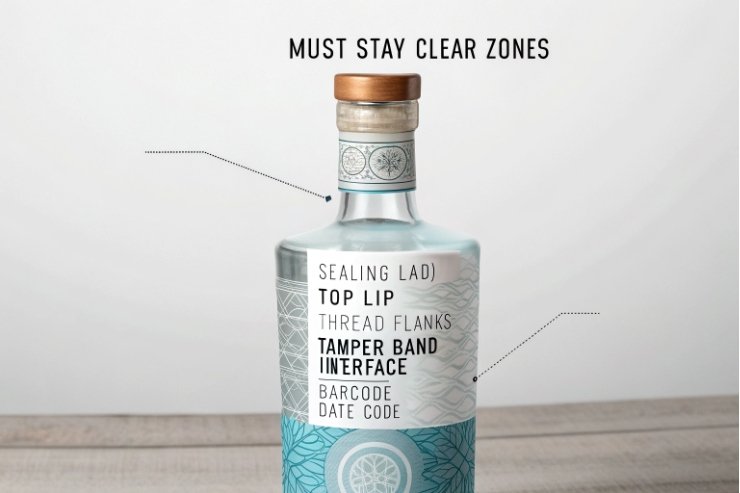
Decide what must never be frosted
For spirits packaging, these zones are usually “no frost”:
- the sealing land (top lip or bore interface)
- the thread flanks (where friction impacts torque-to-load)
- any tamper band interface
- any tight tolerance gauge surfaces used by the filler
Even light frosting in these zones can change friction, create dust, or create micro-channels that trap residue. It can also increase torque scatter. That leads to leaks or “false tight” closures.
Masking methods that work on production lines
Good masking is mechanical and repeatable. Common choices include threaded plugs, silicone stoppers, precision caps, and UV-resistant tapes with die-cut edges. For sandblast, masks must resist abrasion and must stay flat with no lifted corners. For acid-etch, masks must resist chemicals and must not allow seepage at edges.
Edge protection is about preventing weak boundaries
The boundary between frosted and clear zones is a stress and wear zone. If the edge is too sharp, it becomes a scuff line. If the mask lifts slightly, you get a fuzzy boundary that looks cheap. A clean edge comes from:
- tight mask fit
- stable bottle positioning
- controlled dwell time
- and a post-process rinse that removes residues at the boundary
Thread protection is also a capping performance tool
Threads are not the seal, but they create sealing force. If frosting changes thread friction, torque becomes less predictive. A cap can hit target torque but still deliver low axial load. This is why I prefer “threads stay clear” for premium programs, unless the closure is designed to compensate with a thick liner and a wide seal land.
| Critical zone | Why it must stay clean | Typical masking tool | QC check |
|---|---|---|---|
| Sealing land / top lip | seal integrity and leak risk | precision cap or plug | 360° visual + leak test |
| Threads | torque stability and repeatability | threaded plug | torque scatter trend |
| Tamper band zone | clean tear and fit | cap mask | band fit check |
| Code/date zone | readability | tape mask | scan test after frosting |
Which etch and sandblast parameters deliver uniform matte?
Many teams chase “more frosting” when they need “more uniformity.” Uniform matte comes from stable energy, stable time, and stable cleanliness.
Uniform matte comes from tight control of etch chemistry or blast energy, plus consistent bottle rotation and dwell. Acid-etch gives a smoother satin matte, while sandblast gives a deeper tactile matte that needs stricter strength and dust control.
Acid-etch control points that matter most
Acid-etching glass 2 uniformity depends on concentration, temperature, dwell time, and agitation. If agitation is weak, the etch rate varies by zone and you get streaks. If dwell is too long, the surface can become too rough and more stain-prone. If rinsing is weak, residues can remain and cause haze changes over time.
For production control, we keep:
- a tight chemistry window (not “best effort”)
- stable bath temperature
- timer-based exposure
- and rinse/neutralize steps that are verified with simple water-break checks
Sandblast control points that matter most
Sandblasting for a matte finish 3 is a mechanical erosion process. Uniformity depends on media type, grit size, pressure, nozzle distance, angle, and travel speed. If nozzle distance changes, the matte changes. If media breaks down and becomes fine dust, the finish becomes inconsistent and can turn chalky.
Sandblast also affects strength more than light etch when it is aggressive. So the program should define “maximum roughness” and avoid blasting high-stress zones like heels and sharp corners unless design requires it.
Choose the matte based on customer handling
If the bottle will be handled often in bars, a smoother satin matte stains less and wipes easier. A very deep matte feels premium but can trap oils and show fingerprints. The right choice depends on how the bottle is used, not only how it looks on day one.
| Method | Key parameters to lock | Typical matte feel | Main risk | Best use |
|---|---|---|---|---|
| Acid-etch | concentration, temp, dwell, agitation | smooth satin | rinse residue, over-etch | premium “clean” look |
| Sandblast | grit, pressure, distance, speed | tactile matte | strength loss, dust, chalking | bold texture and patterns |
| Spray-frost coating | film thickness, cure, slip | controlled matte | scuff and curing issues | tight ΔE and high volume |
Which post-treatments lock in stain resistance, and how do we verify ΔE and roughness at QC?
A frosted bottle that stains in transit or fingerprints on shelf is not premium. Post-treatments and QC are what protect the matte look until the customer buys again.
Stain resistance improves with thorough neutralize/rinse, controlled drying, and optional protective topcoats that reduce oil pickup. QC should verify ΔE color consistency and Ra roughness using defined zones, fixtures, and sampling by cavity and lot.

Post-treatments that keep matte looking clean
Stain issues come from two sources: surface chemistry and surface texture. A rougher matte traps oils and dust. Residues from etch or wash can also attract staining. A strong post-treatment stack includes:
- neutralize and rinse until no film remains
- final rinse with controlled water quality
- complete drying so water marks do not bake in
- optional protective layers when the supply chain is rough
Protective options include clear anti-scuff layers, thin silane-style treatments, or compatible topcoats that reduce fingerprint pickup. When topcoats are used, confirm label compatibility with quick surface energy dyne testing 4, because low-energy surfaces can hurt adhesion.
ΔE color control for frosted bottles
Frosting changes how color is perceived because it scatters light. So ΔE checks must be done the same way every time, with a stable instrument setup. The easiest approach is to set:
- a reference master bottle or tile
- a fixed measurement location (front panel, back panel)
- and a fixture that keeps the curved bottle stable
For tight programs, we track CIE L*a*b* values 5 and limit ΔE color difference 6 drift by lot. We also check visual match under controlled lighting, because customers see bottles under retail light, not lab light.
Roughness and gloss acceptance must be measurable
“Feels smooth” is not a spec. A good QC plan defines:
- target range for the Ra surface roughness parameter 7 on label panels
- separate allowance near seams and embossing
- and a rub/scuff test that matches the chosen carton and divider
Sampling should be by cavity, not only by random bottles, because one cavity can drift and cause most rejects.
| QC metric | Tool | Where to measure | Typical acceptance idea |
|---|---|---|---|
| ΔE color | spectrophotometer | front + back panel | low drift vs master, stable by lot |
| Ra roughness | profilometer | label panel zones | target range by finish type |
| Gloss or haze | gloss meter / haze setup | panel zones | trend control, not only pass/fail |
| Stain pickup | oil/fingerprint wipe test | high-touch zones | no permanent mark after wipe |
| Scuff resistance | rub + vibration in carton | shoulder and heel contact | no heavy burnish rings |
Conclusion
Frosted spirits bottles succeed when masking protects functional zones, etch or blast parameters stay stable, post-treatments prevent staining, and QC locks ΔE and Ra with clear, repeatable measurements.
Footnotes
-
Explains lehr annealing schedules that relieve stress before decoration and reduce cracking risk. ↩ ↩
-
Definition-level overview of acid-etching and how it creates a matte surface on glass. ↩ ↩
-
Clear definition of sandblasting and why it produces a frosted, matte finish. ↩ ↩
-
Shows how dyne tests estimate surface energy to predict whether labels and inks will wet properly. ↩ ↩
-
Reference for what L*, a*, b* mean and how they standardize color measurement. ↩ ↩
-
Practical explanation of ΔE tolerancing and how teams set pass/fail limits for color drift. ↩ ↩
-
Quick guide defining Ra and roughness measurement basics used when setting tactile matte targets. ↩ ↩


