Broken bottles, line stops, and customer complaints often come from the same root cause: a few repeatable defects that hide in the hot or cold end before anyone sees them.
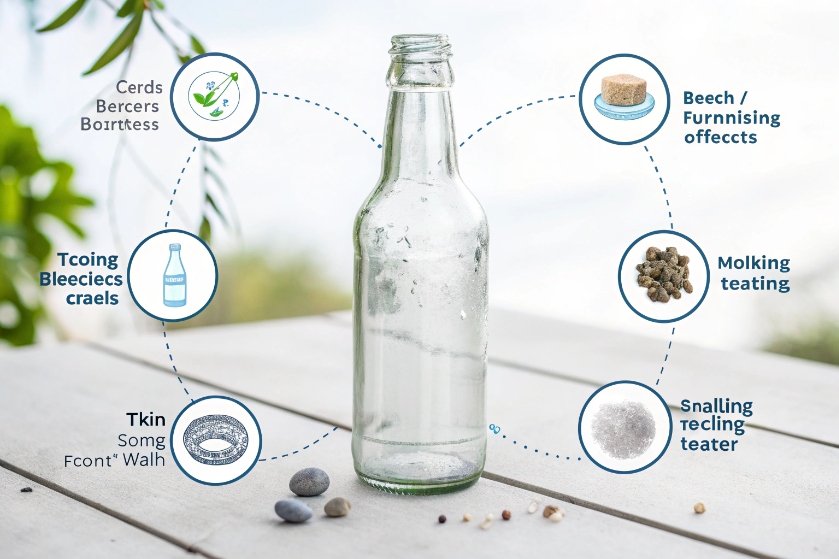
Common glass bottle defects like stones, cords, blisters, checks, thin walls, and birdswing come from issues in batch, melting, forming, or annealing. Stable melting, controlled forming, correct annealing curves, and strong QA testing prevent most of them.

When these defects show up at a filling line or in the market, the cost is already high. So the goal is to understand how each defect starts, tie it back to a specific part of the process, and put simple controls in place that keep it from returning. The good news is that most defects are predictable, not random bad luck.
How do stones, cords, blisters, and seeds form in glass bottle production?
Unmelted grains, streaks, and bubbles in the glass do not appear out of nowhere. They tell a clear story about what happened in the furnace, forehearth, or batch house.
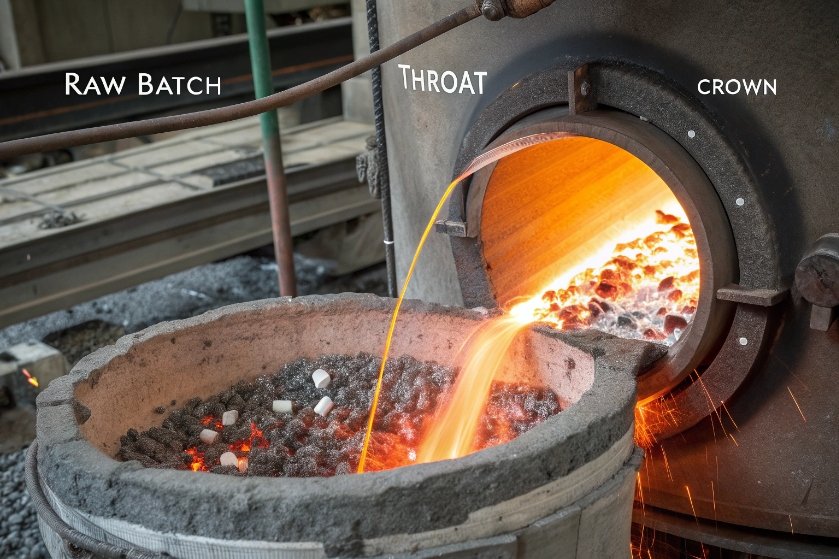
Stones, cords, seeds, and blisters arise from poor melting, unstable refining, dirty refractories, and gas sources in the batch. Better raw materials, mixing, melting control, and fining practice sharply reduce these defects.
Stones and cords: a fingerprint of melting and refractories
Stones are hard inclusions, often white or dark specks, usually unmelted batch or fragments of refractory. Cords are streaks or lines of glass with a different composition or viscosity that cut across the body or finish. Both create stress, optical distortion, and weak points in the bottle.
In practice, stones and cords usually link back to at least one of these issues:
- Low-quality or contaminated raw materials
- Poor batch mixing or segregation during charging
- Damaged or corroding throat, port, or crown refractories
- Large pull or frequent changes that disturb the melt
- Uneven temperature distribution in the tank or forehearth
Prevention starts with the batch. Clean sand, stable cullet, and consistent fining agents help the melt homogenize. Good mixing and tight control of batch moisture avoid “hot spots” where unmelted grains survive. Furnace design and operation matter as well. Stable crown and port temperatures, correct burner settings, and proper glass level keep refractories from being attacked and carried into the melt as stones.
If you want a shared reference for defect names and the usual hot-end/cold-end root causes, align teams around the Emhart Glass container defect causes and remedies guide 1.
Modern plants now add data-driven viscosity “soft sensors” that estimate glass viscosity from temperature, pull, and other signals. These tools keep the melt in a narrow, stable window without waiting for lab results. A stable viscosity profile in the tank and forehearth cuts cords and composition streaks, because the glass flows and mixes in a more repeatable way.
Seeds and blisters: gas that never escaped
Seeds and blisters are small or larger bubbles, often visible in the body or shoulder. The gas may come from:
- CO₂ and other gases released by carbonate raw materials
- Air trapped in the batch pile or at the surface
- Moisture in batch or cullet
- Redox reactions in the melt
- Leaks or air entrainment at plungers or orifice rings
Refining or “fining” is the key barrier. Enough residence time at high temperature lets small bubbles rise, grow, and escape. Strong fining practice means:
- Stable, high enough refining temperature
- Correct fining agent type and dosage
- Steady pull rate, not aggressive swings
- Clean surface, without crusts or scum trapping bubbles
If you need to brief a non-furnace team on what fining is actually doing (bubble growth, rise, stripping, and secondary fining), this overview of industrial glass melting and fining processes 2 is a useful common baseline.
Forehearth control matters too. If the glass cools too fast or unevenly, bubbles may “freeze” in place before they reach the surface. Uniform forehearth temperatures and good level control help bubbles migrate away from the gob stream.
A simple way to think about these four defects is:
| Defect | Typical Root Cause Area | Main Triggers | Key Preventive Actions |
|---|---|---|---|
| Stones | Batch / Refractories | Dirty batch, refractory corrosion | Better raw materials, inspection, controlled furnace wear |
| Cords | Melting / Flow | Temperature gradients, unstable viscosity | Stable firing, viscosity control, good forehearth balancing |
| Seeds | Batch / Refining | Gas release, short refining time | Strong fining practice, proper residence time |
| Blisters | Refining / Forming | Gas not released, air entrained at hot end | Fining, stable gob, clean orifices, correct plunger settings |
When the hot end team knows this simple map, they can see a defect and immediately check the right part of the furnace, rather than guessing across the whole line.
Which forming and mold problems cause thin walls, uneven seams, and birdswing?
Shaping the gob into a finished bottle is where many cosmetic and strength issues begin. Most “bad geometry” defects are not mysterious; they are signs that the glass, the molds, or the timing are out of balance.
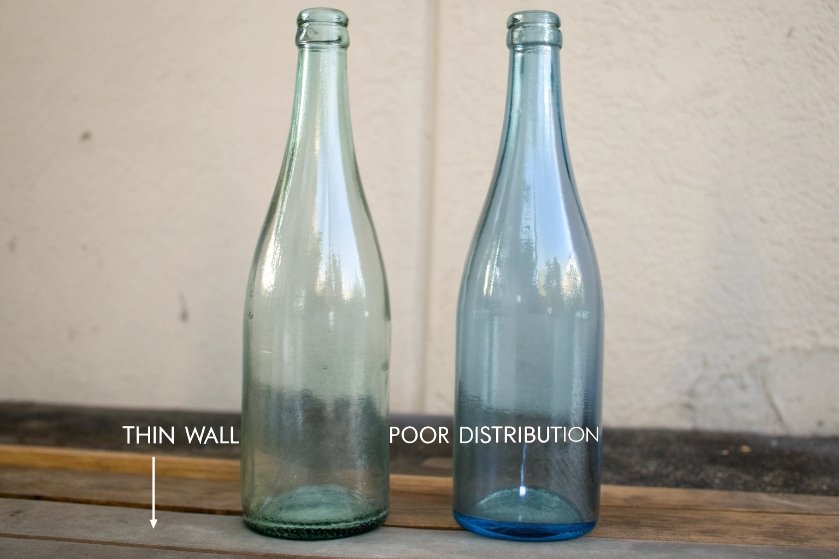
Thin walls, uneven seams, and birdswing usually come from non-uniform gob temperature, poor parison distribution, worn or misaligned molds, and wrong timing in the IS machine. Stable gob delivery, good mold maintenance, and precise forming settings prevent most of them.
Wall thickness and seam issues: where the glass went
Uneven wall thickness, thin heel, or thin shoulder often mean that the glass did not spread evenly in the blank or blow mold. Common reasons include:
- Gob too hot or too cold at one side
- Incorrect gob weight or shape
- Misaligned blank molds or neck rings
- Wrong plunger stroke, timing, or counter-blow
- Uneven mold cooling or lubrication
The result can be:
- Thin heel or shoulder that fails in drop or impact tests
- Heavy heel that wastes glass and looks clumsy
- Body lean or ovality
- Visible, offset seams that hurt appearance
If you want a simple reference for how the parison is formed and transferred in the container glass forming process on an IS machine 3, it helps align “forming timing” discussions across production, QA, and suppliers.
Practical controls focus on the gob first. Uniform gob temperature from a well-balanced forehearth, with correct orifice size and gob shear timing, gives more even distribution in the parison. Camera-based gob monitoring helps spot tailing, off-center gobs, or weight drift before bottles fail.
Next, forming mechanics matter. Regular alignment of blank molds, neck rings, and blow molds keeps the parison centered. Worn neck rings cause choked necks and bore constriction, which lead to filling problems and broken closures. A simple preventive plan with mold inspection, polishing, and timely replacement cuts many of these issues.
Uneven seams often point directly to mold alignment or damage. If the mold halves do not close square, or if debris sits on the joint, the seam will mis-match and become more visible. Operators should treat ugly seams as early warnings, not just cosmetic annoyances.
Birdswing and other internal forming defects
Birdswing is a thin filament of glass that stretches from the inside wall to the opposite wall or finish, like a spider web. It is dangerous, because it can break off and contaminate the product. Birdswing usually links to:
- Gob tailing and stringing at the shear
- Glass picked up by plungers or neck rings and stretched inside the parison
- Incorrect timing of blank mold opening or take-out
- Poor mold temperature balance or lubrication pattern
Prevention focuses on a clean, well-cut gob and smooth handling. Sharp, well-timed shears reduce tails. Correct parison delivery into the blank mold keeps glass from catching surfaces where it can be pulled into filaments. Mold temperatures should stay in a tight band; too cold zones “grab” the glass, while too hot areas encourage stringing.
Here is a simple summary of key forming defects and their sources:
| Defect | Main Cause Group | Typical Triggers | Prevention Focus |
|---|---|---|---|
| Thin wall / heel | Gob / Forming distribution | Uneven gob temp, misaligned molds, wrong counter-blow | Gob control, mold alignment, forming parameter checks |
| Uneven seams | Mold alignment / wear | Dirty joints, worn guide pins, loose arms | Mold maintenance, cleaning, correct closing pressure |
| Birdswing | Gob cutting / Handling / Timing | Gob tailing, glass pickup, poor IS timing | Shear adjustment, temperature control, timing tuning |
| Choked neck | Finish forming | Worn neck rings, misaligned parison, wrong blow timing | Tooling maintenance, parison alignment, finish checks |
If the hot end team treats these defects as messages about gob, molds, and timing, every forming issue becomes a chance to tune the process, not just scrap.
How do proper annealing curves and cold-end coatings reduce glass bottle breakage?
Many bottles look perfect leaving the forming machine but fail later under filling pressure, pasteurization, or transport. Hidden stress is usually the real enemy, not visible flaws.
Proper annealing curves relieve built-in thermal stress from forming, and cold-end coatings protect the surface from damage in conveyors and packing. Together they greatly reduce checks, fire cracks, and handling breaks.
Annealing: letting the glass relax
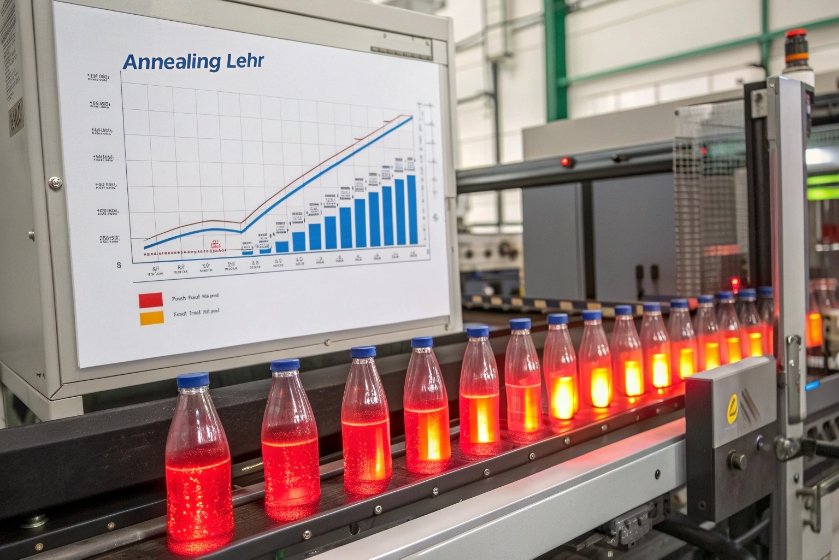
Right after forming, the outside of the bottle is much cooler than the inside. This temperature gradient creates strong internal stresses. Without proper annealing, these stresses stay locked in, and even small impacts or temperature shocks later can cause checks and breaks.
If you want a technical-but-readable explanation of why the lehr curve matters (annealing point, strain point, and “best” cooling rate vs residual stress), use these annealing and tempering lecture notes 4.
A good annealing lehr does three basic things:
- Reheats the glass to near the annealing point so stresses can move.
- Holds long enough for stress to relax through the wall.
- Cools down slowly and evenly through the strain range.
Under-annealing leaves high residual tension, often seen as:
- Shoulder checks
- Vertical or circumferential body checks
- Fire cracks near the heel or finish after hot treatment
Over-annealing is also a risk. Bottles may soften, deform slightly, or pick up conveyor marks if temperatures stay too high for too long. The key is not just the setpoint, but the full profile across the lehr width and length.
Non-contact pyrometers and continuous thermal profiling help keep that profile correct. Portable “lehr riders” or wireless devices run through the lehr and record the true bottle temperature at many points. This data shows cold edges, hot spots, or sudden drops. Small changes in belt speed, zone setpoints, or airflow can then bring the curve back into the ideal band.
Cold-end coatings and stress verification
Even with perfect annealing, the glass surface is still fragile. Bottles rub against each other on conveyors, in accumulation tables, and in packing equipment. Each contact can scratch the surface and create tiny flaws that will grow under load.
Hot-end and cold-end coatings work as a system, and this paper on hot-end and cold-end coatings in high-speed filling and handling 5 is a solid reference when you need to justify coatings as a “strength protection” control.
To make sure annealing and coating really do their job, plants use stress verification tools. Polariscopes or strain viewers show colored patterns where stress is higher. By comparing these patterns to internal standards, the team can classify bottles as properly annealed or not. Routine “stress audits” across different molds, production times, and lehr lanes catch problems early.
A simple way to link these concepts:
| Control Step | What It Fixes | How It Helps Reduce Breaks |
|---|---|---|
| Correct lehr curve | Residual thermal stress | Fewer checks and spontaneous fractures |
| Thermal profiling | Hot/cold zones in lehr | Stable, repeatable annealing across all bottles |
| Hot-end coating | Base surface strength | Higher resistance to impact and compression |
| Cold-end coating | Handling damage, scuffing | Less crack initiation during transport and filling |
| Polariscopic checks | Hidden stress patterns | Prevents bad lots from reaching customers |
When annealing and coatings are treated as active process controls, not just “set and forget” steps, breakage rates drop and customers see a big improvement in consistency.
Which QA tests catch glass bottle defects early in production?
Strong process control needs strong feedback. Random sampling and a quick visual check are not enough when bottles go into high-speed, high-pressure lines.
Pressure, leak, drop, and stress tests find weak or defective bottles before they leave the factory. Together with visual and dimensional checks, they provide an early warning system for process problems.
Mechanical and pressure tests: making the bottle prove itself
Different customers demand different performance tests, but most QA programs include at least:
-
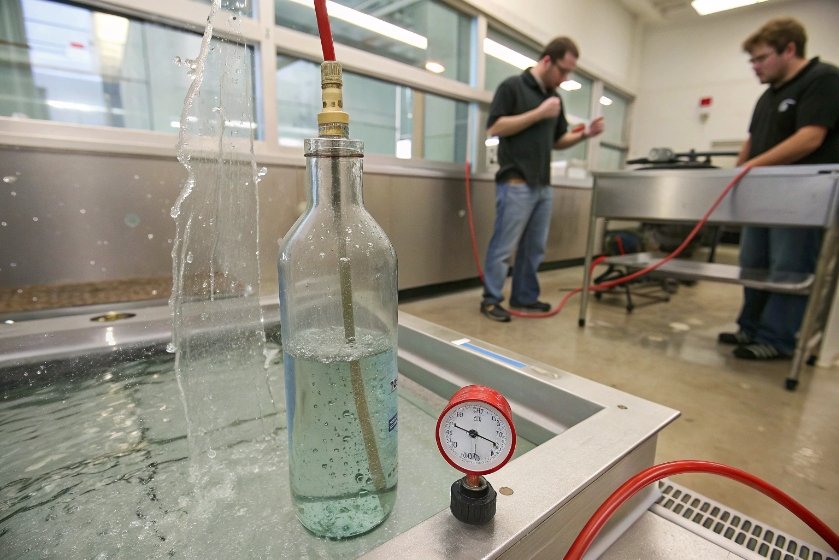
Internal pressure test
Bottles are filled with water and pressurized to a set value or until break. For standards-based programs, many teams reference the ASTM C147 internal pressure strength test methods for glass containers 6. Failures often point to thin walls, bad geometry, or high residual stress. -
Vertical load or top-load test
A controlled force is applied to the finish. This checks how well the bottle carries stacking loads. Weak finishes, poor distribution at the shoulder, or bad annealing will show here. -
Drop test
Bottles are filled or empty and dropped from a defined height onto a hard surface or plate. Typical weak points that show up are heel, shoulder, or impact on seams. -
Thermal shock test
Bottles are cycled between hot and cold water baths. Failures highlight poor annealing, high stress, or local thickness extremes.
Alongside these tests, leak testers on the production line check every bottle. They use vacuum or compressed air with sensors to detect through-cracks, pinholes, or serious wall defects. These machines remove bad bottles right away and give real-time data about defect trends.
Stress and dimensional QA: connecting back to the process
Mechanical tests tell you that something is wrong; stress and dimensional checks help you find where it started.
-
Polariscopic or strain-optic inspection
As discussed earlier, this shows stress patterns in the glass. Operators learn to recognize patterns linked to fast cooling, heel issues, or finish stress. This is a powerful preventive tool, not just a pass/fail gate. -
Dimensional checks
Gauging finish diameter, thread depth, bore, body diameter, and height ensures that closures will work and filling lines will run smoothly. Many forming defects, like choked necks or misaligned finishes, appear as out-of-spec dimensions before they hurt downstream. -
Visual and cosmetic inspection
Manual or automatic vision systems look for stones, cords, blisters, birdswing, checks, and heavy seams. By mapping defects to mold numbers and time stamps, QA helps the hot end team correct specific IS cavities, forehearth segments, or lehr lanes. -
Sampling discipline (AQL)
To keep release decisions consistent lot-to-lot, tie defect categories to an ISO 2859-1 sampling scheme indexed by acceptance quality limit (AQL) 7, then lock your critical/major/minor rules into the control plan.
An integrated view of QA tests looks like this:
| Test Type | Primary Purpose | Main Defects Detected |
|---|---|---|
| Pressure / internal | Burst strength | Thin walls, checks, stress concentrations |
| Top-load | Stack strength | Weak finishes, poor distribution, bad annealing |
| Drop / thermal shock | Impact and thermal resistance | Heel checks, fire cracks, thickness issues |
| Leak test | Container integrity | Through-cracks, pinholes, birdswing breaks |
| Polariscopic | Residual stress | Under/over annealing, local stress peaks |
| Dimensional | Fit and function | Choked neck, finish faults, deformation |
| Visual / vision | Cosmetic and safety | Stones, cords, blisters, birdswing, checks |
When QA data flows back daily to process engineers and operators, it becomes a living guide. Recurring defects are tied to specific root causes, and the plant can act before customers ever see a problem.
Conclusion
Most glass bottle defects are not random. With stable melting, tight forming control, smart annealing, and strong QA feedback, defect rates fall and real quality becomes repeatable.
Footnotes
-
Defect photos plus causes/remedies for faster root-cause discussions. ↩ ↩
-
Explains gas release, fining chemistry, and why bubbles survive. ↩ ↩
-
Clarifies parison formation and timing steps that drive thickness defects. ↩ ↩
-
Shows how annealing/strain points relate to residual stress control. ↩ ↩
-
Practical overview of coatings protecting containers in filling/handling. ↩ ↩
-
Standard scope for measuring burst strength under internal pressure. ↩ ↩
-
Industry baseline for attribute sampling plans using AQL decisions. ↩ ↩


