Glass handles add functionality and premium appeal, but they introduce a significant structural weakness if engineered poorly. A beautiful handled jug that shatters on the filling line is a liability, not an asset.
Yes, thermal expansion is the single most critical factor in designing handled glass bottles. The complex geometry creates varying glass thicknesses that cool at different rates, leading to severe internal tension. Without calculating for this, thermal shock will snap the handle at its connection points.

The Engineering Challenge of Complex Geometries
In my two decades at FuSenglass, I have seen many designers treat glass like plastic. They design a handle with sharp angles or massive thickness, assuming it will behave uniformly. It does not. "Dive Deeper" into the mechanics of glass reveals that it is a poor thermal conductor. This means heat moves through it slowly.
When you mold a bottle with a handle, you are essentially fusing two different structures together: a thin-walled container (the body) and a thick, solid mass (the handle). During production, specifically in the "Hot End," the entire bottle is formed at over 1000°C. As it moves down the line to the annealing lehr 1, it begins to cool.
The thin body cools rapidly. The thick solid handle holds heat like a battery. As the body contracts (shrinks) while the handle remains expanded (hot), massive tensile stress builds up at the connection points—the "joints" where the handle meets the body. If this stress is not relieved through proper design and careful annealing 2, the bottle becomes a ticking time bomb. It might survive the factory, but the moment a customer pours hot tea into it or a factory hot-fills it with juice, the added thermal shock triggers that stored energy, and the handle shears off.
Thermal Mass Discrepancy
The core issue is the difference in "Thermal Mass." We can visualize this as a race to room temperature where the runners have different speeds.
| Component | Physical Structure | Thermal Behavior | Stress Consequence |
|---|---|---|---|
| Bottle Body | Thin, uniform wall (~3-4mm). | Rapid heat dissipation. Contracts quickly. | Pulls away from the handle. |
| Solid Handle | Thick, dense glass (>10mm). | Retains heat deeply. Stays expanded longer. | Resists the pull of the body. |
| Connection Point (Top) | Junction of thick/thin glass. | Complex stress vectors. | High Risk: Most common failure point (Shear). |
| Connection Point (Bottom) | Junction of thick/thin glass. | Compression/Tension mix. | Moderate Risk: Cracks can radiate into the body. |
Understanding this mismatch is the first step. The second step is mitigating it through smart geometry.
How can a handle geometry create uneven wall thickness and thermal stress?
A handle is rarely hollow in standard glass production; it is often a solid bar of glass attached to a hollow vessel. This inherent contradiction in thickness is the primary source of thermal danger.
Uneven wall thickness leads to "Differential Cooling." As the thin body cools and shrinks, the hot, thick handle remains expanded. This tug-of-war creates permanent residual stress at the interface, making the bottle hypersensitive to thermal shock during hot-fill or pasteurization processes.
The Mechanics of Differential Cooling
Imagine a glass jug exiting the mold. The body wall might be 3mm thick, while the handle is a solid cylinder 15mm in diameter. In the cooling tunnel, the body drops below the "strain point" (the temperature where glass becomes solid and stress is locked in) much faster than the handle.
The body essentially "freezes" in size while the handle is still soft and hot. As the handle finally cools and tries to shrink later, it pulls against the already rigid body. This creates Tensile Stress—the most dangerous force for glass. Glass is strong in compression (being squeezed) but weak in tension (being pulled apart).
The "Hot-Fill" Scenario
Now, take that stressed bottle and put it on your production line. You fill it with liquid at 90°C.
-
Rapid Heating: The thin body heats up instantly and tries to expand.
-
Lag Time: The thick handle takes longer to absorb the heat and expand.
-
Stress Reversal: You now have a hot, expanding body fighting against a cold, rigid handle.
This rapid reversal of forces adds "Transient Stress" on top of any "Residual Stress" left over from manufacturing. If the sum of these stresses exceeds the glass’s breaking threshold, the handle snaps cleanly off, often taking a chunk of the body wall with it (a "pull-out" fracture).
Geometry-Induced Defects
Poor mold design can also lead to specific glass distribution faults near handles.
-
Checks: Tiny hairline cracks that form immediately after molding because the handle cooled too fast relative to the body.
-
Suck-in: Where the thick handle cools, it shrinks inward, sometimes deforming the inner bore of the bottle neck, causing sealing issues with the cap.
Stress Generation Scenarios
Here is how different geometric choices exacerbate the problem.
| Geometry Feature | Thermal Impact | Risk Assessment |
|---|---|---|
| Solid Handle | Huge thermal mass difference. | Severe. Requires very slow annealing. |
| Hollow Handle | Balanced wall thickness. | Ideal. Very difficult/expensive to mold. |
| Short Attachment Area | Concentrates force on small point. | High. "Stress riser" effect. |
| Sharp Inner Corners | Focuses tension into a crack tip. | Critical. Will almost certainly fail. |
What handle design features reduce cracking risk?
You cannot change the physics of glass, but you can manipulate the geometry to distribute stress more evenly. The goal is to avoid "stress concentrators" at all costs.
To prevent cracking, designs must utilize generous fillets (rounded corners) at connection points to distribute load. Transitioning wall thickness gradually rather than abruptly, and positioning ribs to reinforce the attachment area, significantly dampens thermal shock.
The Power of Fillets and Radii
In engineering, a sharp corner is a stress magnifier. In glass handles, a 90-degree angle at the attachment point is a death sentence. We must use Fillets—curved transitions.
Instead of a sharp T-junction where the handle meets the body, we design a sweeping curve. This spreads the thermal expansion force over a larger surface area rather than focusing it on a single line. The larger the radius of this curve, the more durable the bottle.
Balancing the Mass
If we cannot make the handle hollow, we can try to reduce its mass.
-
Profile Shape: Instead of a round cylinder (maximum mass), use a flattened oval or "I-beam" cross-section. This maintains strength and ergonomics but reduces the volume of glass, allowing it to cool faster and stay closer to the body’s temperature.
-
Webbing: Some designs use a thin web of glass between the handle and the neck. This acts as a heat bridge, helping temperatures equalize between the two sections and adding structural support.
Smooth Transitions
Sudden changes in thickness are bad. If you have a 3mm body and a 15mm handle, the transition zone is critical. We often thicken the body wall slightly near the handle attachment to create a gradient: 3mm -> 5mm -> 8mm -> Handle. This "ramps up" the thickness so there isn’t a single cliff-edge where stress can accumulate.
Ribs and reinforcements
Sometimes we add external ribs or bumpers around the handle base. These act as physical reinforcements, adding bulk to the connection point so it is stronger than the forces trying to tear it apart.
Design Feature Checklist
Compare these features when reviewing your 3D CAD 3 drawings.
| Design Feature | Function | Thermal Benefit |
|---|---|---|
| Large Fillet Radius (>3mm) | Smooths out the connection angle. | Distributes stress; eliminates "notch sensitivity." |
| Oval Cross-Section | Flattens the handle shape. | Reduces thermal mass; faster cooling. |
| Tapered Attachment | Gradual thickening of the joint. | Reduces "shock" of thickness change. |
| Webbing / Bridge | Connects handle to neck continuously. | Adds structural rigidity; equalizes heat. |
| Grooved Handle | Removing material from the center. | Reduces mass; increases surface area for cooling. |
Does the glass type (soda-lime vs. borosilicate) change how safe a handled bottle is?
The material itself sets the baseline for thermal performance. Understanding the difference between "standard" glass and "lab" glass is crucial for managing expectations.
Yes, significantly. Borosilicate glass has a very low Coefficient of Thermal Expansion (CTE), making handled designs much safer and more forgiving. Soda-lime glass, which makes up 90% of commercial packaging, has a high CTE, meaning the design controls strictly discussed above are mandatory to prevent breakage.
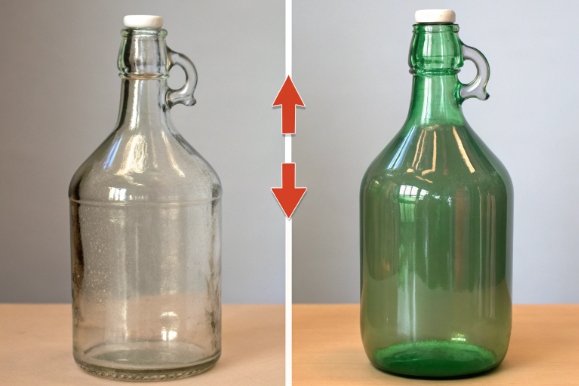
Soda-Lime Glass: The Industry Standard
At FuSenglass, most of our mass production is Type III Soda-Lime Glass 4. It is cost-effective, clear, and recyclable. However, it has a high CTE 5 (approx. 9.0 x 10⁻⁶ K⁻¹). This means it expands a lot when heated. Because it moves so much, the "fight" between the thick handle and thin body is violent.
- Implication: You must anneal it perfectly. You must design perfectly. You cannot hot-fill it above a 40-50°C temperature difference without risking shock, unless it is specially tempered.
Borosilicate Glass: The Premium Option
Borosilicate 6 (like Pyrex) has a low CTE (approx. 3.3 x 10⁻⁶ K⁻¹). It expands very little when heated.
-
Implication: You can get away with thicker handles and sharper angles. You can pour boiling water (100°C) into a room-temp borosilicate jug and it won’t break. The handle and body expand so little that the differential stress is negligible.
-
The Catch: It is expensive, harder to melt, and typically used for teapots, labware, or premium double-wall cups, not mass-market beverage packaging.
Which Should You Choose?
If you are selling a supermarket juice (single use), you will use Soda-Lime. You must rely on geometry and testing. If you are selling a premium reusable coffee carafe, you should pay for Borosilicate to ensure consumer safety during daily washing and boiling.
Material Comparison Table
A direct look at why the material dictates the design freedom.
| Feature | Soda-Lime Glass (Type III) | Borosilicate Glass (Type I) |
|---|---|---|
| CTE (Expansion Rate) | High (~9.0) | Low (~3.3) |
| Thermal Shock Resistance | Low (Delta T ~42°C) | High (Delta T ~120°C+) |
| Design Sensitivity | High. Needs large fillets, even walls. | Low. Forgiving of thickness variance. |
| Production Cost | Low. High speed molding. | High. Slower, hotter melting. |
| Typical Use | Beer, Juice, Sauce, Spirits. | Teaware, Labware, Bakeware. |
What validation tests should buyers require for handled bottles?
A 3D model is just a theory. A physical bottle is reality. You must stress-test the reality to ensure the handle stays attached under pressure.
Buyers must enforce a rigorous testing protocol including Polariscope inspection for residual stress, ASTM Thermal Shock testing to simulate filling, Drop Testing for impact strength, and Handle Load testing to ensure it can support the liquid’s weight.

1. Polariscope Inspection (Birefringence)
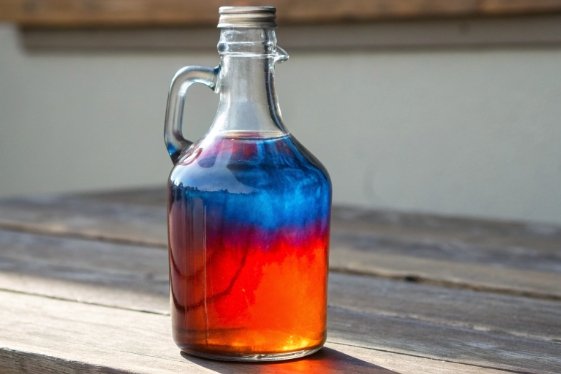
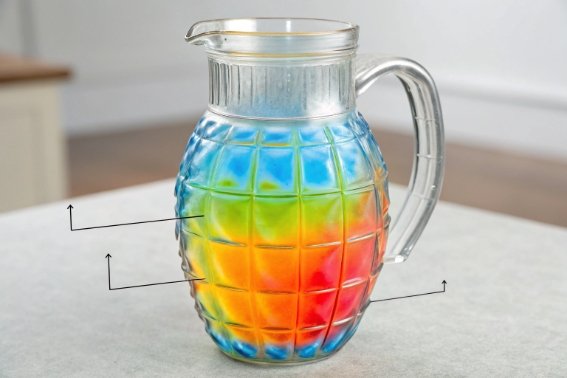
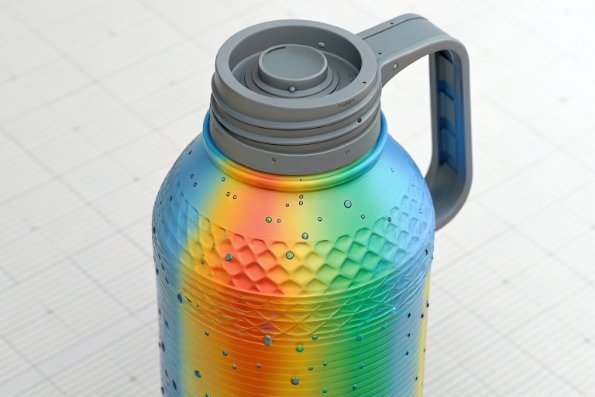
This is the most "scientific" test. We place the bottle between two polarized light filters. Glass under stress bends light differently.
-
What we see: Stress appears as colorful patterns (rainbows).
-
The Goal: A properly annealed bottle should show an even, muted color (usually grayish-purple).
-
The Failure: Bright bands of red, orange, or blue specifically around the handle attachment points indicate high residual tension. These bottles are rejected immediately.
2. ASTM C149 Thermal Shock Test
As discussed in previous articles, this is the gold standard. For handled ware, it is even more critical.
-
The Method: Heat the bottle to 60°C, then plunge it into 20°C water.
-
The Handle Factor: We watch closely to see if the handle snaps off. If the handle breaks but the body remains intact, it confirms that the handle geometry is the weak link, not the glass quality itself.
3. Static Load Test (The "Full Jug" Test)
A handle is for lifting. It must hold the weight of the contents plus a safety margin.
-
The Method: Fill the bottle with wet sand or lead shot to achieve 2x or 3x the normal fill weight. Hang the bottle by its handle for a set time (e.g., 1 hour).
-
Why: This tests the tensile strength of the upper attachment point purely under mechanical load, separate from thermal stress.
4. Impact / Pendulum Test
Handles stick out. They get knocked against other bottles on the conveyor and on the shelf.
-
The Method: A swinging pendulum hammer strikes the handle from the side.
-
The Goal: We measure how much energy (Joules) it takes to snap the handle. This helps us determine if the glass is too brittle or if the shape causes it to catch impacts too easily.
Recommended Testing Protocol
Include these in your Quality Assurance (QA) 7 agreement.
| Test Name | Purpose | Target / Passing Standard |
|---|---|---|
| Polariscope | Visualize internal stress. | ASTM C148 8. Grade < 4 (Commercial Annealing). |
| Thermal Shock | Simulate hot-fill/cooling. | ASTM C149 9. Survival at Delta T = 42°C. |
| Vertical Load | Test lifting strength. | Hold 2x product weight for 1 minute. |
| Impact Test | Simulates knocking/shipping. | No breakage at defined impact energy (e.g., 0.5J). |
| Sectioning | Check wall thickness. | Handle attachment points must not be <2mm thick. |
Conclusion
A handle transforms a bottle from a vessel into a tool, but it demands respect for thermodynamics. By prioritizing generous fillets, managing wall thickness, and validating with polarized light, we can ensure that form never compromises function.
Footnotes
-
A long, tunnel-like oven used in glass manufacturing to slowly cool and anneal glass containers. ↩
-
The critical cooling process that relieves internal stress in glass to prevent spontaneous breakage. ↩
-
Computer-aided design software used to create precise 3D models and simulations for manufacturing. ↩
-
The standard glass composition used for most beverage and food containers, known for its cost-effectiveness. ↩
-
A measure of how much a material expands when heated, critical for predicting thermal stress. ↩
-
A type of glass with very low thermal expansion, used for high-heat applications like labware. ↩
-
The systematic process of ensuring that products meet specified requirements and quality standards. ↩
-
Standard test method for analyzing stress in glass using a polariscope. ↩
-
Standard test method for thermal shock resistance of glass containers. ↩


