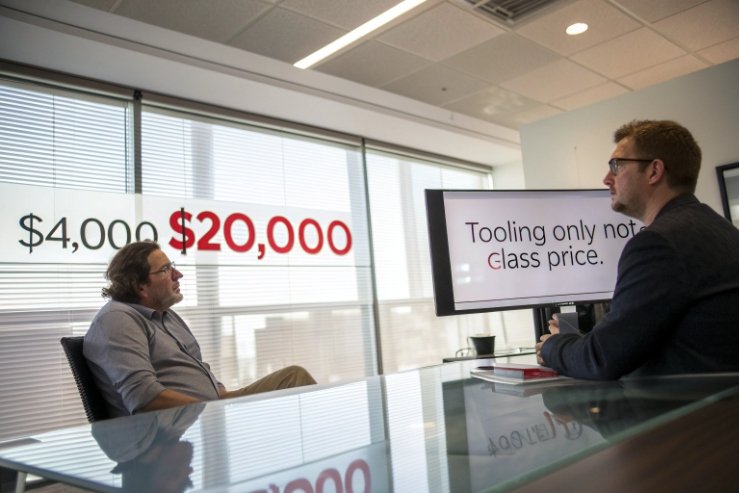
The first shock for many founders is not glass price, but the mold quote. It can feel abstract, high, and hard to justify to a finance team.
Most custom glass bottle molds sit somewhere between a low four-figure and a mid five-figure investment, depending on size, cavities, and complexity, and the real question is how fast you can earn that cost back across volume.

When we break the project into simple blocks—mold scope, line timing, volume plan, and options—it gets much easier to decide if full custom, semi-custom, or stock makes more sense right now. Many teams find it helpful to benchmark against custom glass bottle mold cost ranges 1 before building the internal ROI case.
Which factors (cavities, bottle size, finish complexity, texture) drive mold pricing?
Many brand teams only see a single mold quote number in an email and have no idea what actually drives it. That makes negotiation and planning almost impossible.
Mold cost mainly comes from bottle size, number of cavities, finish and embossing complexity, texture, and even glass type. Once you understand each lever, you can adjust the design to fit the budget.
The main drivers behind mold cost
When we walk customers through a new mold, we usually break it into four questions.
1. Bottle size and glass family
A small 30 ml vial does not use the same tooling as a 1 L spirits bottle.
- Larger bottles need bigger blocks of steel or cast iron.
- Heavy bases and extra-thick walls need more precise machining.
- Different glass families (soda-lime, borosilicate, crystal) also have different thermal and wear needs for the metal.
As a simple rule, the same level of design usually costs more in molds as the bottle gets larger and heavier.
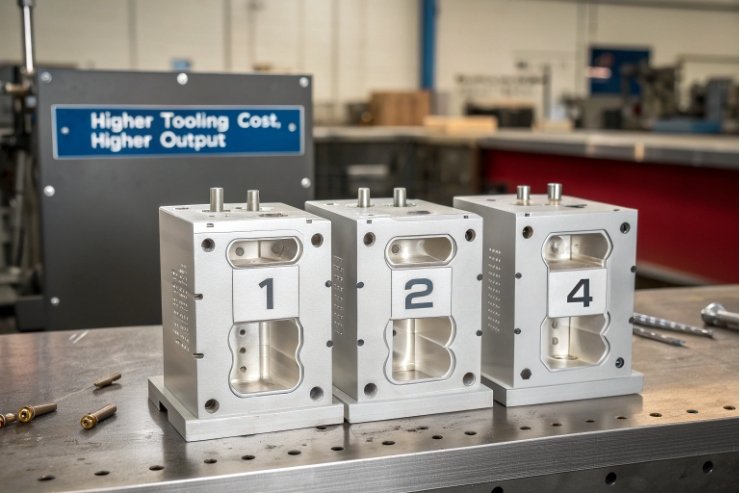
2. Number of cavities and production speed
A “cavity” is one bottle shape inside the mold. More cavities mean more bottles per cycle, but also more tooling to build.
If you want a concrete mental model, it helps to understand how Individual Section (IS) machine mould sets and parts 2 are combined to form containers at scale.
- Single-cavity: good for prototypes, low speed, or niche runs.
- Two to four cavities: common for mainstream bottles, balance of cost and speed.
- High-cavity systems: for large, stable SKUs that will run for many years.
The mold set for a four-cavity machine costs more than a single cavity, but the cost per bottle drops sharply once you spread it over hundreds of thousands of units.
3. Finish complexity, embossing, and shape
The neck and shoulder are where costs jump fastest.
- Non-standard finishes, deep cork tapers, or complex thread profiles need more precise machining.
- Embossed logos, multi-level patterns, or decorative panels add programming and polishing time.
- Strongly non-round bodies (triangles, arcs, organic shapes) also push cost up.
When teams are trying to control spend, we often start by keeping to standard bottle neck finishes and thread dimensions 3, then put most of the “personality” into body shape and embossing.
Sometimes we keep the neck to an industry-standard finish, then put most of the “personality” into body shape and embossing. That keeps closure options wide open and avoids special finish tooling.
4. Texture, patterns, and special inserts
Textures look simple in photos but they add work.
- Knurling, stipple, or micro-texture need extra engraving steps.
- Interchangeable inserts for limited editions (for example, different embossed years) add more parts.
- Anti-slip or anti-counterfeit features often use fine details that need higher-grade tooling.
You can control cost by using strong but limited “hero” areas of texture instead of covering the full surface.
Factor summary table
| Factor | Cost impact level | How to control it |
|---|---|---|
| Bottle size / weight | Medium–High | Avoid unnecessary wall thickness and base height |
| Number of cavities | Medium–High | Match cavities to realistic long-term volume |
| Finish and neck complexity | High | Use standard finishes where possible |
| Body shape (round vs fancy) | Medium | Mix simple geometry with one or two signature details |
| Embossing and debossing | Medium–High | Limit to key brand zones, simplify linework |
| Texture and patterns | Low–Medium | Use partial texture instead of full-body coverage |
| Glass type (e.g. borosilicate) | Medium–High | Only upgrade where performance really needs it |
Once you see mold design as a menu of cost levers, you can brief your designer very clearly: where you are willing to pay more, and where you prefer to keep things simple.
What’s the typical tooling lead time, and how long to first samples for approval?
Even when the price is clear, timing can still feel like a black box, which makes launch planning risky.
Most custom bottle projects run on a simple curve: a few weeks for design lock, about 3–6 weeks for mold manufacture, and another 2–4 weeks to produce, ship, and approve glass samples before full production.
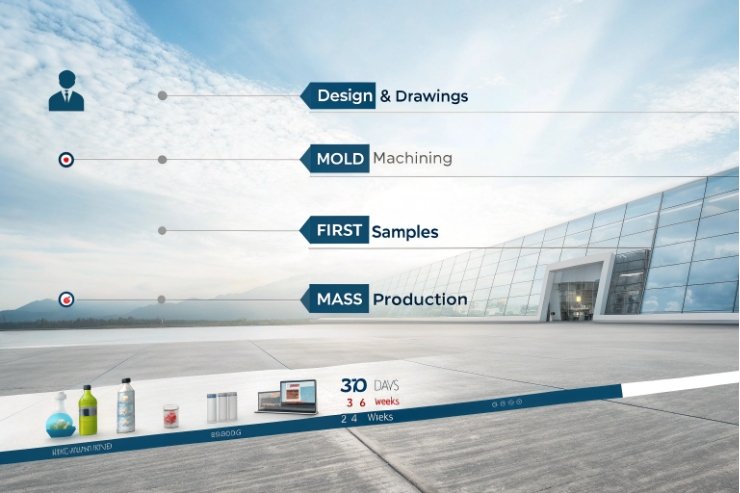
How the timeline usually breaks down
Dates shift by factory and season, but the steps are fairly standard.
1. Design and technical drawing
Once the 3D design is agreed, the glass plant prepares detailed bottle drawings and checks them against the production line.
- This step often takes 3–10 working days, depending on changes.
- It is the best moment to catch issues with height, base diameter, neck finish, and weight.
If drawings bounce back and forth for weeks, the whole project moves late, so tight feedback here saves calendar time later.
2. Mold machining and assembly
After drawing approval and deposit, the mold shop starts work.
- Simple shapes with standard finishes often need around 3–4 weeks.
- Larger or heavily decorated bottles can take 5–6 weeks or more.
- Multi-cavity sets add time because programming and polishing are more complex.
Good suppliers send interim photos or videos so your team can see progress instead of guessing.
3. First glass samples
When the mold is ready, the plant runs a trial.
A useful reference point is the common mold-to-sample timing for custom glass projects 4, because sample lead times are what usually drives your launch calendar.
- Trial runs usually produce several cartons of bottles.
- Samples go through basic quality checks, then ship to you for review.
- Transit time will depend on region, but many customers have samples in hand 1–2 weeks after production.
Most brands use this window to test closures, labels, filling lines, and sometimes consumer panels. If small changes are needed (for example, neck ring size, embossing sharpness), the mold can often be tuned in a week or two.
4. Full production slot
Once samples are signed off, the bottle moves into the main production schedule.
- For first orders, factories often need 2–4 weeks to finish the run.
- After that, repeat orders tend to be more flexible because tooling already exists.
A clean project, with fast approvals, can go from signed drawing to delivered mass production within about 8–12 weeks. Complex shapes, long approval cycles, or heavy seasonal loads can extend this, so we always suggest building a small buffer into your launch plan.
Should I amortize mold charges over MOQ and multi-SKU runs to lower unit cost?
Many teams see the mold as a painful one-time hit and forget that it becomes very cheap once spread across real volume.
You should always plan to amortize mold cost over your realistic bottle volume. Once you pass tens or hundreds of thousands of units, the mold cost per bottle often drops to just a few cents or less.
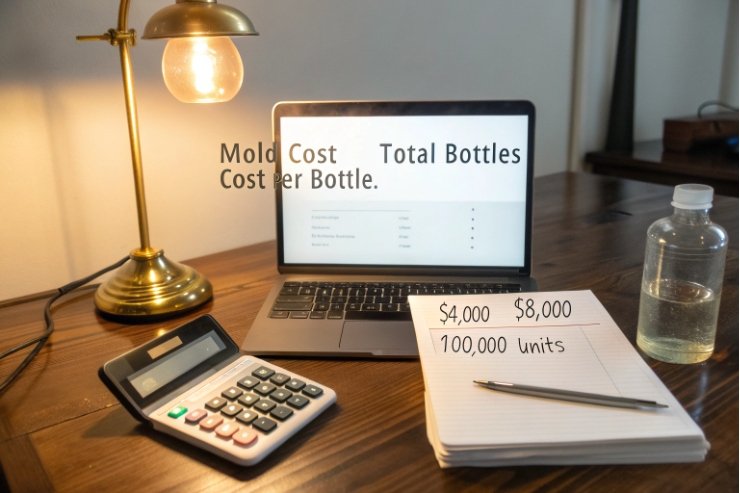
Turning an abstract mold quote into a per-bottle number
Treat the mold as a non-recurring engineering (NRE) cost 5, not an ongoing fee. The math is simple:
Mold cost ÷ Total bottles over its life = Mold cost per bottle
Some quick examples:
| Mold cost | Total bottles over life | Mold cost per bottle |
|---|---|---|
| $4,000 | 20,000 | $0.20 |
| $4,000 | 100,000 | $0.04 |
| $8,000 | 500,000 | $0.016 |
| $15,000 | 1,000,000 | $0.015 |
When your glass price is, for example, $0.40–$1.00 per bottle, the difference between adding $0.02 versus $0.20 from the mold is huge. This is why low-volume projects sometimes feel “expensive” and high-volume ones can carry very advanced custom glass.
Using MOQ and multi-SKU families to your advantage
Most factories have minimum order quantities (MOQs) 6, often 10,000 units or more per run. Instead of treating each SKU in isolation, you can:
- Plan a full family of sizes that share many design elements.
- Launch multiple SKUs together to hit higher total volume.
- Use the same bottle for several flavors or shades with different decoration.
This way, you spread the mold cost across all units, not only the first hero SKU.
For example, a spirits brand might design a 700 ml, 750 ml, and 1 L family. Each size has its own cavity set, but the neck and general silhouette are shared. Over several years, all three sizes contribute to paying back the overall tooling spend.
Thinking about mold life
A well-maintained mold can run many hundreds of thousands of bottles, sometimes into the millions, before it needs major repair or replacement. So when you estimate payback, think about:
- Launch year forecast.
- Reasonable growth path over 3–5 years.
- Potential for line extensions (RTD, limited editions, gift sets) that re-use the same glass.
Once the mold is paid back, every extra bottle benefits from lower “hidden” cost and from all the brand equity that unique shape has built.
Not every project is ready for a full private mold, and that is fine. You can still get strong differentiation without paying for everything from scratch.
Semi-custom strategies, like using stock bodies with custom necks, shared family molds, or modified existing tools, can cut tooling cost sharply while still giving real brand difference and line efficiency.

Semi-custom paths that work well in practice
There are a few approaches we use again and again for brands who want impact without full tooling spend.
1. Stock body + custom neck or finish
Many catalog bottles already have good shapes and proven performance on lines.
- We can keep the stock body and modify only the neck region.
- This allows special corks, droppers, or pumps without changing the whole cavity.
- The tooling work is smaller, so cost and lead time drop.
This path is popular for skincare or home fragrance where the closure and decoration carry much of the branding.
If you know you will need several sizes, we can design them together.
- The same design language repeats across all bottles.
- Neck finishes stay common, so closure SKUs stay low.
- In some cases, inserts or partial blocks can be reused or only slightly modified between sizes.
You still pay for more than one mold, but engineering time and risk fall because we solve many issues once and then repeat the logic.
3. Modifying existing private molds
If you already have a custom bottle and want a refresh, you may not need a new mold.
- Embossing can often be updated or sharpened.
- Shoulders can be softened or made more angular.
- Base details, like year marks or small symbols, can be changed.
These changes usually cost less and move faster than a full new cavity set, as long as we respect the core geometry and line compatibility.
Semi-custom vs fully custom vs stock
A simple comparison helps frame the choice.
| Option | Upfront mold cost | Design freedom | Time to market | Best for |
|---|---|---|---|---|
| Stock only | None | Low | Fastest | Tests, small runs, very tight budgets |
| Semi-custom | Low–Medium | Medium–High in key areas | Fast–Medium | Growth brands, first step into custom |
| Fully custom | Medium–High | Very high | Medium (needs tooling) | Long-term core SKUs with real volume |
If you want to move quickly while you validate demand, many packaging partners offer in-stock and semi-custom custom glass bottle programs 7 that bridge the gap before full private tooling.
In many cases, a brand will start with stock or semi-custom to prove the concept, then move into fully custom once volumes and positioning are clear. The key is to think ahead so early choices do not block future upgrades—for example, choosing neck finishes and rough heights that can migrate to a future private mold.
Conclusion
A custom glass mold is a one-time tool that, when planned around volume, timing, and smart semi-custom options, becomes a very small cost compared with the long-term value it creates.
Footnotes
-
A quick benchmark of real-world mold ranges, plus what pushes tooling toward the high end. ↩︎ ↩
-
Helps you understand what “cavities” imply in real forming equipment and why more tooling increases cost. ↩︎ ↩
-
Clarifies common neck/finish standards so you can avoid expensive custom threads unless they’re truly needed. ↩︎ ↩
-
Practical expectations for sample lead times, revisions, and how the trial-run stage affects schedules. ↩︎ ↩
-
Explains one-time vs recurring costs so finance teams can budget molds like tooling, not like unit COGS. ↩︎ ↩
-
Defines MOQ and why suppliers set it, helping you plan volume and spread tooling cost intelligently. ↩︎ ↩
-
Shows a real-world pathway for semi-custom and stocked options when full private molds aren’t ideal yet. ↩︎ ↩


