A bottle can look perfect at release. Then weeks of retail light makes the product fade or lose potency. That failure hurts brands and creates supplier disputes.
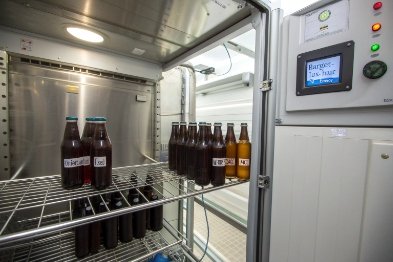
Light aging resistance is tested by exposing bottles and filled packs to controlled UV and visible light until a defined dose is reached, then measuring package and product changes with validated methods and clear acceptance limits.

Light-aging resistance testing: what to control before choosing a chamber?
Separate three problems before running any exposure
Light aging work becomes simple when three questions are separated:
1) Is the filled product light-sensitive? This is chemistry. It needs assay, degradants, color, odor, and performance checks.
2) Does the package block the risky wavelengths? This is optics. It needs UV-VIS spectra 1, coverage mapping, and defect checks.
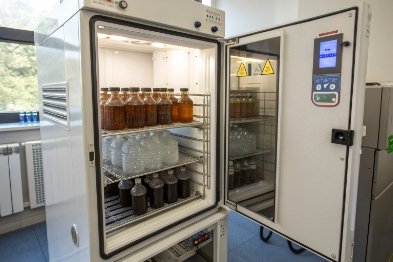
3) Is the test method reliable? This is metrology. It needs dose control, uniformity mapping, and repeatable fixtures within a photostability chamber 2.
Many teams jump straight to “xenon vs LED” and miss the real root cause. A weak label seam, a thin hot-end coating, or a loose shrink sleeve can create a local “light window.” That window can fail a sensitive fill even when average transmittance looks fine.
Define “pass/fail” using dose and acceptance limits
A good light-aging plan defines:
-
Target dose (lux·hours for visible and Wh/m² for UVA)
-
Wavelength bands that matter (often 320–400 nm for UVA, plus 400–450 nm for violet for some formulas)
-
Acceptance criteria for both package and product
For packaging, acceptance can include ΔE change, haze, coating adhesion, label fade, and pinhole growth. For filled products, acceptance is usually based on assay and degradants, plus appearance limits.
Control temperature so the test stays about light
Heat can speed reactions that are not photo-driven. This is why photostability tests often target room temperature conditions and use dark controls. If the sample warms up, the result becomes a mix of light aging and thermal aging. That creates arguments during audits and technical reviews.
| Control item | What to record | Why it prevents disputes |
|---|---|---|
| Light dose (VIS and UVA) | lux·h and Wh/m² | Makes tests comparable across labs |
| Spectrum and filters | lamp type, filter set, spectral range | Avoids “wrong wavelength” exposure |
| Uniformity map | min/avg/max across shelf | Stops location-driven failures |
| Sample orientation | distance, angle, rotation rules | Reduces geometry bias on bottles |
| Temperature | chamber air and sample surface | Avoids heat-driven false results |
| Dark control | wrapped control beside sample | Separates light vs heat effects |
A strong plan treats “bottle package photostability” as a system test. It includes glass, decoration, label, closure shadowing, and headspace effects.
If this foundation is in place, the standard-specific execution becomes much easier.
What defines photo-aging for bottles and filled products?
A project can fail because everyone uses a different definition of “photo-aging.” One side looks at label fade. Another side only looks at assay. Both sides feel correct.
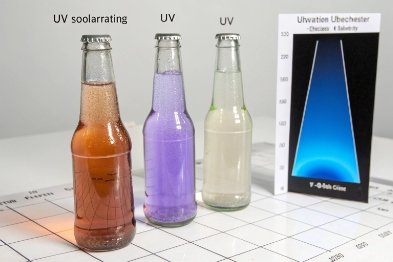
Photo-aging is any unacceptable change caused by light exposure. For bottles it includes color shift, coating/ink fading, haze, micro-cracking, and reflectance drift. For filled products it includes potency loss, degradants, off-odor, and visible changes like yellowing or clouding.
)
Bottle photo-aging is mostly optics plus surface durability
Glass itself is usually stable under normal retail light. The weak points are the things added on top:
-
Decorations: sprayed colors, hot stamping, metallization, frosts
-
Labels and sleeves: inks, adhesives, overlap seams, shrink stress
-
Coatings: scratch-resistant or internal functional layers
Photo-aging shows up as ΔE drift, gloss loss, haze increase, and reduced shelf appeal. A premium bottle can also change reflectance and look “cheap” after exposure, even when the fill is fine.
Filled product photo-aging is chemistry driven by wavelength
Most photo-reactions start in UVA and sometimes extend into violet-blue. Oxygen in headspace can accelerate reactions. Some fills also react faster at the glass interface. That is why “filled pack” testing matters. A clear bottle with a strong label might pass. The same clear bottle with a minimal label might fail.
A useful practice is to test in steps:
1) Product in a quartz or inert cell (worst case)
2) Product in clear bottle without label (worst case for packaging)
3) Product in final pack (real world)
This step approach prevents a common mistake: blaming the bottle when the photo-oxidation process 3 is inherently photolabile.
Include the label and closure in the “primary pack” mindset
In many regulated workflows, the immediate pack includes what is directly on the container, including an appropriate label. That pushes teams to incorporate ICH-style photostability work 4 to treat label coverage and print density as part of light protection, not only as marketing.
| Item being tested | Typical photo-aging signals | Practical measurement |
|---|---|---|
| Glass + decoration | ΔE drift, gloss loss, haze, micro-cracks | colorimeter, gloss meter, haze/UV-VIS |
| Label/sleeve | ink fade, whitening, seam lift, adhesive yellowing | ΔE, peel checks, visual grading |
| Closure shadowing | uneven exposure zones | bottle mapping and rotation plan |
| Filled product | assay loss, degradants, color/odor change | HPLC/GC + appearance limits |
| Pack system | “window” defects and local hot spots | dark-box inspection + UV-VIS map |
Why accelerated tests matter for regulatory submissions?
Teams sometimes see accelerated light exposure as “extra work.” Then a regulator or a major buyer asks for evidence, and the team scrambles.
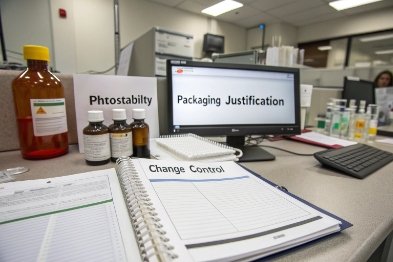
Accelerated photostability tests matter because they create standardized, repeatable evidence that the product and its packaging stay within justified limits under defined UV and visible light doses, which supports registrations, change control, and labeling decisions.
Regulators and major buyers want controlled proof, not opinions
For regulated products, photostability is not a marketing topic. It is part of risk control. A submission package often needs to show:
-
The product’s intrinsic photosensitivity
-
Whether the immediate pack provides protection
-
Whether marketing packs add needed shielding
-
Whether special labeling is required
Accelerated tests compress time by increasing control, not by guessing. The test uses defined dose targets and defined measurement methods. That makes the results defendable.
Accelerated testing supports packaging change control
The most common reason for re-testing is not a new formula. It is a packaging change:
-
Flint to extra flint, or flint to amber
-
New decoration supplier
-
New label material or higher transparency film
-
New closure color or different shoulder coverage
-
New shrink sleeve design with a larger window
A buyer can avoid disputes by linking these changes to a clear rule: any change that increases transmittance in the risk band triggers a photostability check.
How to run UV-VIS exposure per standards and report?
Many disputes start because the exposure was “close enough.” One lab reports lux only. Another reports Wh/m² only. A third lab uses a different spectrum. The results will not match.
A standard-compliant run controls spectrum, dose, temperature, and sample positioning. Reporting must include lamp type, filters, measured VIS and UVA dose, uniformity, sample orientation, dark controls, and the analytical results tied to justified acceptance limits.
Build the exposure plan around dose targets and spectrum
For many regulated workflows, two exposure targets are used:
-
Visible dose expressed as lux·hours
-
Near-UV dose expressed as Wh/m² over the specified UV band
Two practical exposure approaches are common:
-
Broad-spectrum exposure using a D65-like source such as xenon or metal halide with proper filtering
-
Two-lamp exposure using a cool white visible source and a near-UV fluorescent source (320–400 nm) with defined distribution
A key point is that “lux” depends on spectrum. Lux is weighted to human vision. If the spectrum changes, the same radiometric power can give a different lux value. This is why many teams rely on chamber sensors designed for the method, or validated actinometry 5, and they keep calibration records.
Report in a way procurement can enforce
A strong report includes:
-
Light source description (type, model, filters)
-
Dose control method (sensor type, actinometry, calibration date)
-
Exposure targets and achieved values (VIS and UVA)
-
Uniformity map and sample layout
-
Temperature and any humidity settings
-
Sample description (glass type, thickness, decoration stack, label construction)
-
Results (product assay/degradants, package ΔE/haze/gloss, defect counts)
-
Acceptance criteria and pass/fail statement with justification
Are LED arrays improving repeatability over xenon lamps?
Xenon systems are powerful, but they drift. Filters age. Lamps age. Warm-up and heat can change results. This is why many teams look at LEDs.
LED arrays can improve repeatability because they offer stable output, fast control, and easy uniformity tuning. Still, xenon remains strong for broad “sunlight-like” spectra, and many compliant setups still rely on fluorescent UVA or filtered xenon to meet required UV band shapes.
Where LEDs win in daily quality work
LED arrays can deliver:
-
Stable intensity over time with less lamp-to-lamp variation
-
Low warm-up time and easy on/off cycling
-
Lower heat load on samples
-
Narrow-band control, which helps root-cause studies
For packaging development, this is useful. If a team wants to know whether 365 nm drives discoloration more than 405 nm, LED arrays are ideal. This kind of wavelength targeting shortens troubleshooting.
Where xenon still leads
Xenon systems 6 are powerful, but they drift. Xenon with the right filters can approximate broad daylight across UV and visible. That matters when the goal is correlation to general sunlight exposure and when one chamber must represent a wide band without complex tuning.
Xenon systems also have a long history in weathering standards 7 used for labels, coatings, and non-metallic materials. That history matters during audits and in buyer–supplier alignment.
| Decision need | Best-fit light source | Why |
|---|---|---|
| Regulatory confirmatory dose compliance | validated ICH-style chamber setup | dose targets and spectrum are controlled |
| Packaging screening across many SKUs | LED-heavy or hybrid chambers | fast, stable, low maintenance |
| Full-spectrum weathering of labels/coatings | filtered xenon | broad spectrum and established practice |
| Wavelength root-cause study | multi-channel LED array | tunable bands isolate mechanisms |
| Lowest lab-to-lab disputes | any system with strong dose control + mapping | method discipline matters most |
LED arrays are improving repeatability. Still, the winning strategy is not chasing a lamp type. It is controlling dose, spectrum, uniformity, and reporting with discipline.
Conclusion
Light-aging resistance testing works when dose, spectrum, and reporting are standardized. Strong methods protect shelf life and remove buyer–supplier arguments before they start.
Footnotes
-
Technical explanation of how light absorption across the UV and visible range is measured. ↩ ↩
-
Overview of the equipment and environmental conditions used for standardized light stability testing. ↩ ↩
-
Insights into chemical reactions triggered by light that lead to product degradation. ↩ ↩
-
Official guidelines for assessing the light stability of pharmaceutical substances and finished products. ↩ ↩
-
Procedures for determining radiation intensity and calculating total absorbed light doses in experiments. ↩ ↩
-
Standard practices for operating light apparatus to simulate long-term sunlight exposure. ↩ ↩
-
Procedures for testing how materials withstand environmental factors like light and moisture. ↩ ↩


