Glass forming looks simple from the outside, but one bad gob, wrong temperature, or poor vent can turn a full shift into cullet and customer complaints.
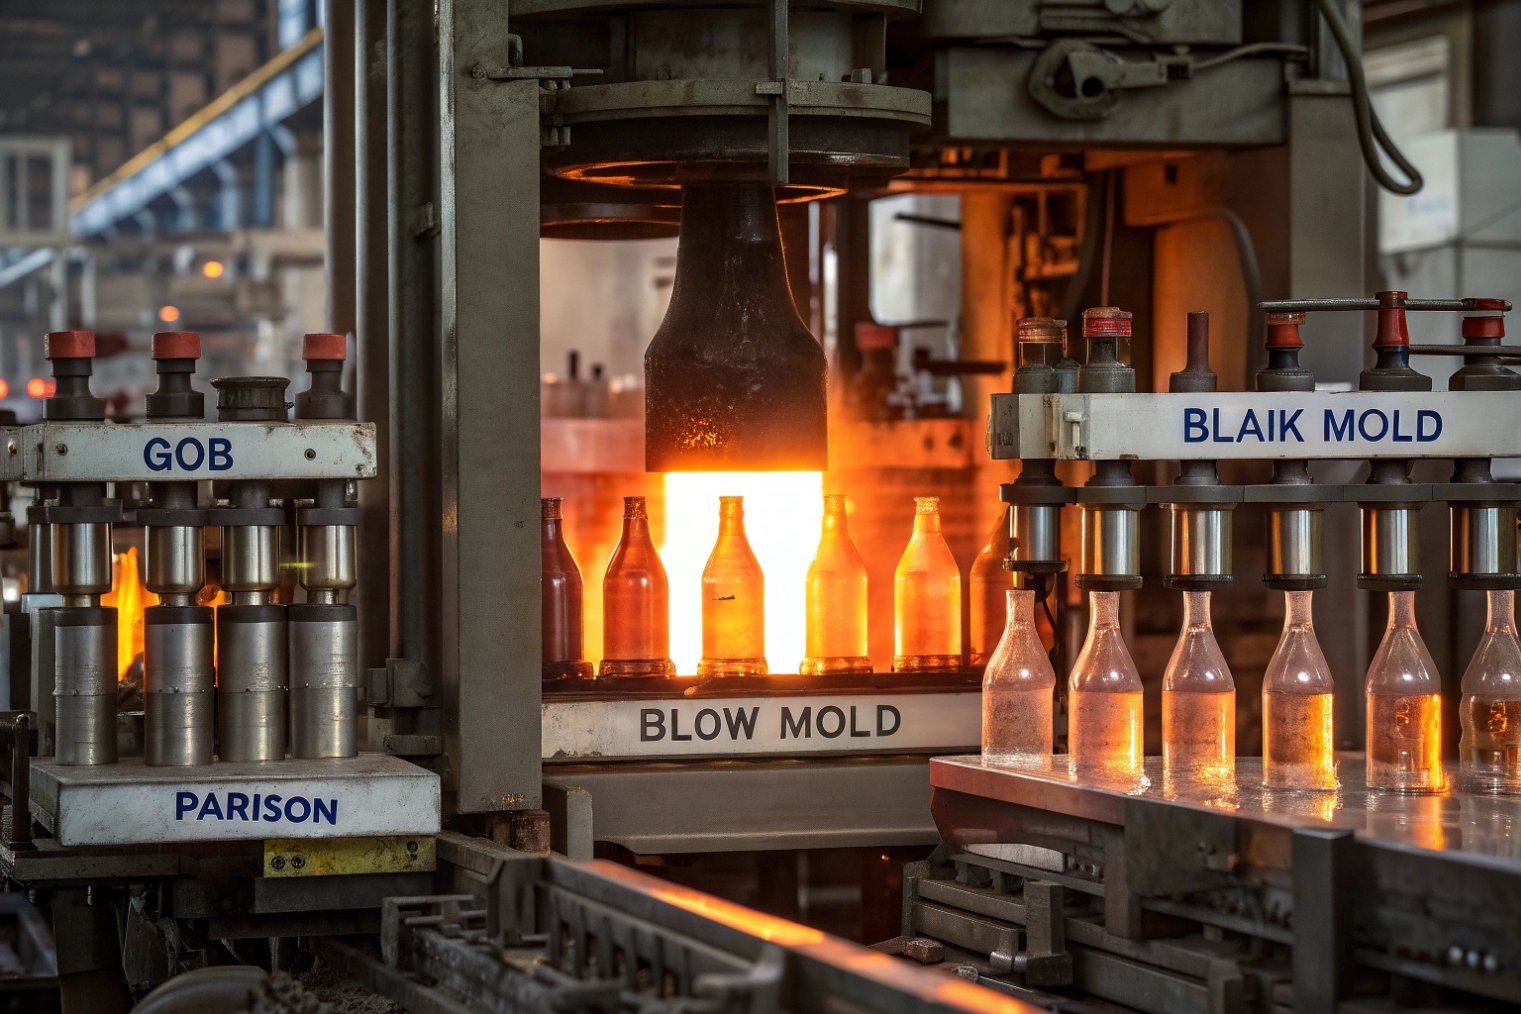
In blow molding, molten gobs drop into blank molds to form parisons, then move to blow molds for final shape; press-and-blow improves glass distribution, while temperature control, vents, and inline inspections stop defects.

Once we see the forming cycle step by step, blow-and-blow and press-and-blow stop feeling mysterious. They become tools we can tune to hit weight, strength, and cosmetic targets for each bottle or jar.
What are the stages from gob loading to parison and final blow?
If the team only watches the hot glass and not the forming sequence, they fix symptoms, not causes, and defects keep coming back.
The cycle starts when the gob enters the blank mold, continues with settle and counterblow or pressing to form a parison, then ends with transfer and final blow into the blow mold.
From gob loading to parison formation
In an Individual Section (IS) machine 1{#fnref2}, each section is a small factory. Gobs coming from the forehearth 2{#fnref1} are cut to weight and delivered to each blank mold. Gravity and timing are critical here. A gob that hits the blank mold off-center, too hot, or too cold will fight every later step.
For the blow-and-blow method 3{#fnref3}, the sequence in the blank mold looks like this:
| Stage | What happens in the mold | Main goal |
|---|---|---|
| Gob loading | Gob drops into blank mold and settles | Fill cavity without trapping air |
| Settle blow | Low-pressure air pushes glass into details and finish | Shape neck and start the cavity |
| Counterblow | Higher-pressure air forms the hollow parison | Control inside profile and thickness |
| Parison reheat | Short dwell while glass equalizes in the mold | Stabilize temperature before transfer |
During these stages, the neck ring defines the finish. The neck ring holds the parison by the finish when it later swings to the blow mold. That is why finish quality depends so much on blank-side setup and not only on the blow mold.
For the press-and-blow process 4{#fnref4}, the early step is different. A cooled plunger presses the gob in the blank mold to push glass into the walls and finish before any blow. This gives more control over wall distribution right from the start, especially in wide-mouth ware.
Transfer, final blow, and take-out
Once the parison is formed, the neck ring arm rotates it from the blank side to the blow side, usually through 180°. The parison now hangs upside down from the finish, inside the open blow mold halves.
A simplified view of the second half of the cycle:
| Stage | What happens | Main goal |
|---|---|---|
| Mold close | Blow mold closes around hanging parison | Seal for final blow |
| Final blow | Air expands parison against mold walls and base | Achieve final geometry and engravings |
| Cooling | Glass cools against mold and internal air | Freeze shape, stabilize dimensions |
| Mold open | Take-out tongs remove container to deadplate/conveyor | Transfer to annealing line |
Air pressure, timings, and mold temperatures all shape the final container. Too fast or too hard a final blow can thin the shoulder or stretch the heel. Too soft and the glass never reaches engravings or corners.
Once the container leaves the IS machine, it is still only half done. The annealing lehr 5{#fnref6}, coatings, and inspection systems must support whatever the forming cycle created. When gob loading, parison formation, and final blow stay stable, everything downstream becomes easier and more predictable.
When should you choose press-and-blow for wide-mouth jars?
Many wide-mouth jars start as “just use blow-and-blow.” Then heel cracks, base checks, and overweight complaints start, and everyone realizes the forming method matters.
Press-and-blow is the best choice for most wide-mouth jars because the plunger pushes glass into the walls and finish more evenly, enabling lighter weights and stronger heels than blow-and-blow.

Blow-and-blow vs press-and-blow in practice
Blow-and-blow works well for many narrow-neck bottles, but its control over wall distribution is limited. The gob stretches under air alone. In wide-mouth ware, this can leave thin shoulders and heavy bases, or the opposite, depending on timing.
Press-and-blow uses a plunger in the blank mold. The plunger pushes glass outwards before air enters. This gives more consistent body walls and better control of glass around the finish and shoulder.
| Aspect | Blow-and-blow | Press-and-blow / NNPB |
|---|---|---|
| First forming step | Air forms parison | Plunger presses gob |
| Wall-thickness control | Medium | High |
| Lightweighting ability | Limited | Strong (often 10–15% glass saved) |
| Best for | Narrow-neck, standard bottles | Wide-mouth jars, lightweight bottles |
| Finish definition | Air-dominated | Plunger assists finish and shoulder |
For narrow-neck press-and-blow (NNPB), the plunger also acts as a heat exchanger. It removes heat from inside the gob as it presses, which changes viscosity distribution and helps glass spread more evenly.
For wide-mouth jars in food, cosmetics, or premium beverages, there are clear signs that press-and-blow is the better choice:
- The design needs thinner, even walls to reduce weight without losing performance.
- The closure needs a very flat, precise land for sealing across many cavities.
- The jar shoulders must survive hot-fill, retort, or heavy stacking loads.
- Branding needs deep embossing around the body without over-thick sections.
In these cases, press-and-blow often delivers:
- More uniform wall thickness from shoulder to heel.
- Better heel impact strength, especially after lightweighting.
- Lower average glass weight per jar, which cuts both cost and CO₂.
- Lower risk of sink marks or panel deformation after hot-fill and cooling.
The trade-off is more complex plunger design and tighter temperature control. The plunger cooling circuit must keep temperature stable across sections, or wall distribution will drift. In return, the process gives a stable, tunable platform for high-quality wide-mouth jars.
For premium jars with complex shapes, press-and-blow lets the design stay elegant while still meeting strict mechanical and dimensional standards. That is why many brands quietly shift existing jar models from blow-and-blow to press-and-blow when they push into lighter or more demanding specs.
How do temperature profiles and mold vents prevent defects?
When defects appear, teams often change air pressures first. Many problems actually start with glass temperature and trapped air, not with pressure settings.
Stable temperature from gob to take-out and well-designed mold vents let glass flow and press uniformly, avoid trapped air and surface marks, and keep stress patterns under control.

Temperature profile through the forming cycle
Glass viscosity changes quickly with temperature. A gob only a little too hot or too cold behaves very differently in the mold. The whole cycle needs a controlled temperature profile:
- Gob temperature and shape out of the forehearth.
- Blank mold and plunger temperature.
- Blow mold temperature and internal air temperature.
- Take-out and deadplate conditions before the lehr.
A simple view:
| Location | Too hot | Too cold |
|---|---|---|
| Gob | Sagging, stuck in blank, heavy base | Poor cavity fill, seams, stress |
| Blank mold | Surface scuffing, wash lines | Non-fill of engravings, early chill wrinkles |
| Plunger | Sticking, wire-edge, bad finish | Poor pressing, uneven walls |
| Blow mold | Thin walls, stretch marks | Orange peel, heavy panels, checks |
Cooling air, water circuits, and sometimes mold coatings all work together to keep molds in a stable window. We watch mold temperatures with handheld infrared tools or built-in sensors and adjust cooling as we change speed or weight.
In NNPB, the plunger also acts as a heat sink. If one plunger runs colder than others, its section can build different wall thickness and stress. That is why we treat plunger temperature as a critical control, not a background detail.
How mold vents protect appearance and strength
Vents are small channels in the mold and neck ring that let air escape when glass flows in and when we blow the parison and final container. If air cannot get out, it becomes a defect:
- Blisters and bubbles trapped against the mold wall.
- Non-fill in fine engravings and corners.
- Surface blemishes where air pockets remained.
For press-and-blow, good venting is essential around the shoulder and at the base, because the plunger pushes glass quickly outward. Air must leave without leaving big vent marks or weak spots.
To troubleshoot repeat defects, teams often refer back to cause-and-remedy lists where mold venting 6{#fnref5} is explicitly linked to non-fill and surface faults. We design vent patterns to balance three needs:
| Area | Venting need | Risk if bad |
|---|---|---|
| Shoulder | High, glass flows upward fast | Blisters, thin shoulders |
| Base / heel | High, glass must fill corners | Heel checks, non-fill, heavy spots |
| Engravings | Fine local vents | Missing letters, weak logo edges |
Vent holes and slots collect dirt, oil, and cullet dust over time. So regular cleaning is essential. A mold with partly blocked vents often shows a slow rise in visual defects and wall-thickness variation that looks random until someone inspects the vents.
Good temperature control and clean vents give the glass a clear path. The glass flows smoothly, air escapes, and the parison and final container both look clean and behave the same from cavity to cavity.
Which inline inspections catch thin heels and uneven finishes?
Many forming problems show up as thin heels, weak shoulders, or out-of-spec finishes. If the line cannot see these in real time, they turn into market complaints and pallet rework.
Inline inspection combines cameras, gauges, and sampling tests to catch thin heels, light-weight sections, and uneven finishes, so the team can adjust gob, mold, and timing before defects reach customers.

Detecting thin heels and poor wall distribution
Heels see high stress from both impacts and internal pressure. A thin heel causes many broken bottles in pasteurizers, fillers, or crates. So we watch heel area closely.
Modern inspection systems use:
- Camera-based wall-thickness or sectional analysis.
- Infrared or X-ray thickness measurement at critical heights.
- Weigh scales by cavity to track glass usage.
When plants specify equipment, they often call out proven wall-thickness measurement sensors 7{#fnref7} designed for container inspection machines. A simple mapping between tool and defect:
| Inspection tool | Main target defects |
|---|---|
| Weight control by cavity | Overall light or heavy bottles |
| Thickness sensors | Thin heels, thin shoulders, heavy panels |
| Sidewall cameras | Birdswings, checks, blisters, lean |
| Base inspection cameras | Soft bottoms, heel checks, base blisters |
When a section starts to produce lighter bottles or thinner heels, alarms or trend charts show it. Operators can then adjust gob weight, gob loading, or mold cooling. For NNPB, they may adjust plunger stroke or temperature to correct local thickness.
We also use routine destructive tests. Heel impact tests or section cuts confirm what the inline systems predict. For premium or lightweight bottles, we often run these tests more often, especially during startup or after job changes.
Controlling finish quality and closure compatibility
Finishes and necks are critical for sealing and tamper evidence. Uneven or out-of-round finishes cause leaks, broken closures, and downstream line stops.
Inline, we use:
- Mechanical or laser finish gauges to check bore diameter, outer diameter, and thread or bead dimensions.
- Neck cameras to find chips, checks, and mold seam shifts.
- Verticality measurement to ensure the finish is straight over the base.
A basic finish control table:
| Check item | Why it matters |
|---|---|
| Bore diameter | Proper insertion of cork or stopper |
| Outer diameter / thread | Closure fit and torque |
| Sealing surface flatness | Tight seal, no leaks |
| Chipping / checks | Prevent closure damage and leaks |
| Verticality (lean) | Capping and labeling stability |
These tools link each defect back to a cavity. If one neck ring is worn or one mold set is misaligned, we can stop that section, change parts, and restart without shutting down the whole machine.
Good inline inspection does not replace forming know-how. It closes the loop. It tells us where thin heels and uneven finishes come from and lets the hot-end team correct the process quickly. That is how weight reduction, premium finishes, and low complaint rates can live together in the same project.
Conclusion
When we understand each blow-molding stage, choose the right process, control temperature and vents, and trust our inline inspections, glass packaging becomes stable, efficient, and ready for demanding brands.
Footnotes
-
Explains IS machines, gob cutting, and parison-to-blow-mold transfer in container forming. ↩ ↩
-
Defines the forehearth and why conditioning glass there stabilizes forming. ↩ ↩
-
Clear overview of blow-and-blow steps (blank mold, parison, final blow) for bottles and jars. ↩ ↩
-
Practical description of press-and-blow and how plungers improve wall distribution. ↩ ↩
-
Explains annealing/strain points and how lehrs reduce residual stress in glass articles. ↩ ↩
-
Troubleshooting guide linking defects to causes like poor venting, dirty molds, and air-trap problems. ↩ ↩
-
Shows thickness-sensing approaches used in inspection systems to catch thin heels and uneven walls. ↩ ↩


