Mold ruins jam in silence. One dirty rim, one rushed lid, and a “perfect” batch turns into waste that looks fine until the day you open it.
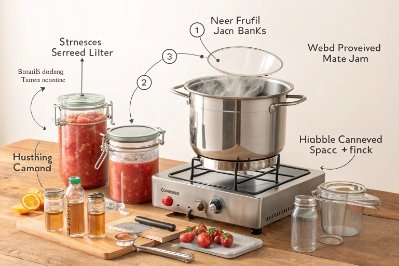
Safe jar sterilizing is simple: start with clean, chip-free jars, keep them hot until filling, use new lids, leave the right headspace, tighten to the correct feel, and process for a tested time so a real vacuum seal forms.

What “sterile” really means for jam jars
Clean is not the same as sterile
A jar can look spotless and still carry yeast, mold, or tiny residues that protect microbes. That is why the workflow has two layers. The first layer is cleaning. The second layer is heat. Heat matters because jam is sweet, and mold loves sugar when it gets oxygen.
The good news is that jam is high-acid. That makes it safer than low-acid foods, but it does not make it “no-risk.” A seal that fails often shows up as mold on the surface, a popped lid, or a dull smell after a few weeks. Most of those failures start before the jar even gets filled.
The “hot chain” prevents re-contamination
The safest habit is to keep jars hot from the moment they are heat-treated until the moment they are filled. That hot chain reduces thermal shock and also reduces the time that airborne dust can land inside the jar.
A simple rule works well in real kitchens:
- Hot jars receive hot jam.
- Warm lids meet a clean, dry rim.
- Full jars go straight into the canner.
That sequence feels strict, but it saves batches.
When pre-sterilizing is required, and when it is not
Many people sterilize every time because it feels safer. That is fine. Still, it helps to understand the logic. If the filled jars will be processed long enough in a boiling-water canner, that processing step can do the sterilizing work—so you mainly need clean jars and a validated process time (see the USDA Complete Guide to Home Canning 1).
If you want the simplest rule for home jam: follow guidance on when to pre-sterilize jars before canning 2, then keep jars hot until filling.
This is also where internet advice gets messy. Some posts recommend oven “sterilizing” as a shortcut. Some recommend flipping jars upside down. These methods can look successful once, then fail later—so stick to science-based guidance on equipment and methods not recommended 3. Jam deserves boring, proven steps.
| Step | Goal | What usually goes wrong | Best control |
|---|---|---|---|
| Wash and inspect | remove residue, reject chips | tiny rim chips, hairline cracks | bright light inspection |
| Heat jars | kill microbes, keep jars hot | cold jar + hot jam = crack | keep jars hot until fill |
| Prepare lids | protect sealing compound | overheating lids, old lids | use new lids, follow lid guidance |
| Fill and wipe | clean sealing land | sticky rim, sugar crystals | wipe with clean damp towel |
| Apply lid and tighten | allow air to vent, then seal | overtighten, crooked lid | correct tightness, straight placement |
| Process in canner | form vacuum seal, destroy microbes | short time, wrong temp | tested time, steady boil |
| Cool and check | confirm seal before storage | moving jars, retightening bands | hands off, check at 12–24 hours |
A safe jam jar is not only about one sterilizing method. It is the full chain from sink to shelf.
If this chain is clear, the next choices become easy. The first choice is the heat method used for jars.
Which sterilizing methods—boiling, oven-warm, or steam—should you use?
A fast method feels tempting when jam is bubbling and the kitchen is hot. Still, speed is not the same as safety.
Boiling-water sterilizing is the most reliable choice, oven-warm can help keep clean jars hot but is not a replacement for validated water/steam methods, and steam can work when used with a tested process and proper equipment control.
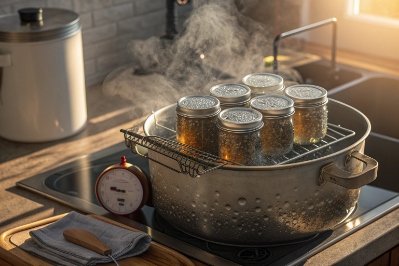
Boiling-water method: the most dependable baseline
Boiling-water sterilizing is simple and predictable. Jars sit upright and get fully surrounded by heat. Heat reaches the whole inner surface, the rim, and the threads. It is also easy to scale. A large pot, a rack, and a steady boil do the job—especially when you follow setup best practices for recommended boiling-water canners 4.
A practical approach looks like this:
- Put clean jars on a rack.
- Cover with water so the water sits above the jar tops.
- Boil for the recommended time for your elevation.
- Keep jars in hot water until filling.
This method also reduces breakage because the jar is already hot when jam goes in.
Oven-warm: useful for warming, risky as “sterilizing”
Oven-warm is popular in some home kitchens because it is simple and feels tidy. The problem is that dry heat is not always even across glass surfaces, and jar makers do not design canning jars for dry, fluctuating heat. That can increase thermal shock risk. It can also leave uncertainty about true sterilization on all surfaces.
A safer way to use the oven is narrow:
- Use it to keep clean jars warm right before filling.
- Do not treat it as the only sterilization step if your process requires sterile jars.
This keeps the workflow simple while avoiding false confidence.
Steam: a valid tool when the method is tested and controlled
Steam can be effective because steam transfers heat well. Still, steam methods depend on good equipment and good timing. The steam must be consistent. The timing must start when the correct steam column is established. The jar placement must be stable.
In practice, steam becomes a good choice when:
- the recipe or local extension guidance supports it,
- the canner is designed for steam canning,
- the operator can hold steady steam for the full time.
If you’re using steam, use research-based limits for atmospheric steam canners 5 rather than guessing.
| Method | Best use case | Strength | Main risk |
|---|---|---|---|
| Boiling-water | all jam workflows | most validated, even heat | needs more water and heat-up time |
| Oven-warm | warming clean jars before filling | easy staging | uneven dry heat, breakage risk |
| Steam canner | tested steam process | faster heat-up, less water | timing and equipment sensitivity |
This choice matters, but the seal still depends on fill level and lid application. That is where many good jars fail.
How much headspace and what torque create a strong vacuum seal?
People think a seal is only about the lid. A seal is also about air space, temperature, and how the lid vents during processing.
Too little headspace can force jam out under the lid. Too much headspace can leave excess air and weaken the vacuum. Overtightening can trap air and reduce venting. Undertightening can allow leaks during processing. These are small errors, but they are repeatable errors, which makes them expensive.
For most jams and jellies, a small headspace is used, and the lid is tightened just enough to hold position while still letting air escape during processing. Two-piece canning lids use a “fingertip-tight” feel, while commercial lug closures follow a supplier torque spec.
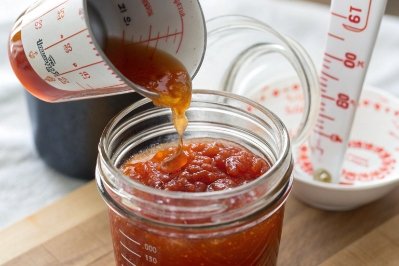
Headspace: the simplest control with the biggest impact
Headspace is the empty space between the jam surface and the underside of the lid. Jam usually needs a small headspace because it does not expand like low-acid vegetables, but it still moves when it boils in the jar.
A reliable habit is to follow jam and jelly processing guidance 6 and measure headspace with a tool, not a guess. Many jars fail because jam touches the rim, then leaves sugar on the sealing land. That sugar blocks the liner from sealing cleanly.
Torque: two-piece lids are “feel,” not “force”
Home canning lids are designed to vent during processing. That venting is part of how a vacuum forms. If the band is too tight, air has trouble escaping. If it is too loose, liquid can leak out and soil the rim.
“Fingertip-tight” works because it creates consistent compression without forcing the lid to behave like a threaded cap. It is a light but firm stop, using fingertips, not a full grip. If you’re new to canning, follow brand guidance for two-piece canning lid instructions 7 to avoid over-tightening and lid damage.
Many retail jam jars use lug caps with a center button. These systems can require real torque control because the vacuum button depends on liner compression and proper thread engagement. In that world, the torque range comes from the cap supplier and the finish size. A torque meter and removal-torque checks keep the line stable.
This is also where short runs go wrong. A brand uses a beautiful jar but uses a random cap. Then the button does not drop. The jar looks unsafe even if the jam is fine. The fix is always the same: match finish specs, liner, and torque.
| Lid system | Tightening method | What “correct” looks like | Common mistake |
|---|---|---|---|
| Two-piece canning lid | fingertip-tight band | lid seals after cool, band can be removed | overtightening band |
| One-piece lug cap | measured torque by spec | button drops and stays down | using the wrong lug finish |
| Twist-off cap (non-canning) | not recommended for home canning | inconsistent | reusing commercial lids |
A small headspace and the correct tightening method make the seal possible. Processing then makes the seal real. The last step is to confirm the seal and protect it during cooling and storage.
A jar can seal and still fail later if the cooling step is rushed or if storage conditions invite moisture and dust. Most contamination after processing comes from one of two causes: a seal that never formed, or a seal that formed and then broke.
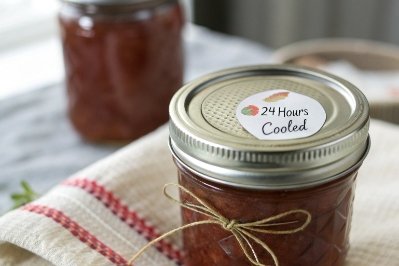
A successful seal shows clear signs: the lid is concave or the button stays down, the lid does not flex when pressed, and the jar can pass a simple lift or twist test after cooling. Cooling should be undisturbed for 12–24 hours, and storage should be cool, dry, and dark with rings removed when using two-piece lids.
Seal confirmation: use more than one signal
Many people trust the “pop” sound. That sound is useful, but it is not enough on its own. A better approach uses two checks:
- a visual check (button down or lid pulled inward),
- a physical check (no flex, strong hold).
For two-piece lids, pressing the center is a quick test. If the lid moves up and down, the jar is unsealed. For lug caps, the button is a fast indicator, but it still helps to check for leakage and proper button position after full cooling.
Cooling: the quiet step that protects the seal
Hot jars are vulnerable. The sealing compound is still settling. The vacuum is still stabilizing. Movement can break that early seal. Retightening bands can also create problems because it can trap moisture and can stress the lid interface.
The safest cooling looks boring:
- Set jars upright on a towel or rack.
- Leave space between jars for airflow.
- Do not tilt, invert, or stack.
- Do not retighten.
- Wait until fully cool before testing.
A personal lesson still sticks here. One season, a batch looked perfect at midnight. The jars were moved to “make space.” A few lids later failed, and mold appeared weeks later. The jam was fine. The cooling step was the mistake.
Storage: keep the vacuum protected
After jars cool and seals are confirmed, storage becomes simple:
- Store in a cool, dry, dark place.
- Keep jars clean and dry on the outside.
- Label and date.
- For two-piece lids, remove the ring band for storage so a failed seal is easier to detect.
If any jar fails to seal, it should not go to pantry storage. It should go to the fridge and be used soon, or it should be reprocessed using a tested method with a new lid.
| Stage | What to do | Why it prevents contamination | What to avoid |
|---|---|---|---|
| Right after canner | place upright, do not touch lids | protects soft seals | tightening bands |
| First 12–24 hours | leave undisturbed | seal finishes forming | moving or stacking jars |
| Seal check | press, lift, inspect | confirms vacuum | trusting only a “pop” sound |
| Pantry storage | cool, dry, dark, labeled | slows quality loss | warm windowsills |
| Failed seal | refrigerate or reprocess | avoids mold risk | storing unsealed jars |
When the seal is real and storage is stable, jam becomes the product it should be: shelf-stable, clean, and safe.
Conclusion
Safe jam jars come from clean glass, hot handling, correct headspace, proper tightening, full processing, and quiet cooling. The seal signs are clear when the method is consistent.
Footnotes
-
Authoritative, science-tested home-canning times and procedures used by extensions nationwide. ↩︎ ↩
-
Explains when jar sterilizing is needed based on processing time and altitude. ↩︎ ↩
-
Lists unsafe shortcuts (oven, dishwasher, open-kettle) and why they’re unreliable. ↩︎ ↩
-
Helps choose the right canner setup and includes safe boiling-water canning practices. ↩︎ ↩
-
Research-based rules and limits for safe use of atmospheric steam canners. ↩︎ ↩
-
Jam-specific headspace and processing basics for reliable seals and shelf stability. ↩︎ ↩
-
Practical guidance on warming lids and tightening “fingertip-tight” for two-piece canning systems. ↩︎ ↩


