A premium spirit can taste perfect, yet a bad bottle can cause leaks, scuffs, and returns. One weak finish or hidden crack can destroy brand trust fast.
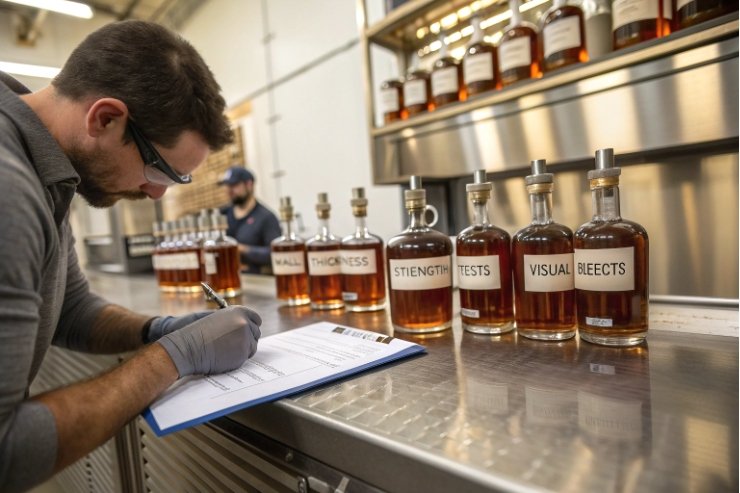
I judge a spirits bottle by four things: closure fit (finish geometry), strength signals (weight and thickness uniformity), proof tests (drop/pressure/thermal), and a strict “no-go” defect list for premium shelf impact.

A bottle is not only a container. It is a mechanical part for the filling line, a sealing system for shelf life, and a marketing asset on a bar shelf. The best evaluation is simple and repeatable, so purchasing, QA, and production teams all agree.
Which finish and neck dimensions ensure T-top fit?
Leaks with T-tops feel “mysterious.” The cork looks fine, the cap looks fine, and the bottle still weeps after shipping. That usually starts with the finish.
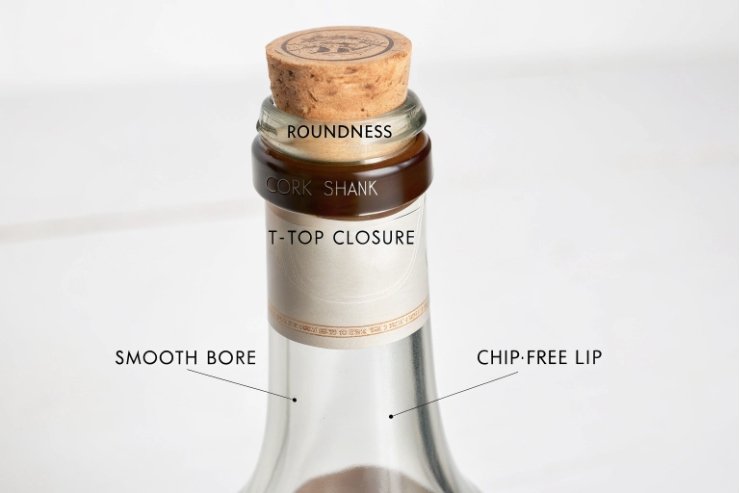
For T-top (bar-top) closures, sealing depends on a round, chip-free bore and a consistent internal diameter that matches the cork shank, plus low ovality, correct chamfer, and controlled insertion depth so friction and compression stay even.
What “good fit” means for T-tops
T-top (bar-top) closures are a type of bottle stopper 1. Sealing is mostly a friction seal. The cork (natural, agglomerated, or synthetic) compresses against the inside of the neck. That is why the bottle’s bore ID and its roundness matter more than the outside look of the neck.
Key fit conditions:
- The bore must be round, not oval.
- The lip and bore must be free of chips and sharp edges.
- The inner wall must be smooth enough that the cork slides in evenly, but not so slick that it loses grip.
- The finish must allow a stable insertion depth, so every unit seats the same.
The dimensions that matter most
For spirits programs, I focus on these measurements first:
- Bore ID (internal diameter): the main control for cork compression.
- Bore roundness/ovality: the hidden cause of one-side leaks.
- Top lip/chamfer: protects the cork during insertion and prevents shaving.
- Finish verticality: keeps the cork seated straight, not tilted.
- Neck wall thickness at the finish: prevents cracking or chipping during corking.
Here is a practical control table teams can share:
| Finish check | Why it matters for T-tops | How to measure fast | What failure looks like |
|---|---|---|---|
| Bore ID | Sets cork compression | Plug gauges + calipers | seepage, slow weep, easy pull-out |
| Ovality | Prevents uneven contact | multi-angle ID checks | leak on one side, crooked seating |
| Lip chips | Avoids leak paths | 360° visual + touch | immediate leaks, cork damage |
| Chamfer quality | Prevents cork shaving | visual + insertion trial | cork dust, poor reseal |
| Finish verticality | Ensures straight seating | gauge + visual alignment | cork sits tilted, uneven gap |
The “1 mm rule” and why it works
In many common bar-top cork closures 2, the cork shank is selected slightly larger than the bottle bore so it compresses and seals. The exact number depends on cork material and hardness, but a simple rule keeps early sampling sane: pick a shank about ~1 mm larger than the bore, then validate with insertion force and leak testing.
This is also why you should never approve a T-top program on drawings alone. The only real approval is:
- production bottles from real cavities,
- real cork lots (not a showroom sample),
- and repeated insertion/removal cycles.
Practical acceptance tests for T-top fit
A good sampling routine includes:
- insertion force check (consistent feel across bottles)
- inversion leak hold (upright + inverted)
- vibration exposure (carton/pallet simulation)
- re-open and re-seal cycles (consumer behavior)
If the bottle only seals when it is “perfectly upright,” it is not ready for export.
What glass weight and wall uniformity indicate strength?
A heavy bottle can still be weak. A light bottle can still be strong. Strength is not only about grams. It is about where the glass is placed.
I treat weight as a signal, not proof. Real strength shows up when wall thickness is uniform in high-stress zones (heel, shoulder, and finish), the base is stable, and thin spots are controlled across mold cavities and shifts.

Many premium spirits choose heavier glass for shelf presence. That is a branding choice and it can also add impact margin. But weight alone can hide problems:
- a thick base with a thin shoulder can still crack under impact,
- a thick body with a weak finish can still chip and leak,
- a heavy bottle with poor annealing can still fail without warning.
So I use weight as a quick screen:
- Is the weight consistent lot-to-lot?
- Does weight drift by cavity?
- Does the bottle “feel” balanced, or base-heavy in a way that suggests uneven distribution?
Uniformity: where to look first
Thickness should be checked in zones where stress concentrates:
- Finish/neck: corking force and handling.
- Shoulder transition: pressure and drop impacts.
- Sidewall mid-body: top-load and handling knocks.
- Heel/base ring: the most common chip and crack origin.
- Punt/base center: stability and stress patterns.
A simple approach that works in production is to define target thickness bands by zone, then track drift by cavity. If one cavity trends thin at the heel, it will become the claim generator.
What “good distribution” looks like in practice
Good bottles usually show:
- no “knife-thin” areas when backlit
- stable heel radius and base ring
- no sudden thickness steps at shoulder or heel
- consistent finish wall thickness (no weak quadrant)
This is also why forming method and setup matter. When glass distribution is controlled, the same weight gives higher performance.
Quick checks that catch 80% of strength problems
- Weight check: per cavity sampling, trend charts.
- Thickness mapping: spot checks with ultrasonic thickness measurement 3 tools at launch.
- Base stability: wobble check on a flat plate.
- Polarized stress view: a photoelasticity 4-style check to spot risky residual stress patterns.
| Indicator | Good sign | Bad sign | What it usually means |
|---|---|---|---|
| Weight consistency | low variation by cavity | drift by cavity or shift | feeder/timing, gob issues |
| Heel thickness | robust and even | thin quadrant | mold wear, distribution issue |
| Shoulder thickness | smooth transition | thin “ring” zone | parison problems, overheating |
| Finish strength | chip-free, uniform | micro-chips, sharp lip | handling, mold, poor chamfer |
| Wobble | stable base | rocking base | base ring distortion, cooling issues |
For premium spirits, the goal is not “maximum thickness.” The goal is controlled thickness where it matters, and repeatability across production.
Do drop, burst, and thermal tests validate logistics?
A bottle that survives the factory floor can still fail in the real world. Export routes add vibration, drops, and temperature swings. The tests must copy those stresses.
Yes. Drop/impact, internal pressure or vacuum checks, and thermal-shock cycling are the fastest way to confirm bottles and packaging will survive filling and distribution—if test conditions match the real route and secondary pack.

Drop and impact: prove the “worst moments”
Most breakage happens during:
- case packing and depalletizing
- warehouse handling
- corner impacts on the heel or finish
- last-mile shocks
So I like impact tests that target the weak zones:
- finish/neck impact (chips lead to leaks)
- heel/base ring impact (chips lead to cracks)
- sidewall knocks (less common, but real)
The drop setup should match the actual pack. A strong bottle can still break if the divider collapses and bottles hit each other.
Pressure and vacuum: even for still spirits
Most spirits are not carbonated, but internal pressure testing can still matter for:
- nitrogen dosing
- temperature expansion in hot containers
- closure performance under altitude changes
- vacuum effects in hot-fill or cooling cycles (for some products)
Even if you do not run a full burst program, a basic internal pressure and vacuum integrity check can reveal weak distribution or hidden cracks.
Thermal shock: not only for hot-fill
Thermal shock can show up when:
- bottles move from cold storage to warm filling rooms
- product is filled warm, then rapidly cooled
- pallets sit in sun, then go into cold warehouses
A practical thermal test is a controlled hot-to-cold or cold-to-hot cycle that matches your route reality. The goal is not to chase extreme numbers. The goal is to avoid surprise cracks at the base and shoulder.
A simple validation plan that teams can execute
For distribution simulation, align your pack tests to ISTA test procedures 5 so drop/vibration/stacking conditions reflect real handling.
| Risk | Bottle test | Packaging test | Pass criteria idea |
|---|---|---|---|
| Handling drops | targeted impact + drop | packed drop (case + pallet) | no breakage, no finish chips |
| Vibration | post-vibration leak check | vibration + tilt stability | no leaks, no rub-through |
| Pressure/vacuum | pressure hold / vacuum hold | after vibration + aging | stable seal, no seepage |
| Temperature swings | thermal cycling | thermal + carton integrity | no cracks, no closure loosen |
When a brand says “premium,” it should also mean “stable.” Tests are the proof, not the marketing line.
Premium spirits live on shelves, bars, and cameras. A small visual defect that might be tolerated for commodity packaging becomes a brand problem in premium.
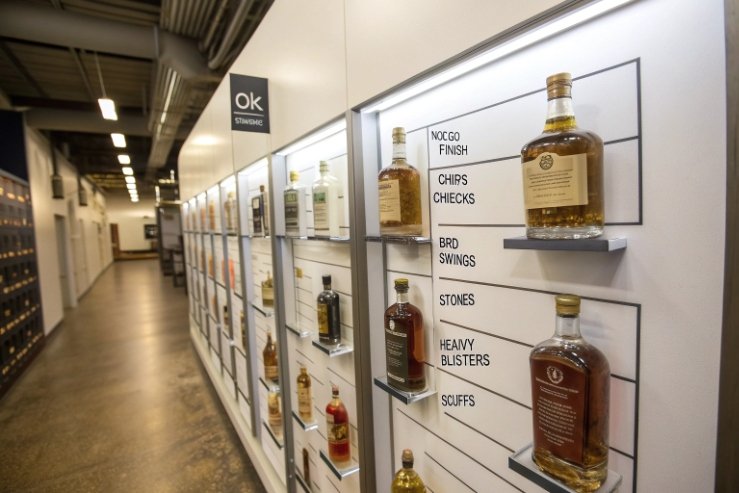
No-go defects for premium spirits include any crack, check, sharp seam, finish chip, stones/inclusions in key viewing zones, bird swings, heavy blisters, and any deformation that risks sealing or label presentation.
Start with “critical vs cosmetic” thinking
Premium programs should treat some “visual” defects as functional risks because they reduce strength. A blister might look cosmetic, but it can be a thin wall. A scuff might look minor, but it can start a crack during shipment.
I like a three-level rule set:
- Critical (reject always): safety, leakage, or structural failure risk.
- Major (tight limit): brand-impacting, line-impacting, or strength-reducing.
- Minor (managed by an acceptable quality limit (AQL) 6 plan and brand standard): small, non-structural, low-visibility issues.
Critical (zero tolerance)
- cracks, checks, and any sharp edges
- finish chips on the sealing land or bore
- glass slivers inside the bottle
- severe out-of-round finish that risks sealing
- broken or bent finish
Major (very low tolerance)
- bird swings (thin glass strings inside)
- stones/inclusions in label panel or front viewing area
- heavy blisters, especially near heel or shoulder
- severe scuffs on primary display faces
- heavy seam mismatch or offset that looks “cheap”
Minor (controlled)
- light haze variations in non-display areas
- tiny seeds far from stress zones
- small mold marks outside the label panel
The inspection routine that prevents arguments
Premium spirits should not rely on “someone looked at it.” A good routine includes:
- 360° finish inspection (chips, ovality signs, sealing land)
- sidewall and base visual under strong light
- internal inspection for strings and stones
- cavity traceability marks reviewed when defects spike
| Defect type | Risk | Premium decision | Why the rule is strict |
|---|---|---|---|
| Finish chip / nick | leak + brand | reject | seal failure is expensive |
| Check / crack | safety | reject | can fail later without warning |
| Bird swing | appearance + strength | reject/very tight | obvious in spirits clarity |
| Stone/inclusion | stress + optics | reject in display zones | looks like contamination |
| Blister (large) | thin wall | reject/major | reduces strength |
| Heavy scuff | brand | major | shows instantly on shelf |
| Mild seam line | minor | controlled | depends on design intent |
Premium is about confidence. If the bottle looks risky, customers assume the spirit is risky too.
Conclusion
A great spirits bottle wins on fit, uniform strength, proven logistics tests, and a strict no-go defect standard. If any one fails, the whole pack feels less premium.
Footnotes
-
See how bar-top corks are sized and why tight fit prevents leaks. ↩ ↩
-
Learn how ultrasound measures wall thickness without cutting bottles. ↩ ↩
-
See how photoelastic methods reveal residual stress patterns in glass. ↩ ↩
-
Explore ISTA methods used to simulate distribution shock and vibration. ↩ ↩
-
Learn how AQL sampling supports consistent accept/reject decisions between buyer and supplier. ↩ ↩


