A custom bottle can turn into a delayed launch fast. One wrong finish spec, one décor that scuffs, or one mold detail that traps air, and the line starts rejecting bottles.
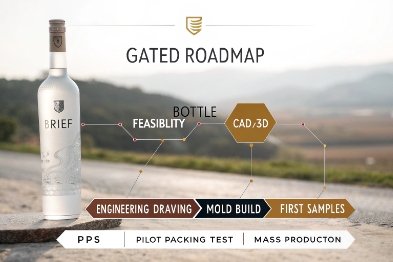
A low-risk custom bottle launch follows a clear path: brief → CAD/3D → prototype checks → mold build → PPS sign-off → production validation. Finish specs lock closure compatibility early, while décor and anti-counterfeit features must match your filling, distribution, and brand tier.

What “custom” really means in glass
Customizing a wine or spirits bottle is not one decision. It is a stack of decisions that must work together:
- Primary pack: shape, capacity, weight, glass color, punt, thickness, shoulder and heel.
- Finish system: the neck finish that makes closures fit and seal.
- Décor: anything added on top of the glass (printing, coating, frosting, foil, labels).
- Anti-counterfeit: features that prevent copying or make copying expensive.
- Line fit: how the bottle behaves on conveyors, rinser, filler, corker/capper, and packer.
- Supply plan: MOQ, tooling, lead time, and change control.
A bottle looks simple on a shelf, but the de-risk work happens before the mold is cut. That is why the process matters more than the “cool idea.”
Below is the workflow that reduces surprises, plus the spec choices that protect compatibility and brand intent.
The de-risk ladder: do the cheapest tests first
Glass customization fails when teams jump straight to “make the mold” without locking the finish, the line needs, and the décor sequence. A safer approach is to stage decisions, so each step kills a different type of risk.
| Stage | What gets locked | Main risk removed | Typical output |
|---|---|---|---|
| Brief | Brand, shelf goals, target cost, line constraints | Misaligned expectations | One-page packaging design brief 1 + spec targets |
| CAD/3D | Geometry, weight targets, finish selection | Hidden manufacturability issues | STEP/IGES CAD exchange formats 2 + 2D drawings |
| Engineering review | Tolerances, heel/base stability, stress zones | Breakage and wobble | design for manufacturability (DFM) 3 notes + revision list |
| Prototype / sample approach | Look/feel validation, label fit, grip | Wrong shelf presence | 3D print / mock / existing mold sample |
| Mold build | Final tooling | Geometry locked too early | Mold design pack + timeline |
| PPS (Pre-Production Sample) | Real glass from production tooling | Mass production surprises | PPS bottles + test report + sign-off |
| Pilot / first run | Line trials and packing | Line jams, scuffs, leakage | Run report + corrective actions |
The goal is to spend effort where it is cheap, before it becomes expensive. CAD changes are cheap. Mold changes are not.
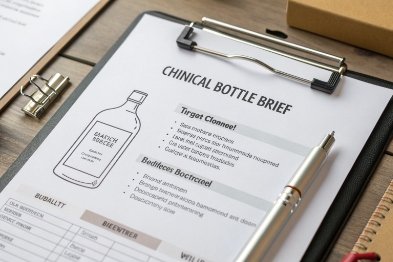
Where the “brief” should be strict, not poetic
A brand story is useful, but a glass factory needs numbers. A good brief includes:
- Category + fill volume: 750ml wine, 700ml spirits, 375ml, etc.
- Target weight class: lightweight vs premium heavy base.
- Shelf blocking: height, label panel, shoulder angle, and “front face.”
- Distribution reality: DTC shipping vs on-trade vs export container.
- Line info: filling speed, closure type, capper/corker model, case pack, pallet pattern.
- Décor durability needs: ice bucket, wet hands, bar rail friction, abrasion.
This makes the next step (CAD) meaningful.
CAD/3D: where most launches get saved
CAD is not only about making a pretty silhouette. It is a risk filter. In CAD, it is possible to check:
- Center of gravity and wobble risk.
- Base contact ring width and heel radius (common break points).
- Emboss depth so the glass still releases from the mold.
- Label panel geometry so labels apply without wrinkles.
- Finish dimensions so the closure seals without stress.
A good CAD pack should include both 3D files and 2D drawings with key control dimensions. If a supplier cannot quote with a drawing, the project is not ready.
PPS: the single best insurance step
PPS is the first time the design becomes real glass from the actual mold. It is where issues appear that CAD will not show:
- Mold seam behavior and visible lines.
- Real glass distribution after forming and annealing.
- Actual emboss sharpness.
- Coating adhesion and scratch behavior.
- Closure seal performance with real tolerances.
PPS should be treated like a gate. If PPS is approved casually, production problems become “normal.”
A practical PPS checklist that catches common failures
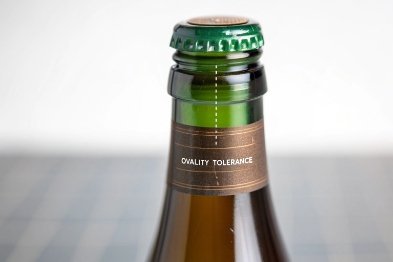
- Dimensional check: height, body diameter, label panel, finish critical dims.
- Verticality and base: wobble on flat plate, base rock, heel chips.
- Closure fit: torque, pull force, leak test, vacuum/pressure performance if relevant.
- Line simulation: guide fit, star wheel contact, rinser grippers, capper head clearance.
- Décor tests: abrasion (dry/wet), ice bucket soak, alcohol wipe, dishwasher if needed.
- Packing test: carton fit, dividers, pallet stability, vibration test (see ISTA test procedures 4) if exporting.
If a supplier offers PPS but no test approach, that is a red flag.
Which steps—brief, CAD/3D, mold build, and PPS—de-risk launch?
A launch is de-risked when three things are true: the bottle runs on the line, the closure seals reliably, and the décor survives distribution.
The best sequence is: lock the brief → confirm finish early in CAD → build the mold only after DFM review → approve PPS with closure and décor tests → run a pilot before full volume.
Brief: kill strategy risk
The brief kills “wrong bottle for the market” risk. It forces decisions like:
- Premium heavy base vs lightweight sustainability.
- Clear flint vs colored glass for UV protection and brand.
- Long neck vs short neck based on closure ritual.
CAD/3D: kill manufacturability risk
CAD kills “can’t make it” risk. It answers:
- Can the emboss release from the mold?
- Is the shoulder too steep for labels or shrink sleeves?
- Is the heel radius safe for impact?
Mold build: lock geometry and control points
Mold build is where design becomes irreversible. A strong mold build package includes:
- Control dimensions (finish, label panel, base).
- Tolerance plan.
- Expected weight range.
- Mold venting and emboss detail plan.
PPS: kill production risk
PPS kills “looks good in CAD, fails in real life” risk. It is the moment to validate:
- Closure fit and sealing.
- Décor durability.
- Real wobble and stability.
- Visual defects at scale.
| Risk type | Best stage to catch it | Typical fix |
|---|---|---|
| Wrong shelf presence | Mock / CAD review | Adjust height/shoulder/label panel |
| Closure leaks | CAD + PPS | Correct finish spec, add tighter control |
| Line jams | PPS + pilot | Modify body diameter, guide fit, base ring |
| Décor scuffs | PPS | Change coating, ink, cure, or sequence |
| High breakage | CAD + PPS | Rebalance glass distribution, heel radius |
This path costs less than “fix after launch.”
How do finish specs ensure closure compatibility?
The finish is the neck interface. It is where the closure seals, where torque is applied, and where consumers interact. If the finish is wrong, nothing else matters.
Finish specs ensure closure compatibility by defining the standard finish type, thread or cork dimensions, sealing surfaces, tolerances, and recommended closure materials. Matching these specs to the capper/corker and to supplier standards prevents leaks, stripping, or poor removal torque.
Finish spec essentials that must be written, not assumed
A proper finish spec typically includes:
- Finish type: screw finish, cork finish, T-top finish, crown, swing-top, etc.
- Key diameters: major and minor diameters, bead, land, and sealing surfaces.
- Thread profile (for screw caps): thread count, pitch, start position, and lead-in.
- Sealing system: where the liner seals (top seal vs side seal).
- Tolerance limits: must match closure supplier capability.
- Neck support ring: needed for handling on some lines.
- Top load and glass strength targets.
For spirits, the finish often must match tamper-evidence needs and pour ritual. For wine, it must match cork style or screw cap system.
Why “standard finishes” save money
Using a recognized standard finish reduces risk because:
- Closure suppliers already stock compatible caps.
- Cappers are set up for known geometry.
- QA gauges exist and are easier to source.
- Tolerance expectations are proven.
When teams talk about “standard,” they often mean the GPI/GCMI neck finish system 5 (plus category-specific spirits/wine finishes), because it makes closure sourcing and inspection more predictable.
Custom finishes are possible, but they raise risk and often extend tooling and validation time.
Testing closure compatibility the right way
- Torque test: apply and remove torque across production range.
- Leak test: vacuum or pressure as needed; hot/cold cycles if relevant.
- Drop and vibration: packed bottles in carton, real shipping vibration.
- Tamper evidence: band break behavior, bridge performance, visual integrity.
| Closure type | Finish focus | Common failure | Prevention |
|---|---|---|---|
| Screw cap | thread + top land | leaks, stripping | use standard finish + torque window |
| Bar-top/T-top | bore and sealing area | weeping, wobble | control bore tolerance, stopper spec |
| Natural cork | mouth ID and chamfer | cork damage, poor seal | correct chamfer, mouth finish quality |
| Wirehood (sparkling) | bead + neck strength | slippage | bead geometry and glass strength spec |
Finish specs are the handshake between glass and closure. That handshake must be written in a drawing and validated in PPS.
Which décor/anti-counterfeit features fit your brand?
Décor should match both brand tier and real-world handling. A nightclub bottle has different needs than a collector’s release.
The right décor and anti-counterfeit mix depends on where the bottle lives: shelf, bar, gifting, or export. Choose décor that survives abrasion and moisture, then add anti-counterfeit features that are easy to verify but hard to copy.
Décor options: pick based on durability and cost
Common décor choices that work well:
- Embossing/debossing (in-glass): permanent, premium, hard to copy exactly.
- Screen printing / ceramic inks 6: strong durability; good for logos and legal text.
- UV/digital direct print: flexible for short runs; durability depends on ink system.
- Frosting: strong tactile cue; can be partial masking for contrast.
- Spray coating (matte/gloss/soft-touch): premium look; must pass scuff tests.
- Hot stamping / foil accents: luxury cue; needs proper base coat and curing.
A strong approach is to combine one “permanent” element (emboss) with one “visual” element (print or coating). That creates depth without relying on fragile add-ons.
Anti-counterfeit: make it easy to check, hard to fake
Practical features that fit many spirits brands:
- Unique emboss at shoulder or heel (low cost once mold exists).
- Laser-etched serialization on glass or on closure (batch-level or unit-level).
- Tamper-evident closure system with brand-specific tear band.
- Microtext in printed décor or label artwork.
- UV-reactive ink marks for trade verification.
- NFC smart labels 7 with backend verification (best when paired with anti-duplicate logic).
- Holographic security label on capsule or neck (works for gifting channels).
Anti-counterfeit works best as layers. One feature alone can be copied. Two or three features raise the cost for counterfeiters.
| Brand situation | Best décor focus | Best anti-counterfeit layer |
|---|---|---|
| Premium on-trade | tactile + bar durability | emboss + TE closure + batch laser |
| Export-heavy | abrasion + moisture resistance | serialization + verified QR + TE band |
| Limited edition | high-relief + metallic | engraving + numbered units + NFC |
| Value tier | clean label panel + simple print | TE closure + simple track code |
Décor should never fight the filling line. For example, heavy coatings can increase friction in guides, and raised labels can catch in star wheels. That is why décor sequence and line trials matter.
What MOQs, tooling, and lead times should you plan for?
Planning fails when teams budget only for glass and ignore tooling, décor setup, and change cycles.
For custom wine/spirits glass, plan for tooling (mold costs), decoration setup, and a realistic lead time that includes design iterations and PPS approval. MOQs usually start high for fully custom molds, while decoration and packaging can sometimes run lower via digital methods or stock components.
The planning model that avoids surprise costs
Custom bottle costs are usually split into:
- Tooling: molds and sometimes auxiliary tooling for decoration.
- Unit cost: glass per bottle, varies by weight and color.
- Setup costs: decoration screens, cylinders, plates, color matching.
- Testing/QA: gauges, inspection, third-party tests if required.
- Packaging: cartons, dividers, closures, capsules, labels.
A realistic plan also includes a buffer for one revision cycle. Many projects need at least one.
Typical lead time logic (what really drives the calendar)
Lead time is controlled by:
- Number of CAD revisions.
- Mold manufacturing and try-out.
- PPS production window.
- Décor sampling and curing validation.
- Closure sourcing and compatibility tests.
- Shipping and import timing.
Even when glass forming is fast, approval loops slow projects down if the decision makers are not aligned.
MOQ: what drives it and how to reduce it
MOQ is driven by furnace scheduling, mold count, and efficiency. Fully custom bottles often require higher MOQs because the factory needs stable production to justify setup time. MOQs can be reduced by:
- Starting from an existing bottle and modifying décor first.
- Using digital printing for short runs.
- Using standard finishes and standard closures.
- Planning a phased launch: first run in stock bottle, second run in custom glass.
| Customization level | MOQ pressure | Tooling load | Best for |
|---|---|---|---|
| Stock bottle + custom label | Low | Low | fast launch, market test |
| Stock bottle + print/coating | Medium | Medium | premium look with lower risk |
| Semi-custom mold tweak | Medium to high | High | brand differentiation with faster tooling |
| Fully custom mold | High | Highest | flagship brand, long lifecycle |
A practical planning target (what to budget early)
To avoid a surprise, budget for:
- Mold tooling (often multiple sets depending on cavities and output).
- PPS sampling and testing.
- Décor setup (screens/plates/foils).
- Gauges for finish and key dimensions.
- A revision reserve for small mold adjustments.
For FuSenglass projects, the working baseline on production orders is:
- MOQ: 10,000 pcs
- Custom capability: shape, capacity, surface treatments, and full closure/packaging sets
That MOQ should be used as the first planning number in a launch model, then adjusted after the bottle geometry and decoration complexity are fixed.

Conclusion
A custom bottle succeeds when finish specs, PPS testing, and décor durability are treated as gates. Lock the closure early, validate in PPS, then scale with confidence.
Footnotes
-
Checklist for writing a packaging design brief that keeps suppliers aligned and reduces revision loops. ↩ ↩
-
Explains STEP/IGES CAD exchange formats and why standard file exports prevent costly geometry misunderstandings. ↩ ↩
-
Shows how DFM reviews catch manufacturability issues before molds are cut and costs lock in. ↩ ↩
-
Official ISTA test procedures used to simulate shipping stresses like vibration, drops, and compression. ↩ ↩
-
Clarifies GPI/GCMI neck finish naming so closures, gauges, and tolerances match from day one. ↩ ↩
-
Why fired ceramic screen printing is durable on glass in wet, abrasive, and bar-handling environments. ↩ ↩
-
Overview of NFC/RFID “smart labels” used for authentication and anti-counterfeiting in real supply chains. ↩ ↩


