Dirty bottles can ruin good beer. One hidden ring of dried yeast can turn a clean batch into sour, funky, and embarrassing pours.
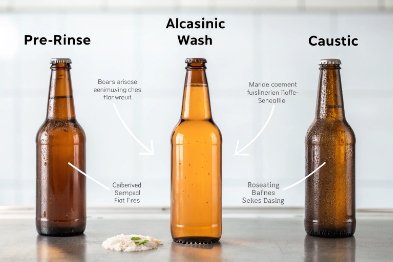
Reclaimed bottles need three things in order: remove soil (pre-rinse), remove films and glue (hot alkaline/caustic wash), and kill microbes right before filling (sanitizer). Clean first, then sanitize, then fill.

Reusing bottles is worth it when the process is tight. The goal is not “looks fine.” The goal is “no soil, no odor, no biofilm, no chips, and no recontamination” from wash to cap.
Which steps are essential: pre-rinse, caustic wash, and sanitizer?
Old beer residue is stubborn. If the inside is not truly clean, sanitizer cannot reach the microbes hiding under the film.
The essential sequence is: sort and pre-rinse, wash with a strong alkaline cleaner at the right temperature and contact time, rinse until neutral, then sanitize immediately before filling and cap right away.
Start with sorting and rejection
Before any washing, every reclaimed bottle gets a quick “yes/no” check. This saves time and prevents risky bottles from entering the pool.
Reject bottles with:
- chips on the lip or finish
- cracks, star checks, or impact marks
- deep internal scratches (microbes hide there)
- unknown chemical residues (solvents, oils, cleaners)
A small chip is not cosmetic. It is a crack starter and a leak risk.
Pre-rinse removes loose soil fast
Pre-rinse is about speed. It removes:
- leftover beer
- yeast sediment
- insects and dust
- loose label paper
Warm water works better than cold water. If the bottle is heavily crusted, a short soak helps, but soaking is not the same as washing.
Alkaline/caustic wash removes the hard stuff
The wash step is where “clean” happens. For home and small operations, common choices are:
- brewery wash powders like Powdered Brewery Wash (PBW) 1
- sodium percarbonate-based cleaners 2
- controlled caustic solutions (commercial systems)
This wash step targets:
- biofilm
- dried beer rings
- protein and hop resins
- glue and label residue (often with help from heat)
Safety matters here. Caustic and strong alkaline cleaners—especially sodium hydroxide (caustic soda) 3—can burn skin and eyes. Gloves and eye protection are not optional. Also, follow the product label for concentration and contact time.
Rinse until there is no cleaner left
Rinsing is not a quick splash. Alkaline residues can:
- ruin foam
- create harsh taste
- reduce sanitizer performance
- react with beer and create off notes
A good sign is “no slick feel” and “no cleaner smell.” In a brewery, conductivity and pH checks make this even more reliable.
Sanitize last, then fill fast
Sanitizer is not a cleaner. It does not remove dirt well. It kills microbes on a clean surface. That is why sanitizing happens immediately before filling.
When choosing sanitizers, follow validated sanitizer concentration and contact-time guidance 4 and avoid guessing.
A simple habit works:
- sanitize
- drain (do not towel dry)
- fill and cap right away
Common brewing options include acid sanitizers like Star San Acid Sanitizer 5 and oxidizers like peracetic acid 6.
| Stage | Goal | What must be true before moving on | Common mistake |
|---|---|---|---|
| Sort | remove unsafe bottles | no chips, cracks, deep scratches | “it will be fine” thinking |
| Pre-rinse | remove loose soil | no liquid, no loose sediment | skipping when bottles look “empty” |
| Wash | remove films, glue, biofilm | interior feels clean, no ring lines | relying on sanitizer to “fix” dirt |
| Rinse | remove all wash chemical | no slick feel, no cleaner odor | short rinse that leaves residue |
| Sanitize | kill microbes on clean glass | correct contact time, clean drain | sanitizing too early, then waiting |
How do you remove labels, glue, and biofilm safely?
Labels and glue are annoying, but biofilm is dangerous for beer quality. If you cannot remove the film, you do not have a reusable bottle.
Hot alkaline soaking loosens labels and glue, while brushing or jetting breaks biofilm. For stubborn adhesive and beerstone, use the right cleaner for the soil type and avoid harsh scraping that scratches the glass.

Labels and glue removal without making a mess
A safe, repeatable label removal approach is:
1) soak in hot water with an alkaline cleaner
2) peel labels while still wet
3) scrub remaining adhesive with a nylon pad or soft scraper
4) re-soak if adhesive smears instead of lifting
I avoid metal blades on premium returnables. Scratches create permanent “microbe parking spots.” Nylon tools and patience beat speed here.
For stubborn glue, two details help more than stronger chemicals:
- temperature (warmth softens many adhesives)
- time (let the chemistry work)
If the bottle uses plastic labels or heavy laminates, soaking may not help much. In that case, mechanical peeling is the first step, then wash.
Biofilm: break the shield, then remove it
A microbial biofilm 7 is a slimy layer that protects microbes. It can sit at:
- the bottom dome
- the shoulder ring
- inside the neck where brushes miss
To remove it, two actions matter:
- chemical attack (hot alkaline wash)
- physical disruption (bottle brush or jet spray)
A bottle brush works well when it reaches the shoulder and bottom. Jet bottle washers work well when they deliver enough pressure and cover the full interior.
Beerstone and mineral haze
Some reclaimed bottles show a chalky ring or “stone” line. That is often mineral scale mixed with organics. Alkaline cleaners can struggle with mineral deposits. A mild acid rinse step (food-safe, label-guided) can help, but it should be controlled and followed by a full rinse.
Do not mix acids and chlorinated cleaners. Also avoid strong bleach routines for beer bottles unless there is a clear reason and a strict rinse method. Chlorine can create medicinal off flavors if residues react with beer compounds.
A practical soil-to-chemical match
| Problem | What it is | Best first move | What to avoid |
|---|---|---|---|
| Paper labels | paper + water-based glue | hot alkaline soak + peel | scraping glass with metal |
| Sticky adhesive | rubbery glue | longer soak + nylon scrub | solvents unless you control rinse fully |
| Dried beer ring | proteins + sugars | hot alkaline wash + brush | short cold rinse only |
| Biofilm | microbial shield | wash + mechanical action | “sanitize only” thinking |
| Beerstone | mineral scale | controlled acid step after cleaning | random chemical mixing |
What visual and odor checks confirm readiness for refill?
Many “clean” bottles fail because of one missed defect: a hairline crack, a lip chip, or a faint sour smell trapped under the cap liner.
A refill-ready bottle looks clear under strong light, smells neutral when warmed slightly in the hand, and has a perfect lip and interior with no haze, rings, chips, or slimy feel. If in doubt, reject it.
Visual inspection that actually catches problems
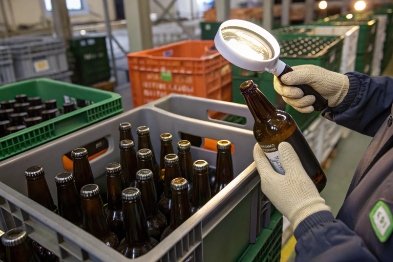
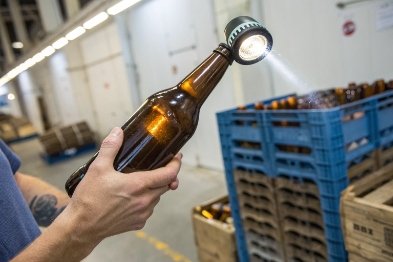
A fast inspection method that works is:
- hold the bottle up to a bright light
- rotate it slowly
- focus on the heel, shoulder, and finish
Look for:
- “ghost rings” at the shoulder (dried beer or biofilm)
- haze or cloudy patches (etching, scale, or leftover cleaner)
- chips at the mouth (feel with a fingertip)
- cracks or checks (especially around the base and shoulder)
- interior scratches (especially returnables that have many trips)
If a bottle has deep scuffs inside, it is not worth saving. It will be harder to sanitize every future time.
Smell is a powerful tool. A clean bottle should smell like nothing. If it smells like:
- sour beer
- vinegar
- moldy basement
- soap or perfume
then it is not ready.
A simple trick is to warm the bottle slightly with your hands, then sniff the neck. Warmth makes hidden odors more obvious.
“Feel” checks that confirm film removal
Run a clean finger around:
- the inner shoulder area (where rings hide)
- the mouth and inner lip
- the outside neck threads (where soy-like sticky residue also happens)
A clean bottle feels smooth. A bottle with biofilm can feel slightly slick even after rinsing.
Readiness checklist you can print
| Check | Pass standard | Fail signal | Action |
|---|---|---|---|
| Clarity | clear, no haze | cloudy film, streaks | re-clean or reject |
| Ring lines | none | shoulder ring, bottom ring | re-wash + brush |
| Lip condition | no chips | sharp chip, rough lip | reject |
| Cracks | none | star checks, hairline cracks | reject |
| Odor | neutral | sour, mold, cleaner smell | re-clean or reject |
| Touch | smooth | slick or gritty | re-clean |
This is one area where being strict saves money. One infected bottle can spoil a whole batch, then the entire bottling day becomes a loss.
Which drying and storage practices prevent recontamination?
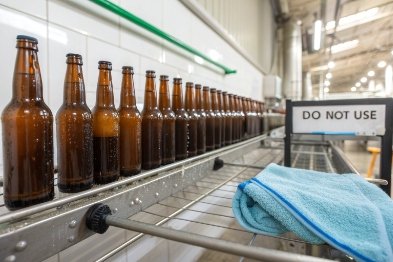
Clean bottles can become dirty again fast. Dust, insects, and damp caps can undo hours of work.
Store bottles clean and dry, inverted, and covered. Sanitize only when you are ready to fill, and cap immediately after filling. Keep gaskets and caps dry and separate to prevent odor and microbial growth.
The best workflow: “clean and store dry,” then “sanitize and fill”
A stable routine is:
1) clean and rinse bottles
2) dry fully
3) store covered until bottling day
4) sanitize right before filling
5) fill and cap without long delays
This reduces the time a wet sanitized surface sits exposed to air. That waiting time is where recontamination happens.
Drying rules that reduce microbes and odors
- Air-dry bottles inverted on a rack.
- Do not towel dry the interior. Towels shed lint and microbes.
- Make sure the bottle is fully dry before long storage.
- Keep caps and gaskets dry. Moisture inside caps is a common odor source.
If you store bottles wet, you create a place for microbes to grow, even if the bottle was sanitized before.
Storage rules that block dust and insects
Good storage options include:
- covered crates
- closed boxes with clean liners
- shrink-wrapped cases
- foil covers on mouths (useful for short-term staging)
Keep stored bottles away from:
- chemical fumes (paint, cleaners, fuels)
- cooking oils and spice aerosols
- damp basements and moldy rooms
Glass does not absorb odors easily, but closures and residual moisture can.
How to keep returnable pools consistent
If you manage a returnable pool, small controls make a big difference:
- separate “clean” and “dirty” zones
- label crates by status (dirty / washed / inspected / ready)
- log washer temperatures and chemical checks
- trend reject rates by source and by time
This is how small operations start acting like commercial systems without buying a full tunnel washer.
| Risk | When it happens | Best prevention |
|---|---|---|
| Dust contamination | dry storage without cover | store inverted and covered |
| Insect entry | warm seasons, open racks | cover mouths or use closed crates |
| Odor in caps | wet gaskets, damp storage | dry caps fully, store separately |
| Recontamination after sanitizing | long wait before filling | sanitize right before filling |
| Mixed-status bottles | pool handling | strict crate labeling and segregation |
Conclusion
Reclaimed beer bottles work when cleaning removes films, rinsing removes chemistry, sanitizing happens right before filling, and storage stays dry and covered so bottles stay truly refill-ready.
Footnotes
-
PBW ingredient sheet helps compare alkaline wash options and safe usage. ↩︎ ↩
-
Learn what sodium percarbonate is and why it’s common in “oxygen” brewery cleaners. ↩︎ ↩
-
NIOSH guidance explains sodium hydroxide exposure risks and protective handling basics. ↩︎ ↩
-
Quick reference for sanitizer ppm/contact time concepts used in food-contact sanitation. ↩︎ ↩
-
Star San label/spec sheet shows dilution guidance and intended food-contact use. ↩︎ ↩
-
CDC overview of peracetic acid hazards and workplace controls for safe sanitizer use. ↩︎ ↩
-
Clear overview of biofilm behavior and why it resists simple “sanitize-only” routines. ↩︎ ↩


