Spots on glass bottles kill a good design. They look like dirt, even when the bottle is technically “in spec,” and they trigger complaints and rework.
Manufacturers prevent spots on glass bottles by controlling furnace refining and filtration, keeping molds and coating systems clean, using cleanroom-style packing and deionized rinsing, and running SPC on water quality, pH, and process temperatures.

When spots show up, the root cause is almost never “one thing.” It is a chain of small drifts: raw material contamination, dirty molds, unstable coatings, poor water quality. So the best defense is a simple but disciplined control plan that covers hot end, cold end, utilities, and maintenance together.
What furnace refining and filtration practices reduce seeds and inclusions?
Seeds and inclusions (including stone inclusions 1) come from bad melting, dirty batch, or tired refractories. They show up later as bright pinpoints or dark specks that customers call “spots,” even if they sit inside the glass wall.
Good furnace control starts with consistent heat. The temperature profile must be stable from doghouse to throat. Large swings create thermal gradients that slow melting and refining. When glass moves through cold zones, bubbles do not rise and pop. Raw material stones do not fully dissolve. So the first rule is simple: keep the heat flat and avoid hot and cold stripes.
Batch and cullet need the same attention. Both should pass through sieving, magnetic separation, and, where needed, optical sorting. This removes coarse grains, tramp metal, and ceramic pieces before they ever hit the furnace. A little time here saves weeks of complaints later.

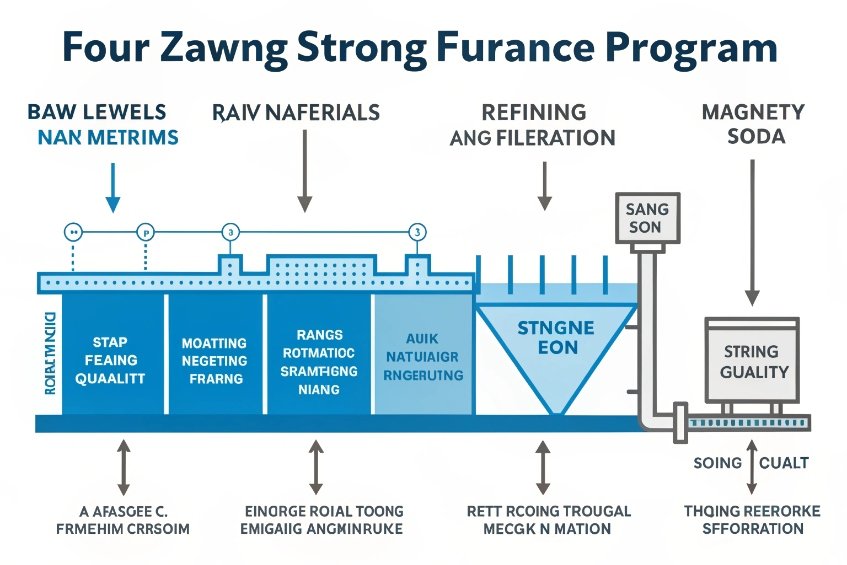
From melting to refining: how to keep seeds and inclusions out
A strong furnace program has four layers: raw materials, melting, refining, and filtration.
-
Raw material control
- Use high-quality sand, soda ash, and limestone with tight specs on Fe, Ti, and other impurities.
- Screen batch to remove oversize particles that become stones.
- Use magnets and metal detectors on both batch and cullet to catch nails, wire, and machinery fragments.
- Keep cullet streams separated by color and source to avoid unknown contaminants.
-
Stable melting and temperature distribution
Points from your list fit here very well. Maintain consistent furnace temperature distribution to eliminate thermal gradients. This means regular checks on burners, ports, and checker health. It also means careful adjustment of pull and boosting. The aim is a steady melt pool with no cold corners. When melting is even, seeds and stones drop sharply. -
Refining time and atmosphere
The refining zone needs enough residence time for bubbles to rise out. Glass level, throat design, and weir heights all matter. Combustion tuning also matters. A stable, slightly oxidizing atmosphere helps burn off carbon defects and keeps refractory corrosion under control. If refining agents are used, their batch addition must be consistent, not “salted” in by hand. -
Filtration and forehearth control
Many high-end lines now use glass filtration or deep-refining channels in the forehearth, including ceramic foam filters 2. Screens, ceramic filters, or foam bricks catch inclusions and smooth out temperature. These systems need routine PM: scheduled changeouts, visual checks for cracks, and flushing procedures. Dirty or damaged filters can add defects instead of removing them.
Feeder settings also play a small but real role. Calibrated feeder blades and orifice rings reduce shear-induced stones and scoring. A smooth gob with even temperature gives the mold a better chance to form an inclusion-free bottle.
When all these layers work together, seeds and inclusions drop, and many “mystery spots” vanish from the complaint log.
How do cleanroom packing, air knives, and deionized rinsing cut particulates?
Even if the glass is perfect, dust and fines can still create visible spots. Customers see them trapped under coatings, labels, or inner rinses. They call them stains or dirt, but they start as simple particulates that land on hot glass.
One strong approach is to treat packing and inspection like a light cleanroom aligned to ISO 14644-1 cleanroom classification 3. It does not have to be semiconductor-grade, but it does need air control, housekeeping standards, and clothing rules. The goal is clear: keep dust, cullet fines, and fibers away from the bottle surface after forming.
Air knives and blow-offs sit right at the heart of this system. Properly installed, they strip loose particles off the bottle before coatings or packaging touch it. When paired with ionized air, they also neutralize static that can hold dust in place.
Keeping surfaces clean from lehr exit to carton
A clean surface program has three steps: remove, rinse, and protect.
-
Remove: air knives and ionized blow-offs
- Install effective air knives or ionized-air blow-offs just after the lehr exit and before cold-end coating.
- Set the distance, angle, and pressure so the jet sweeps the full bottle, including shoulder and heel.
- Balance air knives to avoid streaks; an uneven pattern can leave bands of fines that later look like spotting.
- Use filtered, oil-free air and specify it to ISO 8573-1 compressed air quality classes 4. Compressors and lines must have water and oil traps. Dirty air only moves the problem around.
-
Rinse: deionized or low-TDS water
Your insight about rinse water is key. Use softened, RO, or deionized rinse water and maintain low total dissolved solids (TDS) 5 to prevent mineral “water marks.” Any droplet that dries on the surface can leave a visible ring if minerals or silica are high. Implement water quality and filtration at each spray point and routinely descale nozzles. When nozzles scale up, the spray pattern breaks into streaks and heavy zones, which show as uneven drying marks. -
Protect: clean conveyors and controlled environments
- Keep conveyors, guide rails, and dead plates clean. Remove cullet fines and label glue build-up.
- Enclose critical sections with light curtains or panels to reduce dust fall-out.
- Use top-down, filtered air in inspection and packing to sweep particles away from product zones.
- For high-value cosmetic or pharma bottles, consider basic cleanroom packing with gowning rules and routine surface monitoring.
Drying also ties in. Control dryer and lehr exit conditions (temperature, humidity, airflow) to promote even drying and prevent spotty evaporation rings. If one side of the bottle faces hotter air, droplets can shrink into a ring and leave a halo. Balanced flow gives a uniform dry, which means no shadow spots.
With these steps, particulates fall dramatically. Complaints about “dust in the coating” or “dirty necks” usually drop at the same time.
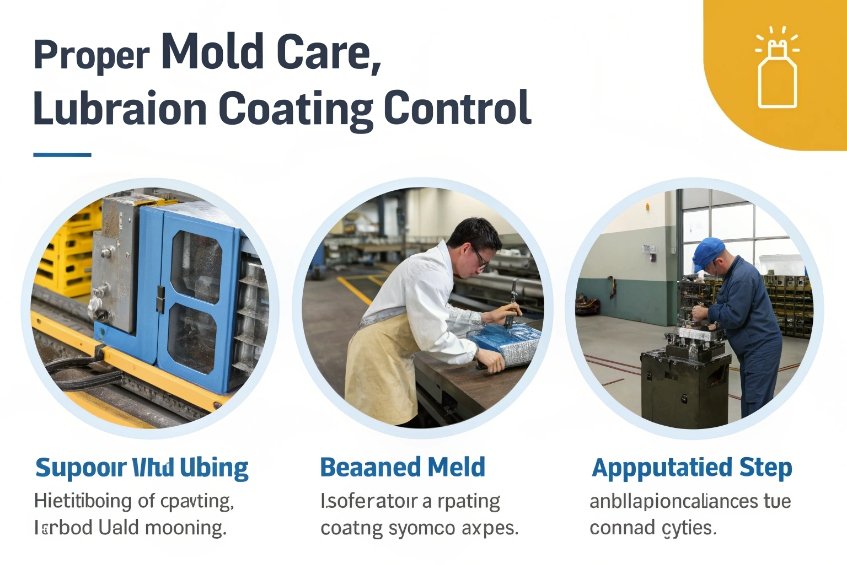
Which PM plans for molds and swabbing protocols avoid residue marks?
Many visible spots come from the contact hardware itself. Worn molds, dirty neck rings, and poor swabbing habits leave dark marks, streaks, or oily patches. These are easy to see on flint cosmetic bottles and pharma containers, so customers notice quickly.
A strong PM plan for molds and equipment starts with cleanliness and smooth contact surfaces. Molds and neck rings should be free from pitting, oxidation, and stuck refractory. When the surface breaks down, it picks up glass and then stamps that pickup back onto the next containers as specks.
Swabbing is another big factor. The line needs lubricant, but too much oil or graphite leaves stripes and spots. Poor practice also blows smoke onto the containers, which can bake in as soot marks.

Mold care, lubrication, and coating balance
There are a few simple rules that avoid residue marks.
-
Keep molds and contact hardware clean and smooth
- Set a fixed cycle for mold changes, cleaning, and inspection rather than waiting for defects.
- Replace or refinish any molds, neck rings, and plungers with visible wear, scoring, or corrosion.
- Eliminate metal or refractory pickup specks by removing loose refractory, drip points, and contact burrs upstream.
- Use high-density mold materials resistant to rapid thermal degradation. This supports smoother surfaces for longer.
-
Control swabbing and lubricants
- Use clean, well-metered swab and shear lubricants only. Reject any drums with visible contamination or high water content.
- Train operators on the correct swabbing frequency and quantity. Over-swabbing is as bad as no swabbing.
- Prevent soot and oil carryover by tuning combustion, shielding flames from containers, and avoiding open flames near swabbing.
- Where possible, deploy automated lubrication systems for consistent mold surface wetting and lower variation.
-
Hot-end and cold-end coating harmony
Your points on coatings fit here. Maintain consistent hot-end coating (for example tin oxide) thickness and oxidation. Avoid overbake or patchiness that appears as stains. At the cold end, calibrate polymer or wax application: dose, droplet size, coverage, and bottle temperature. Non-uniform films can trap swab oil, soot, or dust in islands that customers see as spots or blisters. -
Structured PM routines
Apply robust hygiene and PM routines: tank dumps, line purges, filter swaps, and bath monitoring for coating solutions. Use simple SPC charts on key parameters like coating bath solids, temperature, and line speed. The goal is to catch drift before residue marks appear on finished ware. Tie visual inspection data back to PM cycles, so the team can see how mold age and swabbing habits affect real defects.
With these practices, mold-related spots shift from daily fire-fighting to periodic, predictable maintenance tasks.
What SPC controls on water hardness and pH stop mineral spotting?
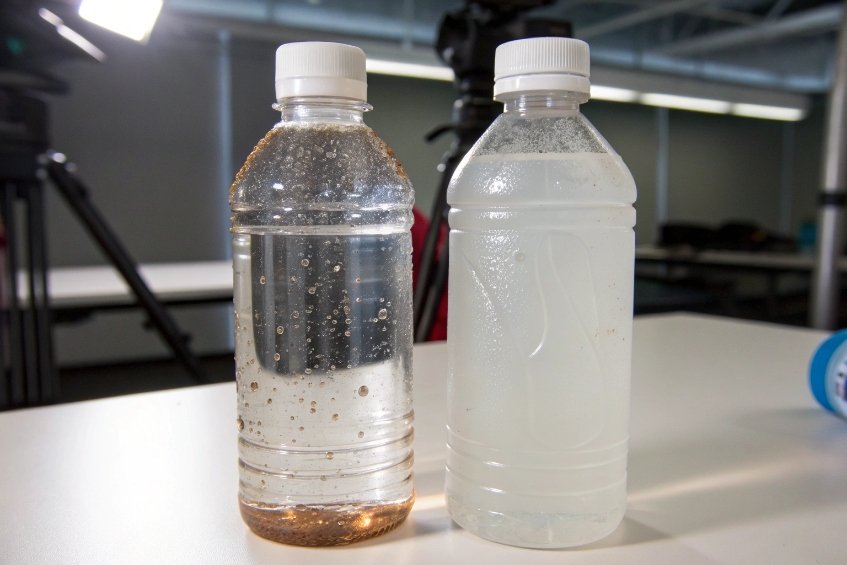
Many “mystery” spots on glass are not from glass at all. They are from water and chemicals that touch the bottle after forming. Returnable-bottle washers, internal rinses, and spray systems all have a big impact on spotting.
Mineral stains come from hard water (high water hardness 6) or high TDS. Caustic films come from alkaline wash that does not rinse off. Both leave dull patches, white rings, or rainbow sheens on the surface. Customers often think these are glass defects, but they sit on top of the glass and come off only with strong cleaning.
The best defense is simple: treat water as a controlled raw material. Measure it, chart it, and react to drift before stains show up on pallets.
Simple water and chemistry control that actually works
Here is a practical statistical process control (SPC) 7 plan that connects your insights into one system.
-
Define water quality targets for each use point
- For final rinses and critical spray points, use softened, RO, or deionized water.
- Set limits on hardness, alkalinity, and TDS. For example, define “red zones” where spotting risk is high.
- Implement water quality and filtration at each spray point, not only at the plant inlet. Local piping and tanks can add contamination.
-
Control bottle washers and chemical baths
For returnable bottles, ensure thorough post-wash rinsing and controlled pH/alkalinity in washers to avoid caustic film residue. Monitor caustic concentration, temperature, pH, soil load, and residence time. Use SPC charts on these values, and link them to visual checks for haze and films. Schedule regular tank dumps, line purges, and filter swaps. Bath monitoring should be a daily routine, not a reaction to complaints. -
Maintain spray systems and nozzles
- Routinely descale nozzles to keep spray patterns even.
- Balance spray patterns to avoid streaks, which often become vertical water marks or “rain” lines.
- Check pressure and flow rates on a simple control sheet and watch trends over time.
-
Drying and lehr exit conditions
Control dryer and lehr exit temperature, humidity, and airflow to promote even drying and prevent spotty evaporation rings. If RH is very low and air is very hot, droplets flash off and leave sharp rings. If air is stagnant, droplets sit too long and collect dust. Record these conditions as part of SPC and connect them to inspection data. -
Close the loop with inspection and vision systems
Deploy real-time vision inspection systems to detect surface anomalies during production. Tag each defect type: ring marks, haze, vertical streaks. Use these signals as feedback into SPC for water and chemistry. When a trend appears, the team can check water hardness, pH, or TDS charts first, instead of guessing.
When water, chemistry, and drying are under control, complaint photos of “spots” often stop overnight. The glass did not change. The way water touches and leaves the surface did.
Conclusion
Spots on glass bottles shrink when furnace refining, molds, coatings, water quality, and cleaning all run under one simple, disciplined control plan.
Footnotes
-
Explains how to identify stone inclusions and trace them to batch, furnace, or forming sources. ↩︎ ↩
-
Overview of ceramic foam melt filtration principles and how filters capture inclusions. ↩︎ ↩
-
Defines cleanroom airborne particle classes—useful for setting practical packing-area contamination targets. ↩︎ ↩
-
Clarifies ISO 8573-1 air purity classes for particulates, water, and oil in compressed air. ↩︎ ↩
-
USGS explanation of TDS and common dissolved ions that cause drying rings and mineral marks. ↩︎ ↩
-
Defines water hardness (calcium/magnesium) and why it creates films and scale on surfaces. ↩︎ ↩
-
Practical guidance on process monitoring and control charts to catch drift before cosmetic defects appear. ↩︎ ↩


