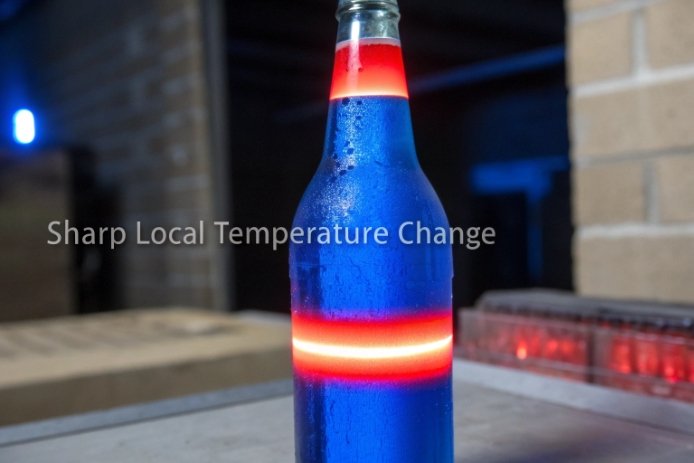
A bottle can survive cold filling and still crack at labeling. The label station feels harmless, but it can create a sharp local temperature jump on stressed glass.
Yes. Hot labeling after cold filling can affect glass bottles. Hot-melt glue and heat-shrink sleeves can create local thermal gradients that add stress and can trigger cracks, especially at thick-to-thin transitions like the shoulder and heel.

Hot labeling is a local thermal shock problem, not a whole-bottle temperature problem
Most people think thermal shock resistance 1 needs hot liquid or sterilization. Hot labeling proves that is not always true. A hot-melt glue bead or a shrink sleeve tunnel can heat a small band of glass very fast while the rest of the bottle stays cold. That creates a steep temperature gradient 2 in one region. Glass expands in the hot spot. The surrounding cold glass restrains it. Tensile stress forms around the boundary. If residual stress from annealing is already present, the stress stack can cross the crack limit.
Hot labeling also adds a second issue: surface and handling damage. Bottles arriving at labeling may have micro-scratches from conveyance. A small scratch at the heel or shoulder can become a crack starter when a hot spot is applied nearby.
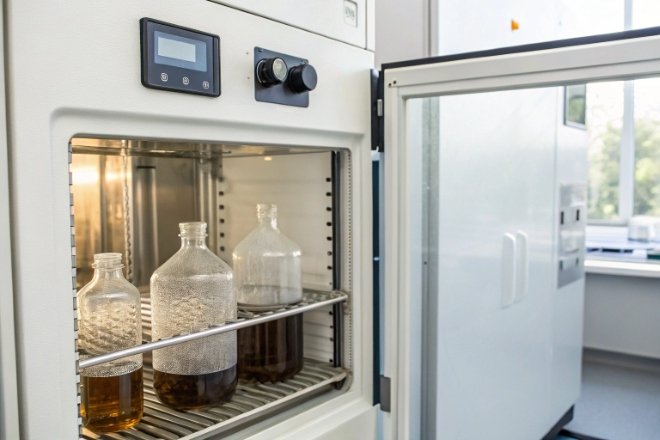
The risk is higher when the bottle is cold (cold-filled product, cold warehouse, winter conditions) and when the label process applies heat quickly in a narrow zone.
The most common failure patterns
- cracks appearing right after the shrink tunnel
- heel or shoulder checks after hot-melt labeling
- microcracks that grow later during transport
- label defects like bubbles, wrinkles, or edge lifting that signal overheating
| Label method | Heat source | Main glass risk | Main label quality risk |
|---|---|---|---|
| Hot-melt glue label | hot adhesive bead | local hot band stress | glue stringing, squeeze-out |
| Heat-shrink sleeve | hot air/steam tunnel | wide band thermal gradient | wrinkles, haze, distortion |
| Cold glue (baseline) | minimal heat | low thermal risk | moisture sensitivity |
The next sections address the four questions: whether hot-melt and sleeves can cause cracks, which bottle areas are most vulnerable, how to set process conditions, and which validation tests prove the system is safe.
Can hot-melt glue or heated shrink sleeves create local thermal shock that leads to cracks in glass bottles?
Label stations do not heat the whole bottle. They heat fast and unevenly. That can be enough.
Yes. Hot-melt glue and shrink sleeve tunnels can create local thermal shock by rapidly heating parts of a cold bottle. The resulting temperature gradient creates tensile stress and can cause immediate cracks or microcracks, especially if the bottle has residual stress, thickness steps, or surface damage.
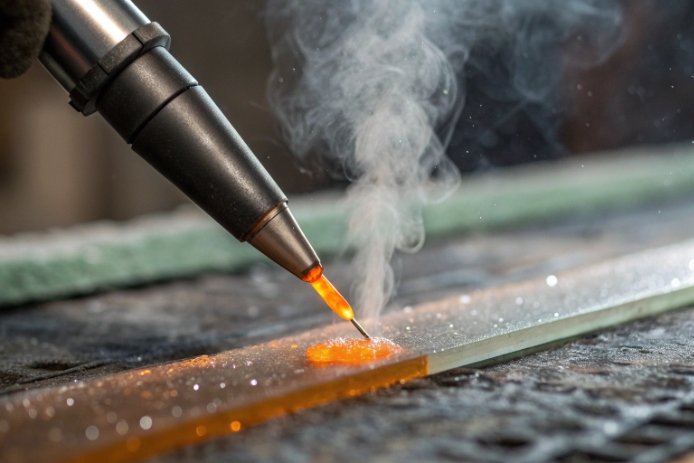
Hot-melt glue: small area, fast heat
Hot-melt adhesive 3 is applied at elevated temperature and contacts glass directly. Even if the adhesive cools quickly, the initial contact can heat a narrow stripe. If the glue pattern concentrates near a shoulder transition or a heel band, stress can rise sharply.
Crack risk increases when:
- adhesive temperature is high
- glue bead is thick and continuous (more heat input)
- bottle surface is very cold
- bottle already carries residual stress
Shrink sleeves: wider heating and longer exposure
Shrink tunnels heat a larger area. The risk comes from:
- high tunnel temperature
- uneven airflow or steam impingement
- a cold bottle entering a hot zone
- sleeves that require aggressive shrink conditions
The sleeve itself can also trap heat and create uneven cooling after exit, which can extend the time the gradient exists.
Why cracks can be delayed
Microcracks can form during labeling but not open immediately. Later, vibration and impacts in packing can grow them. This is why some plants see “mystery breaks” after labeling, not right at the labeler.
| Condition | Why it raises crack risk | What to watch | Fast fix |
|---|---|---|---|
| Cold bottles (low start temp) | higher ΔT at hot spot | seasonal crack spikes | pre-warm or reduce heat input |
| High adhesive temp | more heat flux into glass | cracks near glue lines | lower adhesive setpoint |
| High tunnel temp | stronger gradient | cracks after tunnel exit | lower tunnel zones, balance airflow |
| Uneven airflow | one-side heating | one-side cracks | tune tunnel distribution |
| High residual stress | low margin | polariscope shows high stress | improve annealing/lehr control |
Hot labeling can be safe, but only when temperature and dwell are treated as controlled parameters, not “whatever makes the label stick.”
Which bottle areas are most vulnerable during hot labeling (shoulder, heel, base), and how does thickness variation increase risk?
Cracks rarely start in the middle of a smooth wall. They start where the bottle is thick, curved, or changing shape.
The shoulder and heel are the most vulnerable during hot labeling because they have thickness transitions and stress concentrations. The base is also vulnerable due to contact cooling and thicker mass. Thickness variation increases risk by creating uneven heating and local stress hinges at step changes.
Shoulder: transition zone with stress concentration
The shoulder often has curvature and a thickness gradient from neck to body. If the label or sleeve heat band overlaps this transition, local expansion can be restrained strongly. Shoulder cracks can appear as short checks or longer vertical splits.
Heel: the classic thermal weak point
The heel is thick and is near the base corner radius. It also often has scuffs from conveyance. If a label heat band is near the heel, the combination of thick mass and surface flaws can create crack starts.
Base: thick mass plus metal contact
Even if the label heat is above the base, the base can be stressed because it is cooled by conveyors and can act as a cold anchor. That makes nearby heated zones more constrained.
Thickness variation: why “uneven lightweighting” is risky
If one panel is thinner, it heats faster. If another panel is thicker, it heats slower. The hot spot expands unevenly around the circumference. That creates bending stress and local tensile zones.
| Zone | Why it is vulnerable | Typical defect | Best design/process mitigation |
|---|---|---|---|
| Shoulder | curvature + thickness gradient | shoulder checks | move label band lower, reduce heat |
| Heel | thick + scuffed + radius | heel cracks, base checks | protect heel, improve conveyance |
| Base corner | stress concentration | star cracks | improve radius and cooling symmetry |
| Embossed areas | local thickness peaks | cracks at emboss | avoid heating directly on emboss |
A practical labeling layout avoids placing the hottest exposure right on the shoulder or on a thick heel band, especially in winter or after cold storage.
How should you set labeling temperature, dwell time, and line speed to avoid stress and label defects?
The safest label process uses the minimum heat needed for adhesion and shrink, and it applies that heat evenly and gradually.
Set label temperature and dwell to the minimum that achieves adhesion and shrink quality. Avoid sharp heat spikes by using staged tunnel zones, balanced airflow, and a bottle preconditioning step when bottles are cold. Line speed should be chosen so the glass does not see a rapid surface temperature jump.
Core rule: reduce the temperature jump at the glass surface
Three levers control the jump:
1) bottle start temperature
2) heat flux (temperature and airflow/adhesive mass)
3) exposure time
The safest setup reduces heat flux and increases uniformity, rather than only slowing the line. Slowing the line can actually increase total heat input if tunnel temperature stays high.
Hot-melt glue settings
- Lower adhesive temperature within supplier-approved range.
- Reduce bead mass and avoid continuous thick bands.
- Use patterns that distribute heat rather than concentrate it in one line.
- Ensure bottles are dry and clean; moisture can force higher adhesive temp and cause slip.
Shrink sleeve tunnel settings
- Use multi-zone control: warm-up zone, shrink zone, and set zone.
- Balance airflow to avoid one-side impingement.
- Use the lowest shrink ratio sleeve that still meets appearance targets.
- Avoid overheating that causes glass hot spots and label haze.
Process tuning signs
Label defects often warn of thermal risk:
- wrinkles and burn marks often mean too much heat or uneven airflow
- bubbles or trapped moisture can mean the bottle is too cold or wet
- edge lift can mean not enough heat or wrong adhesive
| Parameter | If too high | If too low | Best control method |
|---|---|---|---|
| Adhesive temperature | local stress, stringing | poor tack | tight setpoint and audits |
| Tunnel temperature | hot spots, cracks | incomplete shrink | zone control + airflow balance |
| Dwell time | overheat, distortion | poor shrink | speed + zone length balance |
| Bottle start temperature | high ΔT risk if cold | can soften label too early if warm | preconditioning window |
| Air/steam impingement | one-side cracks | uneven shrink | flow uniformity checks |
A good setup aims for repeatability: same bottle start temperature, same tunnel profile, same adhesive setpoint. Most cracking spikes come from drift, not from the nominal setting.
What packaging validation tests confirm safety (thermal cycling, abrasion resistance, label adhesion, and post-label leak testing)?
Validation must prove two things: the label stays on, and the bottle survives the heat exposure with no hidden damage.
Confirm safety with a combined validation plan: thermal cycling through label conditions, polariscope stress inspection before and after labeling, abrasion tests for scuffing, adhesion tests for labels, and leak/closure integrity tests after labeling and after aging.
1) Thermal cycling that includes the label station profile
A strong test uses:
- cold bottle start condition (worst case)
- real label heat exposure (glue temp or tunnel zones)
- cool-down to room temperature
- repeat cycles if the line or storage repeats exposure
After cycling, inspect for cracks and microcracks at heel and shoulder.
2) Stress inspection (polariscope) before and after labeling
Polariscope inspection 4 detects residual stress patterns. A big change after labeling suggests the label heat is adding stress. Track by cavity and by line condition.
3) Abrasion and scuff resistance
Labeling and conveyance can add heel scuffs. Scuffs increase crack risk. Use abrasion testing for labeled and unlabeled bottles, especially on the heel band.
4) Label adhesion and appearance tests
- peel strength and shear
- water/ice bucket exposure if relevant
- temperature and humidity aging
- sleeve seam integrity and slip resistance
5) Post-label closure integrity and leak testing
Even if the label does not touch the finish, tunnel heat can warm the finish area in some designs. Verify:
- application torque and back-off torque
- leak testing (vacuum/pressure decay)
- dye ingress for micro-leaks
- vacuum retention if the product uses vacuum
| Test | What it verifies | When to run | Pass indicator |
|---|---|---|---|
| Label heat simulation + cool-down | no thermal cracks | qualification + changes | zero cracks in sample |
| Polariscope stress inspection | stress margin remains | every shift (subset) | stress pattern stable |
| Abrasion resistance | scuff control | qualification | no severe heel scuffs |
| Adhesion/peel tests | label stays on | qualification + audits | meets peel/shear target |
| Torque audit over time | seal load retention | qualification + routine | torque within band after 24–72h |
| Leak test after labeling | no micro-leaks | per lot sampling | passes decay and dye test |
A plant prevents most hot-label failures by treating labeling as a thermal process step and validating it like a hot-fill step. When the tests are tied to the worst-case bottle temperature and the worst-case label heat, surprises disappear.
Conclusion
Hot labeling can crack bottles by creating local thermal shock, especially at shoulders and heels. Use minimal, even heat, control bottle start temperature, and validate with stress, thermal cycling, and leak testing based on proven vacuum decay methods like ASTM F2338 5.
Footnotes
-
Learn how glass thermal shock resistance is defined and why local heating can crack cold glass. ↩ ↩
-
Understand how temperature gradients form and why steep gradients create stress at hot/cold boundaries. ↩ ↩
-
See practical details on hot-melt adhesive behavior, temperatures, and application variables that affect heat input. ↩ ↩
-
Understand how polariscopes reveal residual stress patterns and why stress changes signal higher crack risk. ↩ ↩
-
Reference a widely used vacuum decay standard for leak detection and post-process package integrity verification. ↩ ↩


