This is one of the most common misconceptions I address in my technical workshops. Clients often think thicker glass has a "different" expansion rate. It doesn’t.
Uneven wall thickness does NOT change the Coefficient of Thermal Expansion (CTE) of the glass; that is a fixed chemical property. However, it significantly alters the thermal stress distribution. Uneven thickness causes different parts of the bottle to expand and contract at different speeds, creating internal mechanical conflict (tension) that shatters the glass.

The Physics: Material vs. Geometry
Let’s clear the air: CTE is chemistry.
-
Soda-Lime Glass 1 CTE: $\approx 9.0 \times 10^{-6} / K$
-
Borosilicate Glass 2 CTE: $\approx 3.3 \times 10^{-6} / K$
Whether the glass is 1mm thick or 10mm thick, it wants to expand by the exact same amount for every degree of temperature rise. The problem isn’t how much it wants to expand, but when it does it.
Does wall thickness change the glass CTE itself, or does it mainly create uneven heating/cooling and thermal stress?
The glass material doesn’t care about its shape, but thermal conductivity 3 definitely does.
The CTE remains constant regardless of thickness. The issue is thermal inertia. Thick glass sections hold heat longer (high thermal mass), while thin sections cool rapidly. This time lag means one part of the bottle is contracting while the adjacent part is still expanded, tearing the bottle apart at the transition zone.
The "Traffic Jam" Analogy
Imagine a line of cars (glass molecules) trying to move.
-
Thin Wall: The traffic light turns green, and everyone moves instantly. The glass cools and contracts uniformly.
-
Thick Wall: The front cars move, but the back cars are stuck. The surface cools, but the core stays hot.
When you have a bottle with a "Heavy Bottom" (thick base) and "Thin Sidewalls", you create a disaster.
-
In the Cooling Tunnel: The thin sidewall cools to 30°C and shrinks.
-
The Base: Is still at 60°C and fully expanded.
-
The Result: The shrinking sidewall pulls away from the swollen base. The glass snaps exactly at the "Heel 4" (the corner where bottom meets wall).
How do thin spots and thick spots form temperature gradients that trigger cracks during hot-fill or pasteurization?
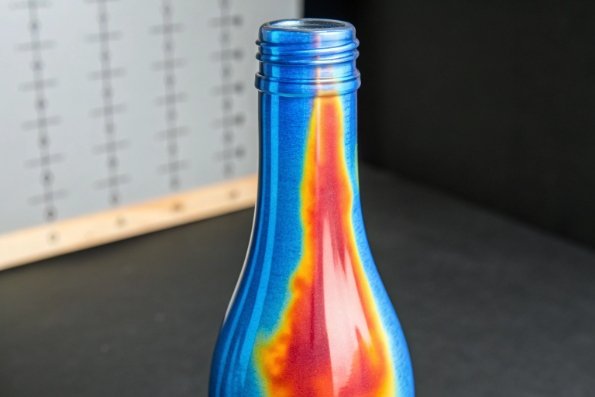
Glass is a terrible conductor of heat. This insulating property is the root cause of thermal shock 5 failure in uneven bottles.
Thick spots act as heat sinks, creating a steep temperature gradient ($\Delta T$) between the inner and outer surfaces. Thin spots reach thermal equilibrium quickly. When these two zones meet, the "Differential Expansion" creates localized tensile stress that exceeds the glass’s breaking point (approx. 5,000-10,000 psi).
The Mechanics of Failure
Let’s look at a Hot Fill scenario ($90^{\circ}C$ liquid):
-
Thin Spot (1.5mm): The heat passes through instantly. Inner and outer surfaces both hit $90^{\circ}C$. Expansion is uniform. Safe.
-
Thick Spot (5.0mm): The inner surface hits $90^{\circ}C$ and expands. The outer surface is still at room temp ($20^{\circ}C$) because heat takes time to travel through 5mm of glass.
-
The Conflict: The expanding inside pushes against the rigid, cold outside.
-
The Fracture: This puts the outer surface into massive Tension. Since glass is weak in tension, it cracks.
Rule of Thumb: A thickness ratio greater than 2:1 (e.g., 4mm base vs. 2mm wall) is a high-risk zone for thermal failure.
Which defects are most linked to non-uniform thickness (base checks, shoulder cracks, finish chipping, microcracks)?
Uneven glass distribution 6 doesn’t just look bad; it creates predictable failure points.
The most common defects driven by uneven thickness are "Heel Taps" (cracks at the base/wall junction), "Shoulder Checks" (cracks where the neck widens), and "Baffle Marks" (seams on the bottom). These defects occur because the stress concentrates exactly where the thickness changes abruptly.
The "Unusual Suspects"
-
1. Heel Tap / Base Separation:
-
Cause: The classic "Thick Bottom / Thin Wall" problem.
-
Symptom: The entire bottom of the bottle breaks off cleanly, like a disc. This is the #1 failure in pasteurization tunnels.
-
-
2. Shoulder Checks:
-
3. Choked Neck:
-
Cause: Excessive glass thickness in the neck bore.
-
Symptom: The filling tube hits the glass, or the liquid backs up because the opening is too small (despite the outer diameter being correct).
-
-
4. Bird Swings:
-
Cause: Extreme variation where a strand of glass connects two walls inside the bottle.
-
Symptom: Immediate catastrophic failure under any thermal or mechanical load.
-
How can you control thickness uniformity and verify it (mold design, forming parameters, thickness mapping, and thermal shock tests)?
You cannot inspect quality into a bottle; you must manufacture it. But you must verify it before shipping.
Control starts with "Parison Design" (the initial shape of the molten glass) to ensure even blowing. Verification requires non-destructive testing like "Hall Effect" magnetic thickness gauging and destructive "Sectioning" to map the vertical glass distribution. Finally, a Thermal Shock Test confirms the bottle can handle the stress.
1. Controlling the Process (The "IS" Machine)
In our factory, "Glass Distribution" is the holy grail. We adjust:
-
Gob Temperature: Uniform heat = uniform flow.
-
Timing: The "Blow" time. If we blow too late, the glass settles and the bottom gets too thick.
-
Parison Shape: We optimize the blank mold 8 to pre-shape the glass so it stretches evenly into the final mold.
2. Measuring the Result
-
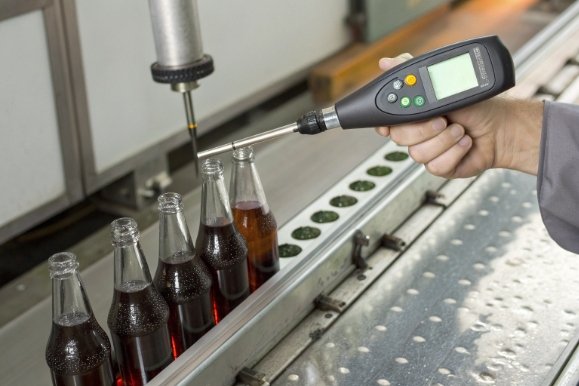
Hall Effect Gauge (The "Magna-Mike"): We drop a small steel ball inside the bottle and use a magnetic probe 9 on the outside. As we scan the bottle, it gives us a real-time digital reading of the wall thickness at every point.
- Target: We want a "Min/Max Ratio 10" of roughly 1.5 or less.
-
Vertical Sectioning: We cut a bottle in half vertically with a diamond saw to visually inspect the profile. This shows us the "transition zones" that digital gauges might miss.
3. The Ultimate Pass/Fail: Thermal Shock
Even if the thickness looks okay, the stress might be there.
-
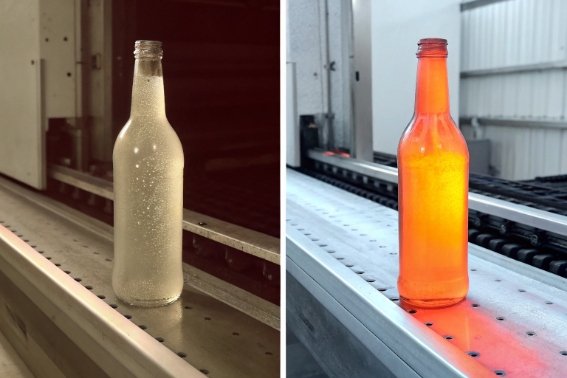
The Test: Heat to $60^{\circ}C$, plunge into $20^{\circ}C$ water.
-
The Logic: If the bottle has bad distribution (thick/thin spots), the stress will find them and break the bottle. If it survives, the distribution is "thermally acceptable."
Conclusion
Uniformity is Strength. A thin, uniform bottle is far stronger in a sterilizer than a thick, uneven one. Don’t ask for "more glass" to solve breakage; ask for "better distribution."
Footnotes
-
Common commercial glass type used for beverages and containers. ↩
-
Glass with silica and boron trioxide, offering low thermal expansion. ↩
-
Measure of a material’s ability to conduct heat. ↩
-
Critical junction where the bottle wall meets the base. ↩
-
Structural failure caused by rapid temperature changes and internal stress. ↩
-
Uniformity of glass wall thickness throughout the container’s body. ↩
-
Measured lump of molten glass fed into the forming machine. ↩
-
Initial mold that forms the parison in the glass forming process. ↩
-
Sensor component used in Hall Effect thickness gauges. ↩
-
Quality metric comparing the thickest and thinnest wall sections. ↩


