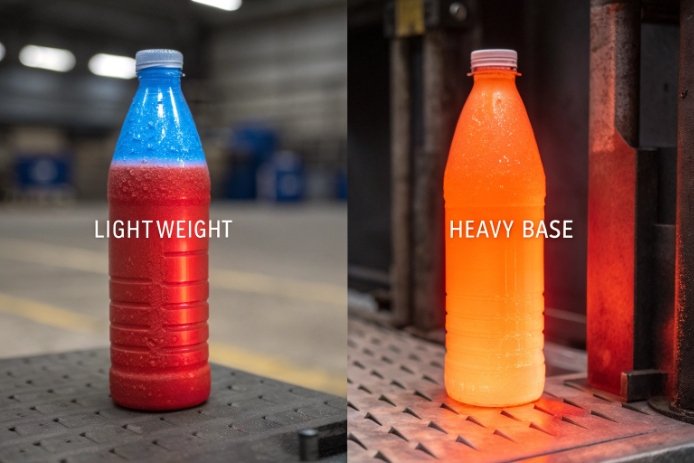
Lightweight bottles can buckle, crack, or show waves. Heavy-base bottles can seed, cord, or trap stress. Both problems often start in the recipe.
Wall thickness changes heat flow and stress, so the same glass chemistry can behave “easy” on thick walls but “narrow” on thin walls. Matching formulation to thickness keeps viscosity, stress relief, and color stable.

The chemistry–geometry trade that decides your forming window
A bottle is not a lab coupon. Thickness varies at the heel, shoulder, and base. Those zones cool at different speeds. That is why thickness and composition must be designed as a pair. When wall thickness drops, the glass loses heat faster. That can freeze the surface while the core is still moving. When thickness rises, the core stays hot longer. That can drive long stress relaxation time, more reheat, and more devit 1 risk near the base.
Thickness changes the “effective viscosity” during forming
At the same forehearth temperature, thin walls see faster cooling. The skin viscosity rises fast. That can lock in flow marks and thin spots. It can also trap a hot core that keeps creeping. Thick walls cool slowly. The surface stays workable longer, but the center can hold heat and keep deforming under its own weight, especially in heavy bases.
So the recipe must shape the viscosity–temperature curve 2 to match how fast the part cools.
Composition changes what thickness will forgive
A high-viscosity curve can help thin walls resist slump and paneling. But it can also create defects if the glass becomes too stiff too early. A lower-viscosity curve can help heavy sections fill and smooth out. But it can also raise creep risk in hot handling, and it can raise CTE and thermal stress.
A simple way to frame it is this: thin walls need a wider forming window, and thick walls need a cleaner melt and safer liquidus margin.
A practical matching map
| Design direction | Thickness tendency | Recipe direction | What it prevents | What it can cause if pushed too far |
|---|---|---|---|---|
| Lightweighting | Thin walls, fast skin freeze | Slightly higher (SiO₂ + Al₂O₃) / alkali, controlled MgO | Blow-and-blow instability, waviness, hot creep | Higher furnace load, harder fining |
| Heavy base / premium | Thick base, slow core cooling | Keep liquidus low, keep viscosity workable, strong refining | Seeds, cords, devit stones, base checks | High CTE and stress if alkali is too high |
When a customer asks for a thinner bottle, the first instinct is to only change the mold and the process. That works sometimes. But the best results come when chemistry moves a little too. A small change in Al₂O₃ 3 or MgO can make the forming window feel much wider. A small change in alkali can change how stable the gob feels at the same temperature.
Here is the rule that guides many of our internal trials: thickness decides the cooling rate, and the cooling rate decides which part of the viscosity curve matters most.
A thin wall lives in the mid-viscosity range for a short time. So it needs the curve to be forgiving there. A thick base stays in that range longer. So it needs the melt to stay clean and stable there, without crystals or cords.
This is why formulation matching is not a “one-number Tg game.” It is a curve-shaping job, tied to thickness and the exact thermal profile of the forming line.
Now the details.
This is where the chemistry can be tuned with clear targets and clear QA checks.
Which oxide ratios (SiO₂–Na₂O–CaO–MgO–Al₂O₃) tune viscosity curves to form thin vs. thick walls without defects?
Thin-wall forming fails when the glass turns stiff too fast at the skin. Thick-wall forming fails when the melt is not clean or devit starts near the base.
For thin walls, the best ratios raise mid-range viscosity without killing meltability: slightly higher SiO₂ + Al₂O₃, controlled total alkali, and a MgO share that improves stability. For thick walls, protect liquidus margin and keep refining strong.
Thin walls: widen the working range, stop early skin freeze
Thin walls need the glass to stretch smoothly and resist “orange peel” or waves. The surface cools fast, so it hits high viscosity early. If the composition is already high-viscosity, thin sections can tear, trap flow lines, or show thin streaks.
A practical approach is to raise viscosity points a little, but keep the mid-range slope gentle.
-
Increase SiO₂ slightly to support stiffness and reduce hot creep.
-
Increase Al₂O₃ slightly to reinforce the network and reduce deformation after forming.
-
Keep total alkali (mostly Na₂O) controlled so the melt still flows and refines.
-
Use MgO as a tuning tool, but avoid moves that raise devit risk.
In simple ratio terms, thin-wall bottles usually benefit when:
-
(SiO₂ + Al₂O₃) / (Na₂O + K₂O) moves up a bit
-
Al₂O₃ / total alkali moves up a bit
-
MgO / (CaO + MgO) moves toward a stable middle, not an extreme
Thick walls: protect against devit, cords, and base defects
Thick walls and heavy bases cool slowly. That gives time for crystals to grow if the liquidus 4 is too high. It also makes cords more visible because the section is optically thick.
So thick-wall designs prefer:
-
A safe liquidus margin in the forehearth and gob range
-
Strong refining to remove bubbles that would be obvious in thick glass
-
A viscosity curve that stays workable long enough to fill the heel and base details
That often means less aggressive viscosity-raising changes. It can also mean the same SiO₂ level, but better control of MgO and Al₂O₃ so the liquidus stays low.
Ratio guide table for decision meetings
| Goal | Ratio direction | Why it helps | Watch-outs |
|---|---|---|---|
| Thin wall, stable forming | Raise (SiO₂ + Al₂O₃) / alkali slightly | Higher mid-range viscosity, less hot creep | Melt energy up, fining harder |
| Thin wall, fewer waves | Keep total alkali controlled | Less viscosity collapse at warm handling | Forming can get stiff if too low |
| Thick base, low stones | Keep liquidus margin safe | Less devit in slow-cooling base | Limits Al₂O₃/MgO increases |
| Thick base, fewer bubbles | Strong refining + redox stability | Thick sections show every seed | Over-refining can foam or color-shift |
In practice, the best matching work happens with small steps and fast feedback. A 0.3–0.8% move in Al₂O₃ can be meaningful. A small MgO/CaO shift can change devit risk a lot. The line tells the truth. We watch defect maps, gob stability, and dimensional drift at warm handling. That is how the ratios become real production control.
How do composition and thickness interact on strength—CTE, annealing/strain point, and thermal-shock limits?
A thin bottle can be strong if stress is low and surfaces are clean. A thick bottle can crack if stress is trapped in the base. Thickness changes stress gradients, so chemistry must support stress control.
Thickness sets thermal gradients, and chemistry sets how much stress those gradients create and how fast the glass can relax. Lower CTE, stable annealing/strain behavior, and uniform lehr control matter more as thickness rises.

CTE and thickness: the stress multiplier shows up in thick zones
Thermal stress scales with both expansion and temperature difference. Thickness increases temperature difference across the wall during hot-fill, pasteurization, and even normal cool-down after forming.
-
If CTE is high, stress rises quickly during fast heat or cool.
-
If CTE is low and stable, stress is lower for the same thermal gradient.
This is why thick bases often fail in pasteurizers first. The core stays hot. The surface cools. The base edge holds stress.
Composition tools that often help lower or stabilize CTE 5 in container glass:
-
Slightly higher SiO₂
-
Slightly higher Al₂O₃
-
Careful control of total alkali
-
Balanced CaO/MgO to avoid raising expansion too much
Annealing and strain points: thickness changes what “enough annealing” means
Annealing point 6 and strain point describe how the glass relaxes stress. Thick bottles need more time or better lehr profiling because the inside cools later. If the composition has a higher annealing point, the glass needs higher lehr setpoints or longer soak to relax. If the process does not adjust, residual stress stays trapped.
Thin bottles cool fast and can trap skin-core stress too, but they usually equalize faster. Their risk is more about handling damage and thermal shock at sudden transitions, like cold rinse after warm filling.
Thermal shock limits: what fails first
Thermal shock is not only about chemistry. It is also about:
-
Residual stress pattern
-
Surface damage and coating quality
-
Thickness transitions (sharp changes raise local stress)
Thick designs often need geometry work, like smoother heel radii and fewer sharp transitions, plus chemistry control.
Matching matrix for strength and heat use
| Thickness trend | Main strength risk | Chemistry focus | Process focus |
|---|---|---|---|
| Lightweight | Abrasion-driven breaks, fast gradients | Control CTE, keep viscosity window forgiving | Hot-end/cold-end coating, uniform thickness |
| Heavy base | Trapped residual stress, base checks | Stabilize CTE, keep annealing behavior stable | Lehr 7 soak/profile, base cooling control |
In many projects, the best “strength gain” did not come from a big recipe change. It came from matching a small recipe move with a lehr profile move. For thin walls, a modest Al₂O₃ lift can reduce creep and paneling, but only if the line keeps stress low and coatings are consistent. For thick bases, a composition that is slightly lower in expansion helps, but only if annealing removes stress in the base core. When thickness rises, the lehr becomes a bigger part of strength than the batch sheet.
Should colorant density (Fe/Cr/Se–S/Co) be adjusted for thicker walls to keep target L*a*b* and UV shielding?
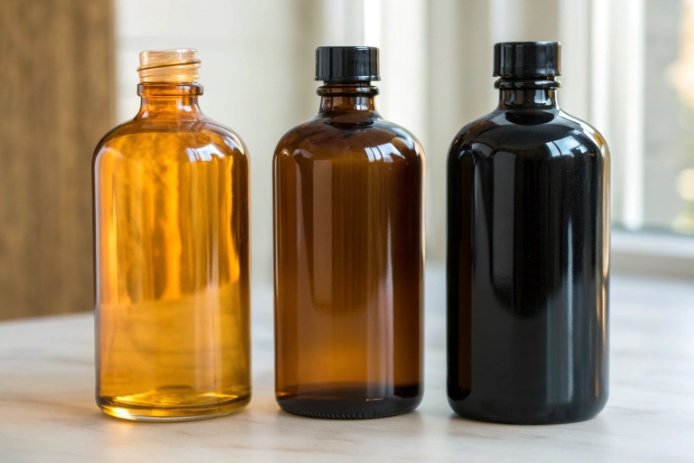
A color that looks perfect in a thin wall can go too dark and muddy in a thick base. That can break brand color rules and can also change UV performance in ways the customer did not ask for.
Thicker walls increase optical path length, so the same colorant package shifts L*a*b* and transmittance. For thick designs, lower colorant loading or a re-balanced Fe/Cr/Se–S/Co mix keeps color and UV shielding on target.
Thickness changes color strength even when chemistry is stable
Color intensity follows Beer–Lambert 8 style behavior. More thickness means more absorption. That reduces L* (darker) and can shift a* and b* depending on the color system.
-
Amber systems (Fe + S, sometimes with Se) can go too dark in heavy bases.
-
Green systems (Fe + Cr) can turn “blackish” at the base if dosing is not adjusted.
-
Cobalt blue can become too saturated and hide defects in thin walls, but can become too deep in thick zones.
So thicker walls usually need one of these approaches:
1) Lower total colorant addition while keeping the same ratio.
2) Re-balance the ratio to keep hue stable while adjusting darkness.
3) Specify color based on a standard thickness coupon that matches the bottle’s critical zone, not just a generic 3–4 mm sample.
UV shielding: do not use color as a guess
Many brands want UV protection for beer, oils, or sensitive drinks. Thicker walls already cut light. But the customer often needs a defined transmission limit, not just “darker.”
For thicker bottles, it is safer to specify:
-
Target transmittance at key wavelengths (UV and visible bands)
-
Target L*a*b* at a defined thickness and illuminant
-
Allowed variation across production lots
Practical color QA table
| Item | Why it matters more in thick walls | Suggested control method |
|---|---|---|
| L*a*b* at defined thickness | Heavy base changes path length | Measure on thickness-matched plaques or bottle zones |
| UV/visible transmittance | UV protection depends on wavelength | Spectrophotometer 9, define wavelength bands and limits |
| Redox stability | Amber and some greens depend on redox state | Track Fe²⁺/Fe³⁺ trend, monitor furnace atmosphere |
| Cord/seed visibility | Thick glass magnifies optical defects | Defect map + optical inspection in base/shoulder zones |
Colorants interact with redox and refining
Se–S amber is sensitive to redox and furnace conditions. If lightweighting increases cullet and changes batch redox, color can drift even if the colorant weight stays the same. For thick bases, that drift becomes more visible because the base looks darker and more saturated.
So yes, colorant density should be adjusted for thicker walls, but it should be done with a control plan. The fastest way to lose time is to chase color only by adding more colorant, while redox is moving under the surface.
What cullet %, fining/redox, and refining choices stabilize quality when lightweighting versus heavy-base designs?
Lightweighting often raises cullet and speeds up pull. Heavy-base designs often raise residence time and stress risk. Both can destabilize quality, but in different ways.
Lightweighting needs stable cullet quality, stable redox, and fining that clears seeds fast without foaming. Heavy-base designs need stronger refining for bubbles and cords, plus redox control to prevent color drift and devit near the base.
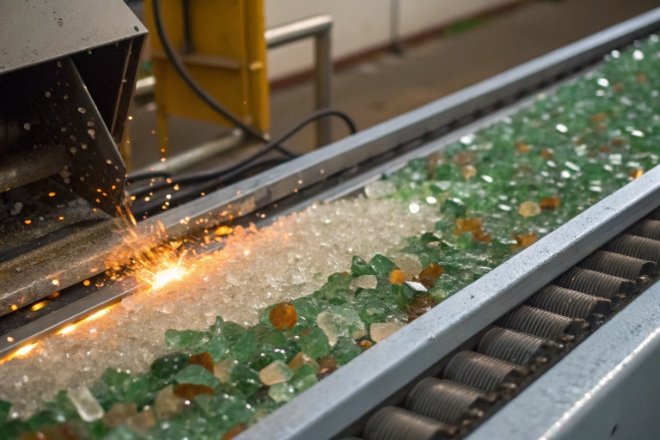
Cullet: the friend that can also bring variability
Higher cullet 10 usually reduces energy and helps melting. That is good for lightweighting. But cullet can carry:
-
Variable color
-
Organics and moisture
-
Metals and ceramics
-
Different redox history
Thin bottles are less forgiving of cords and seeds because small defects can become fracture origins. Thick bottles show bubbles more clearly and can trap cords in the base.
So the cullet program must match the design:
-
Lightweight: tighter cullet sorting and contamination control
-
Heavy base: extra focus on bubble-free melt, since defects are more visible
Fining and refining: tune for the defect that matters
Fining removes bubbles. Refining stabilizes homogeneity and clears cords. If the goal is lightweighting, the line often runs hotter and faster. That can reduce residence time. Seeds can rise in importance. If the goal is heavy-base, residence time is longer, but thermal gradients and devit risk rise, and cords can show in thick zones.
Refining choices usually focus on:
-
Fining agent selection and dosage for fast bubble removal
-
Furnace temperature profile that avoids foaming and avoids cold spots
-
Stirring and mixing control to reduce cords
Redox affects:
-
Amber color development (Se–S systems)
-
Iron state (Fe²⁺ vs Fe³⁺) and green/amber tone
-
Fining reactions and bubble behavior
Lightweighting can shift redox because cullet content changes and fuel/air balance changes at higher pull rates. Heavy-base work can shift redox because temperature profiles and residence time change.
A stable plan uses:
-
A defined redox target window
-
Routine monitoring of color and transmittance
-
Tight control of batch moisture and carbon sources
Stabilization checklist by design type
| Design type | Cullet strategy | Fining/refining strategy | Redox focus | Most important QA outputs |
|---|---|---|---|---|
| Lightweight | High cullet is fine, but sorting must be strict | Fast fining, avoid foam, keep homogeneity | Prevent drift from cullet swings | Seeds/cords, stress pattern, top-load after cycling |
| Heavy-base | Cullet must be clean and consistent in color | Strong refining, keep liquidus margin safe | Prevent color darkening and devit risk | Bubble count in base, cord inspection, base stress |
One internal habit that helps is to treat lightweighting projects like “process sensitivity projects.” Small batch swings show up fast in thin walls. Heavy-base projects behave like “melt cleanliness projects.” The bottle will show every seed and every cord, and the base will keep stress if annealing is not perfect.
When these choices are matched to wall thickness, both designs become stable: thin walls form clean without waves, and thick bases stay clear, strong, and on-color.
Conclusion
Wall thickness sets cooling and stress. Formulation sets viscosity, expansion, and color response. Match both, and control cullet, redox, and QA, and defects drop fast.
Footnotes
-
Devitrification is the unwanted formation of crystals in glass. ↩
-
Viscosity of glass determines its flow properties during forming. ↩
-
Aluminium oxide improves chemical durability and viscosity. ↩
-
Liquidus temperature is the point where crystals start to melt. ↩
-
Thermal expansion measures how material size changes with heat. ↩
-
Annealing point is key for stress relief schedules. ↩
-
Annealing lehr is the oven used to cool glass slowly. ↩
-
Beer–Lambert law relates light absorption to material thickness. ↩
-
Spectrophotometry measures light intensity as a function of color. ↩


