A bottle can pass glass specs and still fail stability tests. The missing piece is often the label. It blocks light, but it also creates “weak windows” you did not plan for.
Yes. Labels, wraps, and sleeves usually reduce light transmission by occluding parts of the bottle, and some materials also absorb or scatter UV and visible light. The real protection depends on coverage %, opacity, and how evenly the label sits on curved glass.

Why labels change transmittance more than teams expect?
A label is an optical mask, not just decoration
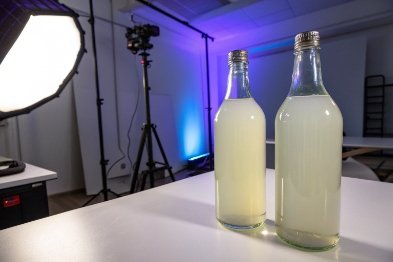
A glass bottle is a transparent wall. A label turns that wall into a mixed system. Part of the surface still transmits. Part of the surface blocks. Part of the surface reflects. Under retail lighting, light comes from many angles, so the product “sees” the whole surface over time. That makes label coverage a real stability factor, not only a branding choice.
The first surprise is how often the label becomes the strongest light barrier in the system. A basic paper label can be close to opaque. A shrink sleeve labeling 1 system can cover 360 degrees. Some sleeve films even advertise light-blocking or UV-protection features. When that happens, the label becomes part of the primary protection plan, whether procurement wrote it down or not.
Curved glass adds scatter and edge leakage
On a flat panel, a label sits clean. On a bottle, the label stretches and bends. Small wrinkles, edge lift, and trapped air bubbles create scatter and glare. That scatter can make the protected area less “black” than expected. It can also make test results jump between labs if the measurement spot lands near a wrinkle or seam.
In real production, label seams and cut edges are the most common weak points. They are thin. They are not always inked. They can transmit more UV than the printed area. If a light-sensitive fill sits on a shelf for months, those small weak zones can matter.
“Dose” thinking makes label impact easy to explain
Stability risk is driven by light dose. If a label blocks 60% of the bottle area, the light dose can drop a lot for diffuse lighting. But the exact drop depends on orientation, store lighting direction, and how the bottle is displayed. A front label protects the front. A full sleeve protects almost everything, but seam and cap gaps still exist.
A simple way to align teams is to treat labels as a controllable optical layer and write it into the packaging risk review.
| Label or wrap type | Typical optical effect | Common weak point | What to control in specs |
|---|---|---|---|
| Front/back paper label | Strong occlusion only where placed | Unlabeled glass zones | Coverage %, placement tolerance |
| Clear pressure-sensitive film | Mild occlusion, more reflection | Very high UV pass-through | UVA band limits if needed |
| Printed wrap-around label | Moderate occlusion across body | Gap at overlap and edges | Overlap width, print density |
| Shrink sleeve (full body) | High occlusion, strong protection possible | Seam line, top/bottom openings | Seam spec, light-block film choice |
| Opaque sleeve / pigmented film | Very strong blocking | Window cutouts | Window transmittance limits |
If the goal is fewer stability surprises, the label needs the same seriousness as glass color and thickness.
What is label occlusion and scatter on curved glass?
A label can look perfect in hand and still behave badly under light. That gap between appearance and physics is where many stability arguments start.
Label occlusion is the direct shading created when a label blocks part of the bottle surface. Scatter is the light that gets redirected by label texture, ink layers, seams, and trapped air on curved glass, which can leak light into areas you thought were protected.

Occlusion is simple shading, but it is still easy to misread
Occlusion is the easiest part. A printed opaque paper label 2 has pigments. Pigments absorb and reflect light. Paper also scatters light inside its fibers and looks opaque. So occlusion usually reduces light reaching the liquid behind the label.
The trap is assuming the “protected area” equals the label footprint. On a curved bottle, the label may not sit flush at the shoulder. The seam may lift. Condensation can loosen edges. Over time, those changes create micro-gaps where light slips through.
Scatter is the reason “thin defects” matter
Scatter is not the same as absorption. A clear film label can scatter light without blocking much UV. A heavy white ink layer can scatter and also block. On curved glass, scattered light can bend around edges and enter the liquid from angles a simple model ignores.
There are three common scatter sources:
- Surface texture: matte varnish, embossed film, paper grain
- Ink microstructure: halftone dots, white underprint, metallic inks
- Air gaps: bubbles and wrinkles that act like tiny lenses
In a lab, scatter changes the measurement mode. Regular transmittance drops fast when scatter rises. Total transmittance may drop less because an integrating sphere collects diffuse transmission 3. That difference is why two labs can “disagree” while both are correct for their method.
Why label coverage impacts stability and claims compliance?
A brand can claim “protected from light,” and then a stability test shows unacceptable change. That often becomes a packaging dispute, even when the formula is fine.
Label coverage impacts stability because it changes the light dose the product receives during storage and retail display. It also impacts compliance because some standards and regulatory approaches treat packaging, including labels, as part of the protection system.
Stability is a dose problem, and coverage changes dose
Light comes from overhead fixtures, windows, and display lighting. If only 30% of the bottle is covered, then most of the surface is still a light entry path. If 90% is covered, dose can drop sharply, even when the glass is clear.
Many teams test the product in a “fully exposed” state first, then test with packaging if needed. Even when the product is not pharma, the photo-oxidation process 4 still matters for flavors, colors, vitamins, and essential oils.
A key lesson from ICH-style photostability testing 5 work is that packaging is an active mitigation tool. When exposure levels are defined, the only honest response is to control every optical layer that changes dose, including labels and wraps.
How to model label area versus spectral protection?
Teams often want one number. But labels turn a bottle into a patchwork of optical zones. A simple model keeps decisions fast and avoids false confidence.
A useful model treats the bottle as a set of surface zones with different spectral transmittance. Overall protection then depends on coverage %, zone transmittance curves, and the lighting directionality the product sees in real life.
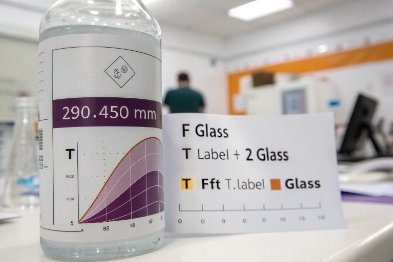
Start with the two-zone model, then add reality
For many projects, a two-zone model is enough to assess light-sensitive formulas 6. Overall protection then depends on the uncovered glass and the labeled area construction.
| Modeling input | What to measure | How to set a tolerance | Why it works |
|---|---|---|---|
| Coverage (C) | CAD + bottle measurement | ±2–5% area (typical) | Controls dose directly |
| Seam strip | Overlap width | Min overlap, no gaps | Seams are common leaks |
| Window zones | Window area | Max area, fixed location | Prevents silent exposure growth |
Are printable UV-barrier inks replacing opaque sleeves?
Sleeves solve protection fast, but they can change recyclability, cost, and line speed. Inks and coatings promise a lighter solution, but they must still be food-safe and stable.
Printable UV-barrier inks and coatings are growing as tools for partial spectral control and design flexibility, but opaque sleeves still win for maximum blocking and full coverage. Inks work best when paired with coverage control and verified spectra.

What printable barriers actually do
Most “barrier by printing” comes from absorbing systems or scattering systems. White inks often use titanium dioxide pigments 7 for opacity. That creates strong scatter and can reduce light reaching the liquid behind the print. This approach works well when the design can accept heavy white coverage.
Conclusion
Labels and wraps can cut light dose a lot, but seams and uncovered zones still matter. The safest path is to specify coverage, construction, and spectral limits as one controlled system.
Footnotes
-
Comprehensive guide to shrink sleeve technology and its applications in protective and branding-focused container packaging. ↩ ↩
-
Technical explanation of how materials block light and achieve opacity through absorption and scattering mechanisms. ↩ ↩
-
Understanding the behavior of light when it passes through translucent materials and scatters in multiple directions. ↩ ↩
-
Insights into the chemical reactions triggered by light exposure that lead to degradation in organic products. ↩ ↩
-
Regulatory guidelines for assessing the light stability of medicinal products and active substances under standardized conditions. ↩ ↩
-
Research on the vulnerability of specific product formulations to light and strategies for effective protective packaging. ↩ ↩
-
Overview of the most widely used white pigment, known for its high refractive index and opacity. ↩ ↩


