Old candle jars look reusable, but wax, fragrance oils, and heat stress can turn a “cute DIY” into cracked glass, stubborn odors, or unsafe food storage.
Reuse candle containers safely by removing wax without overheating the glass, stripping fragrance residue with the right solvents and detergent, inspecting for heat damage, and limiting food contact unless the vessel is proven food-safe and fully de-scented.

Candle containers are often made from glass that looks like normal food jars, but they are not always built or coated for the same job. Many have decorative paint, metallic labels, or glued bases that do not like heat or dishwashers. Some have thin walls that handled candle heat only because the flame was controlled by wax level. Once the jar is empty, it is easy to expose it to new stresses: boiling water, hot ovens, sudden temperature changes, or direct stovetop heat. That is why safe reuse starts with a simple idea: treat the jar like a used tool, not like a new food-grade 1 container.
The second issue is residue. Wax can be removed, but fragrance oils and soot can cling. Those residues can transfer odor, stain what you store later, and cause the next candle pour to burn unevenly. A jar can look clean and still smell like vanilla smoke when warmed. So “clean” must mean two things: no visible wax and no invisible fragrance film.
Finally, reuse should match risk. Desk storage and planters are low risk. The next sections give practical methods that work in real kitchens and DIY candles 2 workshops. The safest strategy is to choose the lowest-risk reuse that still gives value.
| Step | What it prevents | What to avoid | When to stop and discard |
|---|---|---|---|
| Wax removal (cold or gentle heat) | burns, cracked glass | direct flame or boiling shock | chips, cracks, cloudy stress marks |
| Residue stripping (degrease) | lingering scent, oily film | harsh scraping that scratches | scent remains after cleaning cycles |
| Inspection | breakage and leaks | ignoring tiny cracks | any crack at rim/base |
| Reuse choice | unsafe contact or heat | food use “just because it’s glass” | unknown coatings or strong fragrance |
Once the jar is truly clean and structurally sound, repurposing becomes easy and safe. The next sections give practical methods that work in real kitchens and workshops.
How do you remove wax and fragrance residues completely?
If wax stays, it traps odor. If fragrance oil stays, it will come back every time the jar warms. A “half-clean” jar is the most frustrating outcome.
Remove wax first with freezer pop-out or controlled warm-water melt, then remove fragrance residue with a degreasing wash and a final solvent wipe. The goal is zero slickness and zero scent when warmed.
Step 1: Remove the bulk wax safely
Freezer method (best for most jars):
1) Put the jar in the freezer for 2–4 hours.
2) Tap the bottom gently and pop the wax disk out with a plastic tool.
3) Pull out the wick tab with pliers.
This is safer because it avoids heating the glass and avoids pouring hot wax.
Warm-water melt method (good for stubborn wax):
1) Place the jar in a sink or bowl.
2) Pour hot (not boiling) water into the jar to soften wax using a warm-water melt 3 technique.
3) Let wax float and solidify as it cools.
4) Remove the wax layer and repeat if needed.
Never pour wax down the drain. Collect it and throw it away or reuse it for fire starters.
Step 2: Remove wick glue and soot
- Peel the metal wick tab off with pliers.
- Scrape adhesive with a plastic scraper.
- Wipe soot with a paper towel before washing so it does not smear.
Step 3: Strip fragrance oils
Fragrance oils are oily. They need a degreasing wash 4, not just water.
1) Wash with very hot water + dish soap (high surfactant) and scrub the inside.
2) Rinse and feel the glass. If it feels slick, repeat.
3) Wipe with isopropyl alcohol 5 to lift remaining oil film.
4) Final wash and rinse. Air-dry fully.
Odor test: warm the empty jar with hot tap water for 1 minute and smell it. If it still smells like candle, do not use it for food or tight-seal storage.
| Residue problem | Best removal method | What not to do | Success signal |
|---|---|---|---|
| Thick wax | freezer pop-out | knives that scratch | wax releases in one piece |
| Thin wax film | hot soapy wash + wipe | boiling shock | glass feels squeaky clean |
| Wick glue | plastic scraper + alcohol | metal scraping | no tacky spot |
| Fragrance oil | degrease + alcohol wipe | only rinsing | no slickness, no smell when warm |
| Soot | dry wipe, then wash | spreading it wet first | no gray haze on cloth |
When “completely” is the goal, the jar must pass the touch test (no slick film) and the warm odor test (no scent release). If it fails, it is still reusable, but not for food or airtight storage.
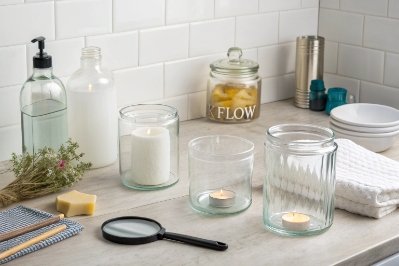
Which uses—planters, storage, DIY candles—are safe?
A reuse idea is safe when the jar’s new job is easier than its old job. A reuse idea is risky when it adds heat, pressure, or food contact.
Planters and dry storage are the safest uses. DIY candles can be safe if the jar is heat-stable and the wick is correct. Food or drink use is the most restrictive and should be avoided unless the vessel is clearly food-grade and fully de-scented.
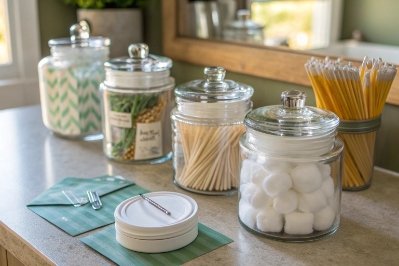
Low-risk reuses (recommended)
- Desk and bathroom organizers: cotton pads, makeup brushes, pens, clips.
- Dry goods (non-food sensitive): craft beads, screws, clothespins.
- Planters: small succulents or herb starters (use a liner or add drainage layer).
For planters, the main risk is water pooling. Candle jars usually have no drainage hole, so add pebbles at the bottom or use a nursery pot insert.
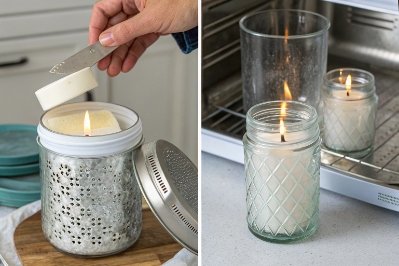
Medium-risk reuse: DIY candles
DIY candles are safe when the jar is meant for heat and the candle is designed correctly.
Key points:
- Use a wick sized 6 for the jar diameter. Oversized wicks overheat glass.
- Keep safe fill levels and avoid pouring wax too hot.
- Use a wick sticker rated for heat, not random glue.
- Place on a heat-resistant coaster when burning.
A shortcut that lowers risk: put a tealight in a metal cup inside the cleaned jar instead of pouring a new candle. This reduces direct heat stress on the glass.
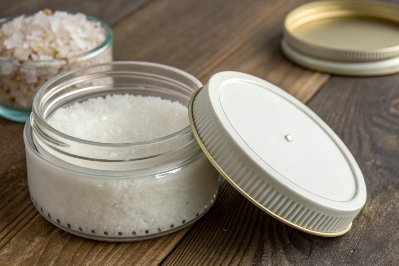
High-risk reuse: food contact
Food storage is only safe when:
- the jar is confirmed food-safe glass with no coatings or paints that can contact food,
- all fragrance and residue are gone,
- the closure system is food-grade and seals reliably.
If any doubt exists, keep reuse non-food. A candle jar that “still smells a bit” should never become a spice jar.
| Reuse idea | Safety level | Main risk | Simple safeguard |
|---|---|---|---|
| Pen holder, cotton pads | Very safe | none significant | wash and dry fully |
| Hardware/craft storage | Very safe | residue odor transfer | alcohol wipe to remove oils |
| Planter | Safe | root rot, algae | add drainage layer or liner |
| Tealight holder | Medium | heat stress | use metal-cup tealight only |
| Re-poured candle | Medium | overheating and cracking | correct wick + burn testing |
| Food storage | Risky unless proven | odor/chemical transfer | only use if fully de-scented and food-grade |
Choose the reuse based on risk tolerance. Most people get the best value from low-risk uses that still look great.
Do you need new lids or gaskets for airtight reuse?
Airtight reuse is not only about the lid fitting. It is about the gasket material and how it behaves with oils, odors, and repeated opening.
Yes, for true airtight storage you usually need a fresh gasket or a food-grade lid system. Old candle lids are often decorative and may not seal, and any gasket that absorbed fragrance should be replaced.
Many candle lids are made for dust control, not for sealing. Even when they screw on, they may not have a real liner. Some have foam inserts or glued parts that hold fragrance. If the goal is airtight storage for anything smell-sensitive (tea, coffee, spices, bath salts), a clean lid with a proper liner matters.
For DIY candle reuse, a lid can help keep dust out and reduce scent loss, but it does not need to be airtight. For dry storage of screws or craft parts, a lid only needs to keep items contained.
For food-grade airtight reuse, the safe path is:
- use a jar with a known compatible finish (like common twist-off sizes),
- buy new lids with food-grade liners,
- confirm a consistent seal by inversion and short-term leak checks (for liquids).
| Storage goal | Can you reuse the old candle lid? | What to replace | Why |
|---|---|---|---|
| Dust cover (cotton pads) | Usually yes | nothing | seal is not critical |
| Dry parts (craft, screws) | Usually yes | nothing | odor is not critical |
| Odor-sensitive dry goods | Often no | liner/gasket | fragrance absorption causes transfer |
| Liquids | Rarely | lid + liner system | leak risk and contamination risk |
| Food storage | Only if verified | new food-grade lid | unknown materials and absorbed oils |
If airtight is important, treat the lid like the critical component. A fresh liner is cheap compared to ruined contents.
What safety tips apply around heat and food contact?
Most accidents happen when people treat candle jars like cookware. Glass can handle heat in some forms, but it can fail fast with shock or direct flame.
Avoid direct heat, avoid thermal shock, and avoid food contact unless the jar is proven food-grade and fully cleaned. For candle reuse, burn-test and use conservative wick sizing to prevent overheating.
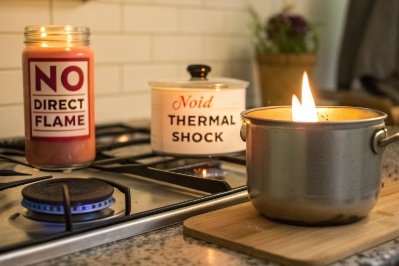
Heat safety rules that prevent cracking
- Never put a candle jar on a stovetop or under a broiler.
- Do not pour boiling water into a cold jar.
- Do not move a hot jar onto a cold countertop. Use a coaster or towel.
- Discard any jar with chips, hairline cracks, or a damaged rim.
If making a new candle:
- Keep flame away from the glass wall by choosing correct wick size.
- Stop burning when wax is low. Over-burn heats the base and can crack.
- Keep the jar away from drafts that create uneven heating.
Food contact rules that prevent contamination
- Do not use jars with painted interiors or unknown coatings for food.
- Do not use jars that retain fragrance for food, even if they look clean.
- Prefer non-food reuse unless the container is clearly designed for food and passes the warm odor test.
A simple line helps: if the jar was sold as a candle, avoid thermal shock 7 risks and assume it is not a food jar unless the brand explicitly states otherwise.
| Risk | What causes it | Best prevention |
|---|---|---|
| Thermal shock crack | fast temperature change | gentle warming, no boiling shock |
| Overheating | oversized wick, long burn | correct wick, burn limits, coaster |
| Hidden fracture | micro-cracks from prior use | inspect under bright light, discard if unsure |
| Odor transfer | fragrance oil residue | degrease + alcohol wipe, avoid food use |
| Contaminant risk | coatings, unknown materials | use for non-food storage |
Safe reuse is about staying conservative. A clean jar used as a planter or organizer is almost always a win. A candle re-pour can be a win when the wick and burn behavior are controlled. Food use is the only area where “maybe” should be treated as “no.”
Conclusion
Reuse candle containers safely by removing wax with cold or gentle heat, stripping fragrance oils completely, inspecting for damage, replacing gaskets for airtight needs, and avoiding direct heat and food contact unless the vessel is clearly food-safe.
Footnotes
-
A guide to identifying food-safe materials and regulatory standards for consumer storage containers. ↩ ↩
-
Creative tutorials and safety best practices for making artisanal candles at home. ↩ ↩
-
A safe technique for removing residual candle wax by leveraging controlled warm water temperatures. ↩ ↩
-
Effective cleaning methods for stripping grease and fragrance oils from glass surfaces. ↩ ↩
-
Instructions for using alcohol as a solvent to remove stubborn oils and residues. ↩ ↩
-
A comprehensive guide to selecting the correct wick based on container diameter and wax type. ↩ ↩
-
Scientific explanation of how rapid temperature changes cause glass to crack or shatter. ↩ ↩


