
A custom bottle mold rarely “fails” all at once. It drifts. First you see scuff, then seams get sharp, then dimensions wander and scrap spikes. The right repair plan catches drift early and fixes it offline.
Custom bottle molds are repaired by pulling the set on a rotation, stripping deposits, rebuilding worn zones by weld/clad, then re-machining and re-polishing to restore profile. High-wear parts like vents, guide rings, and neck rings are often replaced on limits, and dimensional checks re-baseline the toolset so seam alignment and glass distribution return to target.

The best repair systems treat molds like a managed asset: every set has run-hours, a defect history, and a planned “pull-before-fail” preventive maintenance interval 1. That is what keeps downtime low and quality stable.
To standardize how teams name and trace defects, many plants align terminology to a container defect causes and remedies guide 2 so “scuff,” “finning,” and “mismatch” mean the same thing to everyone.
Can weld build-up and re-polish fix scuff, seam mismatch, and distortion?
When customers complain about scuff or “cheap feel,” the root cause is often a rough mold face, scale, or a parting-line mismatch. Many of those issues are repairable.
Yes. Weld build-up (or cladding/hardfacing) plus re-machining and re-polish can restore worn edges, parting surfaces, and cavity faces. It often fixes scuff caused by pitting, improves release, and reduces seam mismatch when guide surfaces and parting lines are restored.

What “repairable” usually means
Repairs work best when wear is:
- surface pitting/oxidation
- small nicks and scratches
- slight parting-line wear
- vent clogging and vent face wear
- minor mismatch from guide surface wear
The repair approach is typically:
1) strip deposits and oxide
2) inspect with magnification and gauges
3) rebuild worn zones using hardfacing alloys for glass container molds 3 (edges, parting surfaces, high-rub faces)
4) stress-relieve if needed
5) machine back to profile
6) polish to the required finish level
7) re-cut vents if specified
8) reassemble and gauge fit
If the shop uses spray-and-fuse style build-up, powder welding repair methods for glass moulds 4 are often applied to edges, corners, and high-wear faces.
What is usually not worth welding
Welding is not a magic fix. Replacement is often smarter when:
- cracks propagate into critical geometry
- dimensional drift is beyond correction allowance
- severe heat checking across large faces 5
- threads/finish geometry is worn deep and repeatability is required
Re-polish is as important as weld
If the mold is repaired but not polished correctly, the bottle can still:
- drag on take-out
- show haze or “orange peel”
- scuff faster in cartons
So premium bottles typically require a defined polish standard per zone: label panels, shoulder, emboss areas, and seam-adjacent regions.
| Defect seen on bottles | Typical mold root cause | Repair action | Fast verification |
|---|---|---|---|
| Scuff rings / haze | pitted face or poor release | clean + re-polish, adjust lube | rub test + visual gloss check |
| Sharp seams / finning | parting line wear or mismatch | weld parting line + re-fit | seam height feel + seam straightness |
| “Drag marks” | deposits or rough mold face | strip + polish, check venting | wipe test + light rotation |
| Soft emboss detail | worn emboss zone | weld or insert replacement | emboss crispness comparison |
When should vents and guide rings be replaced instead of repaired?
Vents and guide rings are small parts, but they control “big” outcomes: seam quality, repeatable closing, and release. They also wear faster than the main cavity.
Vents should be replaced or re-cut when they clog repeatedly, lose their edge definition, or create vent marks and seam problems. Guide rings should be replaced when mismatch increases, seam offsets grow, or closing fit cannot be restored by adjustment.
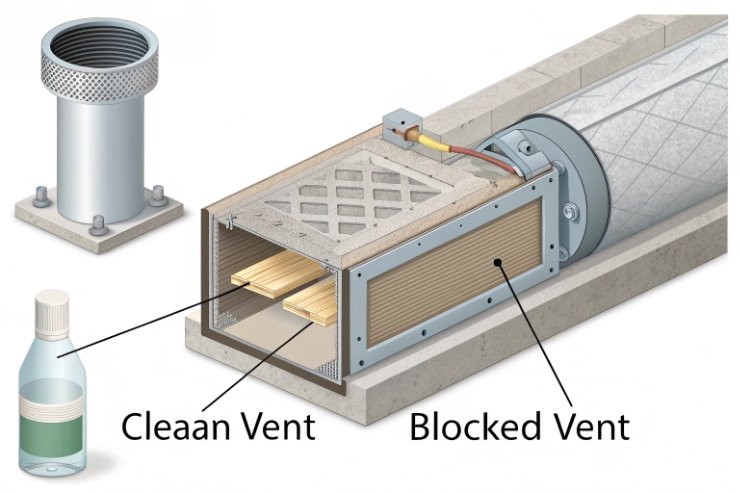
Vents: replace/re-cut based on function, not appearance
Vents fail in two ways:
- blocked vents: trapped air, poor fill, drag, sharp seams
- damaged vents: vent marks, inconsistent matte/gloss bands, poor release
If a vent needs cleaning too often or returns to clogging quickly, the vent design or vent surface is worn. At that point, it is better to re-cut or replace the venting features than to keep chasing symptoms.
Guide rings and alignment features keep the mold halves closing in the same place every cycle. When guides wear:
- seam lines shift
- seam heights change side-to-side
- finning increases
- bottle ovality can increase
If the team keeps adjusting machine settings to “fight” mismatch, that is usually a sign the guide system is worn beyond adjustment range. Replacement is cheaper than running high scrap and shipping bottles with a bad seam feel.
For consistent part naming and scope control during repair, it helps to reference the standard glass container mold equipment list 6 (blank mold, baffle, plunger, neck ring, blow mold, bottom plate) so quotes and work orders match reality.
| Component | Replace trigger | Bottle symptom | Why replacement is best |
|---|---|---|---|
| Vent features | frequent clogging or vent marks | seams, drag, local haze | vents are precision airflow parts |
| Guide rings / alignment | seam offset keeps returning | crooked seams, finning | alignment wear cannot be “tuned away” |
| Neck rings | finish ovality or lip damage | sealing issues, closure complaints | sealing geometry must be stable |
| Bottom plates / baffles | base ring drift, wobble | rocking bottles | base is high-stress zone |
When finish complaints spike, checking for a neck ring seam defect mode 7 can quickly separate “process drift” from “tool closing/fit drift.”
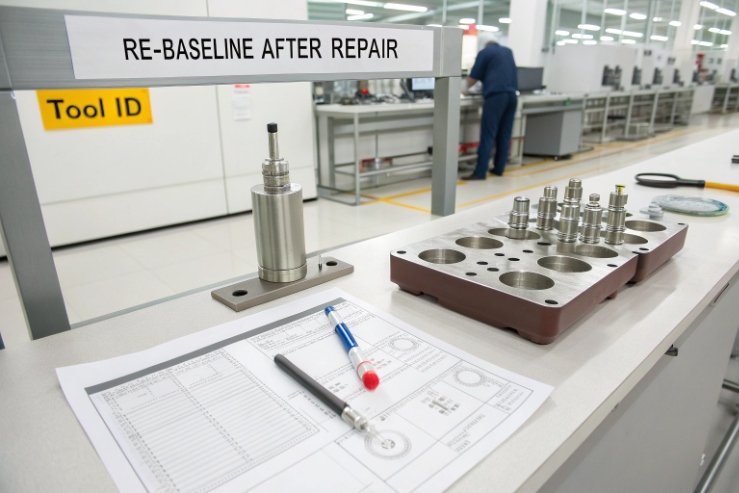
Do dimensional checks re-baseline the toolset after repair?
A repaired mold is not “done” until it is re-baselined. Without re-baselining, you can fix scuff and still ship bottles that leak or wobble.
Yes. Dimensional checks re-baseline the toolset by confirming cavity geometry, parting alignment, and finish/neck critical dimensions. This prevents hidden drift and makes the next run predictable.
What should be measured after repair
For wine and spirits bottles, the most important checks are:
- finish OD/ID and ovality
- lip flatness and chip-free sealing land
- thread geometry (if screw finish)
- bottle height and body diameter
- heel/base ring diameter and flatness
- punt symmetry/concentricity
If the repair included welding on parting surfaces or guide features, the team should also confirm:
- mold half closing fit
- parting line straightness
- mismatch height limits
Why this matters to scrap control
A mold can look “beautiful” after polish and still be wrong by 0.3–0.5 mm in a place that matters. That tiny drift shows up as:
- closure torque scatter
- label skew
- unstable bottles on conveyors
- higher breakage in distribution
Dimensional checks convert repair work into predictable quality output.
Re-baseline means updating your “master”
After repair, the correct approach is to update:
- the tool ID record
- the measured baseline dimensions
- and the expected defect signature for that cavity
That way, if defects return early, you can prove whether it is a tooling issue or a process issue.
How does repair timing minimize downtime and scrap?
The most expensive repair is the one done late—after scrap rises and customers complain. The best plants repair on schedule, not on panic.
Repair timing minimizes downtime and scrap by rotating molds before defect rates spike, using spare sets to swap without stopping the line, and doing repairs offline while production continues. Trend-based triggers (seam height, scuff rate, finish ovality) are more reliable than waiting for visible failures.
The operating model that works
A low-scrap operation usually uses:
- at least one spare set for critical bottles
- planned pull intervals based on run-hours and defect history
- cavity-level defect tracking to isolate one problem cavity
- offline repair capacity with fast turnaround
This makes repairs boring, which is exactly the goal.
Use “early warning” KPIs, not only scrap rate
Scrap rate rises late. Better early indicators are:
- seam height trend
- finish ovality trend
- scuff complaint trend at cold end
- vent cleaning frequency
- coating consumption drift (often linked to scuff compensation)
When those KPIs cross a limit, pull the set. That pull is cheaper than running another two shifts with rising defects.
A simple timing playbook
- Green zone: normal run, standard cleaning
- Yellow zone: rising seam/scuff signals → schedule pull and swap
- Red zone: leak or severe mismatch → immediate pull, protect shipments
| Timing choice | Downtime impact | Scrap impact | Best use case |
|---|---|---|---|
| Planned rotation | low | low | high-volume programs |
| Cavity-only pull | very low | low | one cavity drifting |
| Emergency pull | high | high | sealing or safety risk |
Conclusion
Custom molds are repaired through planned pull-and-rotate, deep cleaning, weld/clad rebuild, re-machining and re-polish, then re-baselined dimensional checks—while spare sets and trend-based timing keep downtime and scrap low.
Footnotes
-
Explains why scheduled pulls reduce surprises versus waiting for scrap spikes. ↩ ↩
-
Standard defect terminology helps teams trace drift to tooling vs process quickly. ↩ ↩
-
Overview of build-up alloys used to restore wear surfaces on molds, neck rings, and plungers. ↩ ↩
-
Shows common powder welding build-up methods used for glass mould repair and edge restoration. ↩ ↩
-
Defines heat checking as a hot-wear failure mode that often signals replacement is safer than more welding. ↩ ↩
-
Helps scope repair parts correctly so “mold set” includes the right change and wear components. ↩ ↩
-
Lists likely causes when seams form at the neck ring and why closing/fit problems repeat. ↩ ↩


