A beautiful color concept means nothing if the coating crawls, orange-peels, or chips off before the wine reaches the shelf.
To improve spray-coating on glass wine bottles, control surface energy and cleanliness, stabilize spray parameters, match cure profile to the chemistry, and then verify uniformity with inline vision and film-thickness checks.

In real projects, most coating “mysteries” are not really mysterious. They come from a missing step in surface prep, a small drift in gun or bottle motion, or a cure oven that does not match the data sheet. If we fix these basics with numbers, not feelings, spray results become much more repeatable.
Which pre-cleaning and dyne levels ensure wetting and adhesion?
Dirty glass will always win against the best paint system in the world.
Clean, activated glass with surface energy above roughly 40–44 dynes/cm is the foundation: remove cold-end coatings and oils, then use flame or plasma to raise dyne levels before spraying.
From “looks clean” to truly clean and high-dyne
On wine bottles, the main enemy of adhesion is not visible dirt. It is invisible films: cold-end lubricants, fingerprints, dust-bound oils, label-release residues from returnables.
A reliable prep chain usually looks like this:
-
Pre-wash / degrease
Use an alkaline cleaner or suitable solvent wash to strip cold-end PE or stearate, plus handling oils (especially where hot-end and cold-end coatings can affect downstream adhesion) 1{#ref-1}. Rinse well and keep final rinse quality consistent. -
Drying and handling
Dry bottles fully and avoid re-contamination. That means clean air, clean conveyors, and no open cardboard dust or loose fibers near the spray booth. -
Surface activation
Just before spraying, use plasma and flame surface treatment 2{#ref-2}. This:- Burns off micro-organic films that survived washing.
- Raises surface energy, so the coating wets instead of beading.
- Makes the surface more polar, which is good for most primers and topcoats.
-
Adhesion promoters / primers
For demanding systems (UV, 2K, waterborne), a silane adhesion promoter primer 3{#ref-3} layer between activation and color coat can multiply bond strength, especially in humidity and ice-bucket tests.
You do not need to guess if the prep is good. Use dyne pens or ink—using a dyne test kit to measure surface energy 4{#ref-4} is a simple way to validate the surface—at critical zones (shoulder, label panel, heel). After activation, a realistic target is:
| Area on bottle | Target surface energy (approx.) | Check method |
|---|---|---|
| Main body / label panel | ≥ 42 dynes/cm | Dyne pens / test inks |
| Shoulder | ≥ 40–42 dynes/cm | Dyne pens + water-break test |
| Heel / lower body | Similar to body if coated | Spot checks |
If dyne ink of 42 dynes/cm beads up or pulls away, you are below the safe window. Fix cleaning and activation first. Changing paint or adding more film will not solve a low-dyne surface.
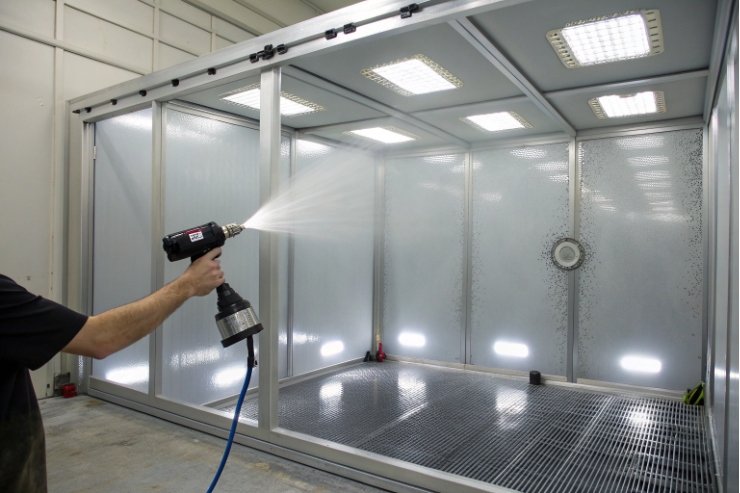
Do gun angle, atomization, and rotation speed prevent orange peel?
Orange peel, tiger stripes, and thin “holidays” on the back of the bottle are usually symptoms of the application triangle, not the paint recipe.
Correct gun distance, overlap, atomization pressure, and bottle rotation speed let the coating land evenly and level out, which prevents orange peel, sags, and bare spots.
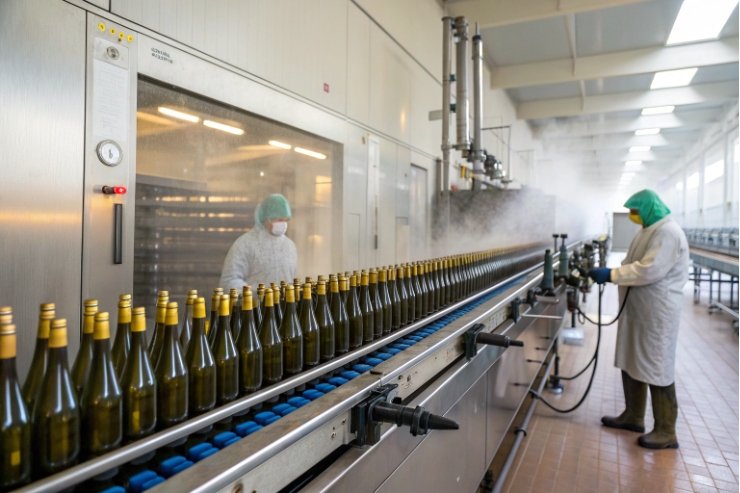
Balancing spray parameters with bottle motion
For round wine bottles, the coating envelope is a dance between the gun and the rotating bottle.
Key control points:
-
Gun distance and angle
- Too close → heavy, wet band, risk of runs and curtains.
- Too far → dry spray, rough orange peel, overspray loss.
- Typical working distance is in the 15–25 cm range, perpendicular or slightly angled (10–20°) to follow the contour.
-
Atomization and fluid flow
- Low atomization pressure + high material flow = large droplets, heavy peel.
- Very high pressure = overspray, bounce-back, dry spray.
- Tune pressure and needle so the fan is full and even, edges not too “dry.”
-
Bottle rotation speed
- Too slow → thick vertical bands, sags on the lower body.
- Too fast → thin film, missed stripes, especially at the back.
- Line speed and gun stroke must match so each point on the circumference sees enough overlapping passes.
Often, the best results come from multiple light passes instead of one heavy coat. For example, two passes at 60–70% overlap each, with short flash time between, will usually level better than a single heavy 100% pass.
A simple parameter matrix when tuning:
| Setting | If set too low | If set too high |
|---|---|---|
| Atomizing air | Coarse droplet, orange peel | Dry spray, rough feel, overspray |
| Material flow | Thin, patchy coverage | Runs, curtains, sagging |
| Gun distance | Narrow heavy band, sags | Dry, powdery, loss of gloss |
| Rotation speed | Bands, very uneven thickness | Stripes, visible “holidays” |
If you need a practical reference for how gun setup, pressure, overlap, and distance map to defects, keep a spray troubleshooting guide for orange peel and runs/sags 5{#ref-5} at the line.
During trials, it helps to coat a series of test bottles while changing only one variable at a time, then cut a few and measure film thickness around the circumference. This makes it much easier to teach the team what good settings look like, instead of relying only on “painter feeling.”
What cure profiles stop runs, pinholes, and color shift?
Even a perfectly sprayed bottle can be ruined in the oven or under the lamps.
The cure profile must match the coating chemistry: enough flash-off to avoid runs and pinholes, a controlled temperature or UV dose to set the film evenly, and no overheating that bakes color out or yellows clear coats.
Flash-off: solving runs and solvent pop before they start
Right after spraying, the coating is fluid and full of solvent or water. If the bottle goes into a hot zone too quickly:
- Solvent boils near the surface and escapes as pinholes or craters.
- The film can still flow downward as viscosity drops, causing runs and curtains.
To avoid this, create a flash-off zone:
- Moderate air movement, not too strong, so you do not disturb the wet film.
- Temperature stable but not too hot (often ambient to 40–50°C, depending on chemistry).
- Long enough dwell for surface solvents to even out.
Thermal cure: temperature, time, and airflow
For heat-cured systems:
- Raise temperature with a controlled ramp instead of a sudden shock.
- Follow the coating supplier’s “metal temperature” or “glass temperature” guide, not just oven air temperature.
If cure is too low:
- Coating remains soft and marks easily.
- Chemical resistance (wine, cleaners, ice bucket) is poor.
If cure is too high:
- Color shifts (for example, bright red becomes dull or brownish).
- Clear coats can yellow.
- Stress in the film can increase, making chipping more likely.
Airflow should be balanced:
- Enough to move away evaporated solvents.
- Not so strong that it creates hot spots on one side of the bottle and leaves the other cool.
UV and IR cure: dose, not just power
For UV-curable coatings:
- What matters is dose (intensity × time), not only lamp power—this relationship is commonly described as light dose (time × intensity) governing curing behavior 6{#ref-6}.
- Bottle rotation and conveyor speed must let every part see enough UV.
- Dark or highly pigmented colors may need higher dose or an extra lamp position.
If dose is too low, you get partially cured films that feel dry at first but fail later in scratch or chemical tests. If it is too high at once, surface cure can “lock” the top while the bottom remains under-cured, which leads to internal stress and adhesion loss.
For both UV and thermal systems, log the profile and keep it stable. When you see runs, pinholes, or strange color shifts, look at flash-off and cure logs first, before changing the coating formula.
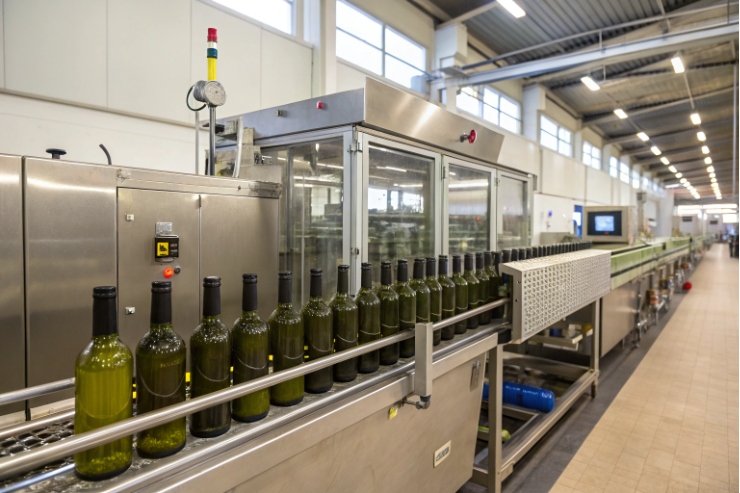
Which inline vision and thickness checks validate uniformity?
If you cannot measure the coating, you cannot really improve it.
Inline vision systems, color and gloss checks, and regular film-thickness measurements give objective proof that the spray and cure are stable, so you can set clear AQLs instead of arguing about “it looks off.”
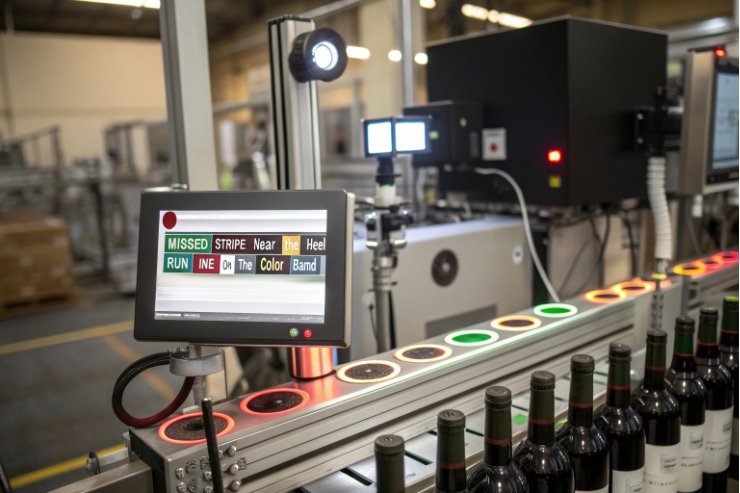
Inline vision inspection
Modern lines can use cameras to check:
- Coverage: no bare glass zones, especially near shoulders and heel.
- Runs and curtains: vertical defects stand out under side lighting.
- Color consistency: basic color comparison within a tolerance window.
Vision systems are taught what a “good bottle” looks like. Then they reject bottles that fall outside defined thresholds. This reduces human subjectivity and catches drift quickly, like a clogged nozzle or a failing gun.
Thickness and weight-based control
Film thickness affects appearance and performance:
- Too thin → poor hiding, low chemical and scratch resistance.
- Too thick → runs, long cure times, waste.
You can check thickness in several ways:
- Weight gain: weigh bottles before and after coating on a sample basis. From the difference, coating density, and area, you estimate average film thickness.
- Direct gauges: on flat test panels sprayed with the bottles, use a wet-film comb or dry-film gauge.
- Cut cross-sections (for lab work): measure with microscope to confirm profiles in body, shoulder, and heel.
If you want a standard reference that teams can write into specs and audits, use ISO 2808 film thickness measurement methods 7{#ref-7} to align on “how thickness is measured,” not just “what thickness should be.”
A simple sample plan:
| Control method | Frequency | Use |
|---|---|---|
| Vision system | 100% inline | Coverage, runs, big defects |
| Weight gain check | Every X pallets / shift | Average thickness, process drift |
| Color / gloss meter | Start-up + periodic | Shade and gloss stability |
| Cross-section (lab) | New color / major change | Confirm design thickness distribution |
AQLs and visual standards for coated glass
Even with cameras and gauges, we still need human visual AQLs:
- Define what counts as critical (deep run, major bare zone).
- Define major (visible sag on side, strong color banding).
- Define minor (small dust nibs outside main view area).
Create a physical standard board or “golden sample” set for:
- Acceptable reference bottles.
- Borderline but still acceptable.
- Clear reject examples.
This way, both your team and the coater see the same reality. When something is out of spec, you can link it to data: vision reject rate, thickness trend, or gloss variation, not just “my customer says it looks rough.”
Conclusion
Better spray-coating on wine bottles is not magic; it is clean, high-dyne glass, stable spray motion, matched cure profiles, and simple measurements that prove every pallet matches the design.
Footnotes
-
Explains how hot-end/cold-end coatings influence adhesion and why they matter before decorating. ↩︎ ↩
-
Overview of how flame and plasma treatments change surface energy to improve wetting and bonding. ↩︎ ↩
-
Product example of silane treatment used to improve bonding performance on glass surfaces. ↩︎ ↩
-
Defines dyne level testing and why higher surface energy improves wettability and adhesion. ↩︎ ↩
-
Practical defect guide linking spray setup (pressure, distance, overlap) to orange peel, runs, and pop. ↩︎ ↩
-
Research explanation of curing dependence on light dose (time × intensity) and related kinetics. ↩︎ ↩
-
Standard reference for wet and dry film thickness measurement methods used in coating QC. ↩︎ ↩


