
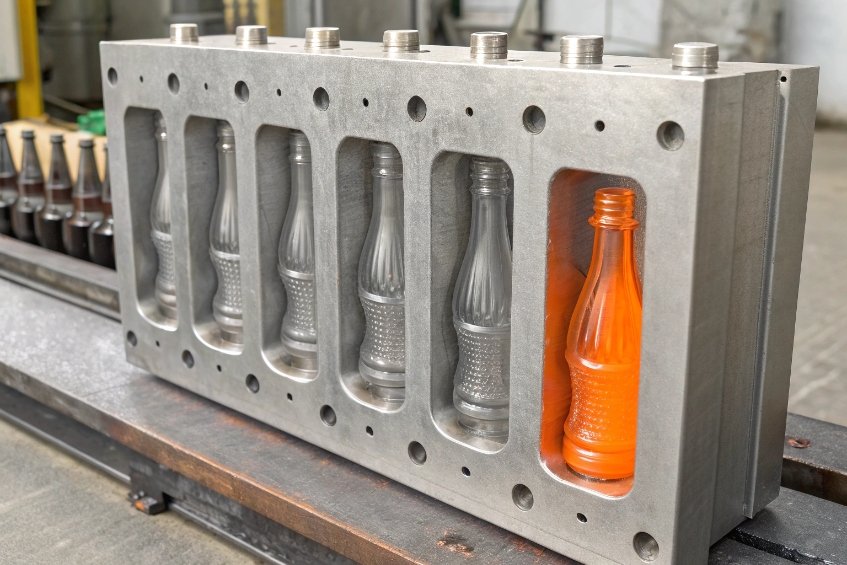
Mold marks on glass bottles do not just appear by chance. They usually point back to small problems in the forming equipment, mold surface, or process settings that grow over time—especially in the IS process for container glass forming 1.
{: #ref-1}
Most mold marks come from mold seams, vent slots, guide rings, poor lubrication, and worn cavity surfaces. Misalignment, bad venting, and uneven gob behavior turn these small features into visible lines, fins, and drag marks on the glass.

When molten glass touches the mold, it records every defect the mold gives it. So even a small mismatch, a plugged vent, or dirty swab oil can print clearly on a clean bottle. If a brand wants premium appearance, these “small” marks suddenly become a big quality issue that must be managed by design, maintenance, and process control.
If teams need shared defect naming and photo references, a practical starting point is Glass Packaging Defects and How to Identify Them 2.
{: #ref-7}
Are mismatch lines from worn guide rings or poor mold alignment?
Mold mismatch marks often tell us that parts no longer meet cleanly. The glass follows that gap and creates a raised step or double line along the seam.
Mismatch lines usually come from poor mold alignment, worn guide rings, or damaged joint faces. When mold halves or neck rings no longer register correctly, the glass forms a visible offset at the parting line.

How alignment and fit create seam marks
When the blank, neck ring, and blow mold align well, the seams look straight and even. The parting line is still there, but it is flat and low. When alignment is off, one side sits slightly higher. This creates a step. The glass at that step cools and locks in the offset.
Guide rings and bushings control this alignment. As they wear, the mold halves can shift under load. A small amount of play may not be visible inside the machine, but the bottle tells the truth. The seam line starts to wander, change height, or appear as a double line where the blank and blow seam do not line up.
Joint faces also play a role. If they are chipped, dented, or eroded, the contact area shrinks. High spots carry all the closing force. The low area becomes a gap. When blow or settle-blow pressure pushes the glass into that gap, it forms a thin fin or a thickened ridge along the seam. For systematic troubleshooting, many plants use a defect map like Container defect causes and remedies 3.
{: #ref-2}
Parison sag and off-center gob loading make this worse. If the gob enters more to one side, that side sees more glass, more pressure, and more push against the joint face. So mismatch marks can appear larger on one quadrant of the bottle.
A simple way to think about it is this: wherever the hardware has play or damage, the seam will tell the story. Good preventive maintenance on guide rings and careful inspection of mold joint faces are often the fastest way to clean up mismatch lines.
| Cause | Typical visual symptom | Main fix |
|---|---|---|
| Worn guide rings/bushings | Wandering or stepped seams | Replace rings, reset alignment |
| Damaged joint faces | Sharp ridges or fins at seam | Rework or replace mold halves |
| Misaligned neck ring/blank | Double seams, offset finish seams | Re-align or re-center forming stack |
| Off-center gob / parison sag | One-sided heavy seam, thick on one side | Adjust gob loading and parison control |
Do inadequate venting and swabbing leave drag and lap marks?
When venting and lubrication are not under control, the glass drags and sticks instead of flowing. The result is drag marks, swirl lines, and ugly “lap” patterns that run from the shoulder to the base.
Poor venting creates heavy vent prints, fins, and lap marks, while bad swabbing practice transfers carbon, streaks, and dull patches. Together they cause many of the “dirty mold” marks that buyers see on the bottle surface.
How vents and lubricants print on the glass
During forming, trapped air must escape. Vents in the mold let air out as the glass expands. When these vents plug with dust, oil, or glass fines, the air has nowhere to go. The glass then presses hard against the vent area. It can enter the vent slot, create fins, or form local sink marks and lap lines where flow stops and restarts.
Excess blow or settle-blow pressure makes this effect worse. When pressure is too high, the glass is forced into the narrow vent gaps and along the seam. This produces finning and very sharp mold lines. These defects are not only cosmetic. They can chip off in service and act as crack starters.
Swabbing is meant to protect the mold and help release. But over-swabbing or dirty swab oils cause new problems. Thick, uneven lubricant films act like a soft mold imprint. They create dull, smeared zones and drag lines where the gob contacts the blank. Carbonized oil can transfer as dark streaks or “mold-transfer” stains on the glass.
If swabbing is not well timed, the first few bottles after swab usually show heavy drag, swirl marks, or even stuck parisons. As the lubricant film thins down, the surface improves. So a line that swabs too often or uses too much oil will always chase “random” mold marks that actually follow the swab cycle.
For a focused defect definition and cause list that matches these symptoms, see Body Defects – Drag Marks 4.
{: #ref-3}
In short, good venting lets the glass breathe. Good lubrication lets it move. When either is out of balance, the bottle surface starts to record that struggle.
| Factor | Defect type | Control action |
|---|---|---|
| Plugged vents | Heavy vent print, fins, blisters | Clean vents, adjust blow pressure |
| High blow pressure | Sharp seams, finning, lap marks | Reduce pressure, tune timing |
| Over-swabbing | Dull, smeared, drag lines | Reduce oil amount, extend swab intervals |
| Dirty swab oil | Dark streaks, carbon transfer marks | Use clean oil, standardize swab tools and method |
Can low gob viscosity imprint baffles, plungers, or engravings?
Gob temperature and viscosity decide how deeply glass records every detail of the mold. When the gob is too hot and soft, it will flow into every scratch, engraving, and corner it touches.
Low viscosity glass prints mold details more aggressively. Hot gobs and slow cooling allow baffle, plunger, and engraving marks to show strongly, especially when surfaces are rough or worn.

How hot glass copies the mold surface
Glass behaves like a very thick liquid at forming temperature. When viscosity is low, it flows more easily into small gaps and textures. So if the gob arrives too hot for a given mold set, it will follow every fine line of the baffle, plunger, and cavity engraving. Small scratches or pitting on these surfaces show up as repeated marks around the container.
Rough or eroded cavity surfaces make this worse. Over time, mold steel can develop “orange peel,” pitting, or thermal cracks. Hot glass copies this rough texture and creates a grainy or hazy finish. This is most visible on flint glass and on large flat panels where light reflects clearly. The underlying mechanism is often thermal cycling damage (thermal checking), discussed in sources like thermal fatigue testing of cast iron for glass molds 5.
{: #ref-5}
Low viscosity also interacts with timing. If the settle-blow or press time is long, the hot glass stays in contact with the mold surface while it is still very soft. This allows deeper imprinting. In contrast, if the glass is slightly stiffer, it bridges over some micro texture and picks up less detail.
Parison behavior is also important. If the gob tails, has strong shear marks, or enters off-center, those defects arrive in the blank cavity and get “frozen in” by the mold pressure. Hot, soft glass does not erase them. It carries them. So shear marks can line up with mold engravings and create complex patterns that look like mold marks but actually begin at the shear.
Engraving itself is a controlled form of mold mark. Logos, codes, and decorations are all mold features that we want to see. When viscosity is too low, these features can appear too heavy, with over-filled edges or “ghost” halos around the design. When viscosity is too high, they look weak or incomplete. So viscosity must sit in a window that gives sharp but clean engraving without making every surface defect visible.
| Parameter | Effect on mold marks | Practical target |
|---|---|---|
| Gob temperature | Higher temp → more imprint and texture | Keep in narrow window for each article and color |
| Cavity roughness | Rougher surface → visible grain, haze | Regular polish, avoid orange peel and pitting |
| Engraving depth | Deep engravings → heavy, sometimes over-filled | Design with process window in mind |
| Forming time/pressure | Longer time at pressure → deeper imprint | Minimize dwell without losing control |
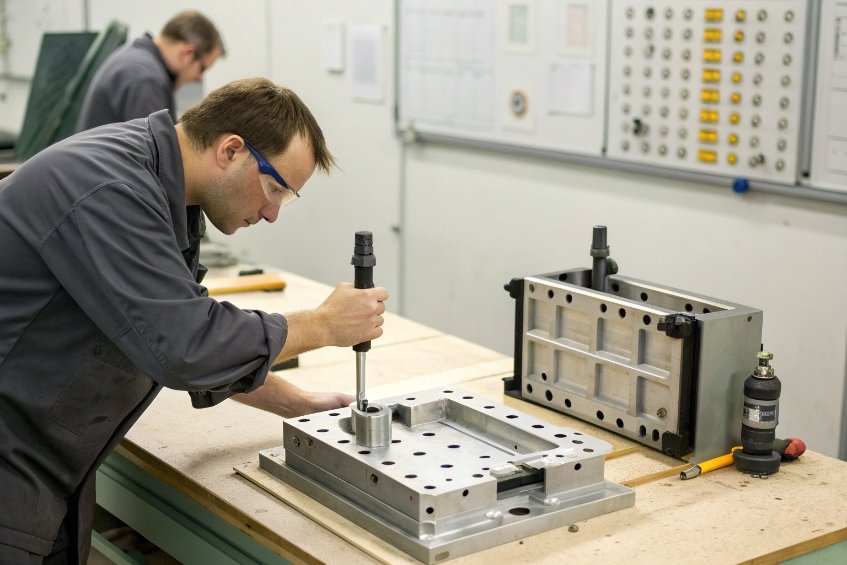
Which maintenance practices minimize seam visibility at scale?
When production volume grows, small alignment and surface issues become thousands of visible seam marks. At that point, maintenance is not just repair. It is a visual quality strategy.
To reduce mold marks and seam visibility at scale, focus on systematic mold alignment checks, surface reconditioning, controlled swabbing, vent cleaning, and timely replacement of guide and seating parts. Stable process settings then keep the improvements in place.
Building a maintenance routine around visible quality
The first step is to link visual inspection with mold maintenance. Operators and inspectors often see trends in seam height, finning, or drag marks before a major defect appears. If these observations feed into a maintenance log, the team can plan mold pulls, re-polishing, or part replacement before customers complain.
Mold alignment should be checked with simple gauges or pins whenever a mold set is serviced. Joint faces must close flat. Neck rings, blanks, and blows must center on the same axis. Guide rings, bushings, and pins must hold tolerances. If alignment drifts over time, the root cause may be wear in these supporting parts, not just in the cavity itself.
Surface maintenance is next. Regular cleaning and light polish prevent progressive “orange peel” and pitting. Rough areas should not be accepted because the bottle still holds pressure. When brands ask for high clarity, these surfaces show every flaw. It is much cheaper to keep surfaces smooth than to rescue a damaged set later.
Vents and seams need strict cleaning routines. Plugged vents do not only cause pressure defects. They amplify seam marks and vent prints. A standard cleaning schedule, with a known tool and method, avoids both under-cleaning and damage from aggressive scraping.
Swabbing practice must also be standardized. Each mold should have a defined swab interval, oil type, and amount. Over-swabbing one cavity usually shows up as a local “bad cavity” in pack-to-melt data with drag marks and dullness. When crews follow a simple, repeatable method, the bottle surface becomes much more consistent. (For how swab compounds can transfer graphite and create “dirty ware,” see swabbing greases 6.)
{: #ref-4}
Finally, process settings should support the hardware. Excess blow pressure, high forming speed, and poor gob control can defeat even the best mold maintenance. A practical way to stabilize imprinting is to keep mold temperatures measurable and repeatable—tools like glass mold temperature measurement 7 help teams audit drift by section and cavity.
{: #ref-6}
So the forming team and the maintenance team must work as one system. When they do, mold marks fade into the background, and the bottle starts to look like the premium product the brand wants.
| Maintenance focus | Key action at scale | Result on mold marks |
|---|---|---|
| Alignment and guidance | Check joint faces, guide rings, bushings | Lower seam steps, fewer mismatch lines |
| Surface condition | Clean, light polish, timely rework | Less texture transfer, cleaner appearance |
| Vent cleanliness | Routine vent cleaning and inspection | Fewer fins, vent prints, and lap marks |
| Swab standardization | Fixed intervals, oil type, small amount | Reduced drag, fewer carbon streaks |
| Process coordination | Match pressure, temp, speed to hardware | Stable, repeatable surface quality |
Conclusion
Mold marks are process fingerprints. When alignment, venting, lubrication, and gob control stay in a tight window, those fingerprints fade and the glass surface becomes truly clean.
Footnotes
-
Explains IS forming flow and where tooling contact can “print” marks onto hot glass. ↩ ↩
-
Visual defect glossary to align inspection language and defect severity discussions across teams. ↩ ↩
-
Practical defect-cause guide linking seam/mismatch symptoms to alignment, venting, and pressure settings. ↩ ↩
-
Defines drag marks and lists common root causes tied to swabbing, temperature, and delivery contamination. ↩ ↩
-
Background on thermal fatigue that leads to mold checking and replicated rough texture on glass. ↩ ↩
-
Shows how swab grease behavior and graphite transfer can create dirty streaks and dull patches. ↩ ↩
-
Why fast, consistent mold temperature measurement supports repeatable surface quality across cavities and sections. ↩ ↩


