
Uneven coating always looks like a “paint” problem, but it usually starts long before the spray guns. It starts with glass temperature, surface energy 1, and line stability.
To prevent uneven coating on glass bottles, keep the surface clean and high-energy, hold spray and rotation stable, control bake curves for proper flow and cure, and protect the system with strict PM and SPC.

In practice, I walk the whole path: glass leaving the lehr, pre-cleaning, coating supply, guns and motion, booth climate, ovens, then PM and QA. When each step is stable, the coating stops being a daily fight and becomes a repeatable process.
How do pre-cleaning, surface energy, and dyne levels shape wetting quality?
If the coating does not wet, it cannot be uniform. Most “mystery” bands, fisheyes, and thin spots start with temperature or surface-energy issues, not with the spray itself.
Uniform coating begins with a stable, dry, clean surface at the right dyne level. Pre-cleaning, de-dusting, and simple dyne checks remove most wetting-related defects before they ever reach the booth.

Stabilize bottle temperature and dryness
First, keep bottles at a consistent temperature when they reach the coating zone.
- If bottles are too cold in a humid room, condensation forms. The coating rides on water, not on glass. It streaks and crawls.
- If temperature varies across lanes or sections, viscosity on the surface changes. Some bottles get a nice “wet” film, others get dry spray and orange peel.
Practical controls:
- Stabilize lehr exit temperature and reduce drafts between lehr and booth.
- Use simple covers or tunnels over conveyors to shield from cold air and dust.
- Add a short pre-heat or IR zone, or at least a warm-air blow-off, to drive off moisture.
The aim is a narrow temperature window and no visible condensation, even during start-up and high humidity days.
Keep the surface clean and high-energy
Any residue that lowers surface energy will repel coating:
- Caustic washer carry-over
- Fingerprints and hand creams
- Conveyor lubricants and oils
- Dust, cullet fines, label fibers
Good practice:
- Use ionized air knives and HEPA-filtered blow-offs before coating.
- Keep conveyors clean; avoid over-lubrication that mists the air.
- Limit manual handling; if people must touch bottles, enforce gloves.
- Place the booth away from labelers, carton formers, and dusty areas.
This turns the bottle into a stable “substrate”, not a random mix of chemistry.
Use dyne and contact-angle checks, not guesswork
Surface energy is invisible, so it must be tested.
Simple tools:
- Dyne pens or test inks 2. If the coating needs, for example, ≥ 40 dynes, set that as the minimum on cleaned glass.
- Contact-angle checks 3 on sample bottles: low angle and full wet-out mean the surface is ready.
If dyne levels drop, act before defects appear:
| Symptom on test | Likely cause | Fast action |
|---|---|---|
| Dyne < target | Lubricant / oil / caustic residue | Check washer, conveyors, handling points |
| Dyne unstable | Batch mix of clean/dirty bottles | Fix upstream sort, rewash suspect lots |
| High contact angle | Poor pre-clean or new contaminant | Review chemicals near the line |
When temperature, cleanliness, and dyne are under control, the spray guns finally have a fair chance to produce uniform films.
How should gun angle, atomization, and rotation speed be set for uniform films?
Even with perfect glass, bad gun setup will ruin the coating. Uneven fan overlap, wrong atomization, and unstable rotation show up as stripes, bands, runs, and dry patches.
Gun angle, atomizing pressure, fluid flow, and bottle rotation must be set as a system. The goal is constant droplet size, stable overlap, and a true 360° wet film on every bottle.

Tune gun geometry before chasing chemistry
Start with the basics:
- Gun distance: too close gives a narrow heavy stripe; too far gives light coverage and overspray loss.
- Gun angle: guns aimed too high or too low build thick bands on shoulder or heel.
- Fan overlap: each fan should overlap its neighbor enough to smooth out the center/edge difference.
A simple setup routine:
- Spray a test panel or sacrificial bottle row with a slow line speed.
- Check for “zebra” patterns: light and dark vertical bands.
- Adjust fan width and overlap until bands disappear.
- Lock positions with hard stops or reference scales, not by eye.
This physical setup is more important than small pressure tweaks.
Balance atomizing air and fluid pressures
Atomization sets droplet size and film build. For air spray systems—especially HVLP spray guns 4—tight control of air and fluid windows is what prevents day-to-day striping.
- Too much atomizing air for the given fluid flow → very fine droplets, dry spray, orange peel, poor leveling.
- Too little atomizing air → big drops, heavy film, runs and curtains.
Target:
- Stable pressure windows for both atomizing and fluid lines.
- Flow checks and recorded setpoints; operators should not “tune by feel” every shift.
A simple guide:
| Parameter | Too low effect | Too high effect |
|---|---|---|
| Atomizing air | Coarse droplets, runs | Dry spray, orange peel |
| Fluid pressure | Thin film, poor hiding | Heavy film, sagging |
| Gun distance | Narrow heavy band | Thin, patchy coverage |
Once a “golden” combination is found for one job, document it with photos and numbers and make it the default.
Control bottle rotation and travel speed
Bottle motion converts a flat spray fan into a full 360° film.
Key points:
- Rotation must be stable: no slip, no stutter.
- Speed must match line speed and gun fan width.
- Complex areas (shoulder, neck, embossing, punt) may need extra guns or slower rotation.
Typical failure modes:
- Slow or no rotation: shadows and bare areas on the back side.
- Too fast rotation: spiral marks, uneven overlap.
- Unstable line speed: some bottles over-coated, some under-coated.
So:
- Hold line speed constant; avoid big accelerations and gaps.
- Use starwheels, timing screws, or pockets to control bottle pitch and reduce turbulence.
- Verify 360° coverage often by backlit rotation and witness bottles with a temporary test coating.
When gun geometry, atomization, and motion are stable, you move most defects out of the booth and into early detection, not into customer hands.
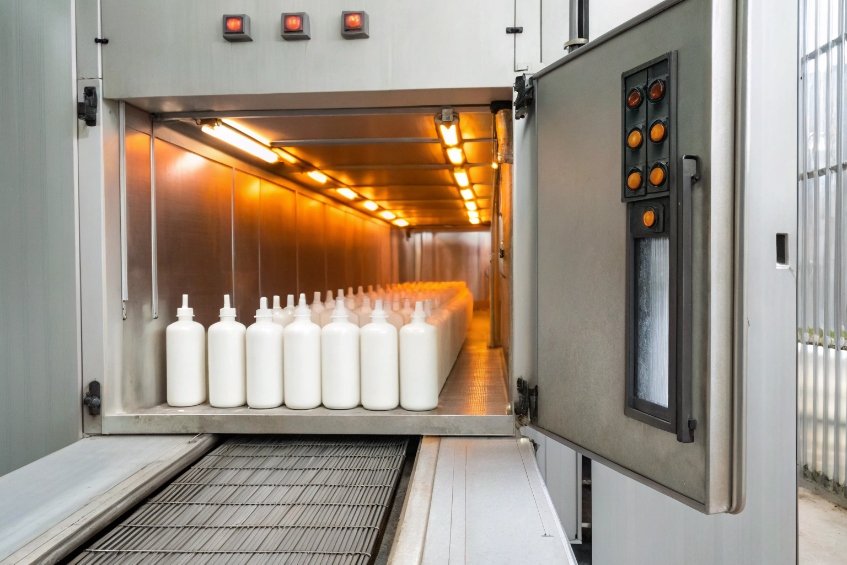
How do bake curves and dwell times stop runs, orange peel, and fisheyes?
Even if the wet film is perfect, bad cure will damage it. Runs, orange peel, blisters, and soft spots often come from wrong flash-off or oven profiles, not only from application.
Proper flash, bake curves, and dwell times let the film flow once, level out, and then cure. Under-bake keeps it soft and sticky; over-bake can dull gloss and increase defects.
Get flash-off and early flow right
Right after spraying, the coating needs a short time to flow and level before full cure.
If air flow or speed is wrong:
- Too much airflow or heat too soon → surface skins, solvent traps under the skin, orange peel and pinholes appear.
- Not enough flash or too cool → the film is still mobile when reaching higher temperatures, so it starts to run.
Controls:
- Set a defined flash zone between booth and main oven.
- Keep airflow smooth and laminar, not a blast.
- Adjust line speed so flash time fits coating TDS.
Set oven curves for cure, not superstition
Think in steps:
- Ramp up: bring glass and coating to the target metal temperature at a safe rate.
- Dwell: hold at this temperature long enough to crosslink or condense the coating.
- Controlled cool down: avoid shock that can crack or print the film.
Under-cure:
- Coating marks easily, blocks in cartons, or fails adhesion tests.
- Often looks glossy at first, then picks or scratches in use.
Over-bake:
- Gloss drops, color shifts, and some coatings become brittle.
- Fisheyes and crater edges can “freeze” in place, very visible.
So set clear targets:
- Peak metal temperature at the bottle surface (validated with oven temperature profiling 5), not just oven air temperature.
- Minimum dwell time above that temperature.
- Allowed range for both, based on real profiling, not only on setpoints.
Link defects to cure profile, not only to spray
Common defect map:
| Defect | Likely cure issue | Secondary suspects |
|---|---|---|
| Runs / sags | Too heavy film + low flash / long dwell | Gun setup, line speed too low |
| Orange peel | Too fast skinning, wrong flash / high air | Atomization too fine, low film build |
| Fisheyes | Surface contamination + poor flow | Oils, silicones, residue, no leveling time |
| Soft film | Under-cure, low peak temp / short dwell | Wrong bake recipe, overloaded oven |
| Dull / chalky | Over-bake or too hot near lamps | Oven hotspots, belt misalignment |
This table should sit next to the booth and oven controls. When a defect appears, the team checks both spray logs and oven profiles, not only one or the other.
What preventive maintenance keeps nozzles, filters, and chemistry stable?
Even a perfectly tuned process drifts if hardware and coating chemistry slide out of spec. Most long-term “random” defects are simply missing PM.
Regular cleaning, filter changes, nozzle replacement, and bath control keep coating flow, droplet size, and wetting stable. Without this, every shift starts from zero again.

Take care of nozzles and spray hardware
Nozzles wear, clog, and misalign over time.
Good routines:
-
Daily
- Flush lines with proper solvent or water at shutdown.
- Wipe caps and guards; do not dig or scratch orifices.
- Quick fan-pattern check on paper or panels.
-
Weekly
- Remove and soak nozzles in approved cleaner.
- Inspect orifices with magnification; discard damaged or oval tips.
- Check gun mounting brackets and reference marks.
-
Monthly or by shot count
- Replace high-wear nozzles on a fixed schedule, even if they still “spray”.
- Recalibrate flow rates and align guns using documented jigs.
This stops creeping changes in droplet size and fan shape, which are hard to see day by day but show up as trending defects.
Keep filters, tanks, and lines in good shape
Coating that reaches the guns must be stable and clean.
Key actions:
- Filter coating in the supply tank and again near the guns. Replace filters on a defined schedule, not only on failure.
- Keep tanks agitated to avoid pigment settling or phase separation.
- Monitor and log solids, viscosity, pH, and temperature. Adjust with controlled additions, not “a bit of solvent by eye”.
- Purge lines when changing colors or coatings. Avoid mixing incompatible systems in hoses.
Match PM rules to risk:
| Item | Risk if ignored | PM action |
|---|---|---|
| Line filters | Particles, tip clogs, streaks | Differential pressure / time based |
| Agitators | Settling, color shift, layer drift | Check operation each shift |
| Supply hoses | Gel or skin build-up, slugs | Scheduled flush or replacement |
| Tanks | Sludge, contamination, bacteria | Periodic full clean-out |
Maintain the booth and environment
Booth air and exhaust shape how the film lands and dries.
- Clean overspray build-up from walls and floor before it flakes and recirculates as dust.
- Check exhaust and make-up air filters; keep air balance stable to avoid drafts.
- Watch booth temperature and humidity; log them so you can link defects to climate events.
All of this PM is prevention, not repair. It lets you hold a narrow “sweet spot” for coating instead of fighting fires shift after shift.
How can in-process QA and SPC keep the process in control?
Even with good engineering and PM, things drift. Without fast feedback, you only see problems when pallets are full.
Simple in-process QA plus SPC keeps coating uniformity inside a defined window. It turns defects into early warnings, not complaints.
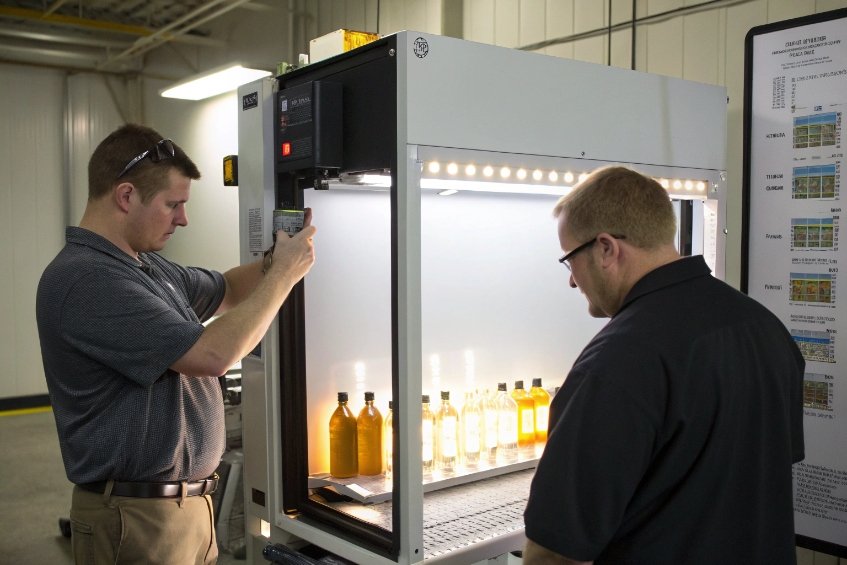
Build quick checks into the line
At defined intervals, operators can run:
- Visual and backlit rotation checks for streaks, skips, and runs.
- Gloss and color readings on a few bottles per sample.
- COF tests on cold-end slip, if relevant.
- Cross-hatch and tape adhesion (ASTM D3359) 6 on one bottle per batch or shift.
Use simple grids on the bottle (front, back, shoulder, neck) so everyone measures the same points.
Use SPC to catch drift, not only out-of-spec
For numeric data (gloss, ΔE, g/m², COF):
- Plot X̄–R or I–MR charts 7 with control limits from a stable period.
- Agree reaction rules when trends start, even if values are still inside spec.
- Link QA charts to real process parameters: pressures, temperatures, speeds.
For attribute data (pass/fail defects):
- Track defect rates per sample on a p-chart.
- Investigate when rates rise, even if still under the formal reject level.
This closes the loop:
- Surface prep and energy are checked by dyne and visual.
- Application is kept stable by gun setup, rotation, and PM.
- Cure is held by oven profiles.
- QA and SPC watch the result and trigger early corrections.
When all four pieces work together, uneven coating stops being “normal scrap” and becomes a rare event with a known cause and a clear fix.
Conclusion
Preventing uneven coating on bottles is simple in theory: stable surface, stable spray, stable cure, and stable hardware. The work is in holding all four every day with clear PM and SPC.
Footnotes
-
Definition and impact of surface free energy on wettability and coating adhesion. ↩ ↩
-
How test inks verify dyne level and surface readiness before coating. ↩ ↩
-
Contact-angle basics for interpreting wetting quality and contamination risk. ↩ ↩
-
EPA overview of HVLP guns and why they can improve transfer efficiency. ↩ ↩
-
Why profiling confirms real part temperature for consistent cure curves. ↩ ↩
-
Standard reference for cross-hatch tape testing to rate coating adhesion. ↩ ↩
-
NIST guide to control charts for monitoring and reacting to process drift. ↩ ↩


